Hardware management is an important element of any
operating system, including Windows 7. The two most important hardware
components are memory and disks, but you'll occasionally have to
consider BIOS and use the Device Manager to troubleshoot other hardware
components.
1. Managing Memory
The processor can't access any
data until it is placed in memory, and the amount of memory you have
will directly impact the speed of your system. Generally, the more
memory you have, the better your system will perform.
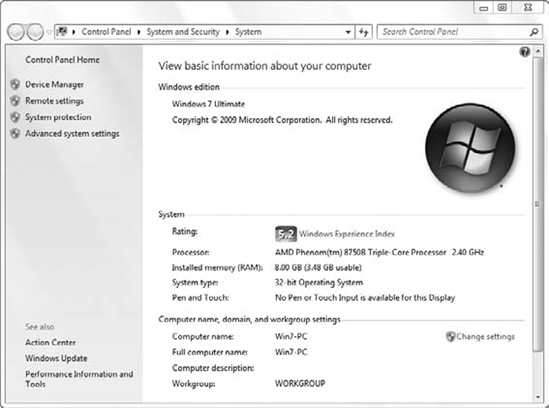
However, the architecture will limit the amount of memory available to your system. Figure 1 shows a screenshot of a 32-bit edition of Windows 7 installed on a 64-bit system that has 8 GB of random access memory (RAM).
NOTE
The amount of unusable
RAM on any Windows 7 system can vary depending on the hardware
installed. One system may not use any more than 3.2 GB of RAM, while
another may use only 3.48 GB of RAM.
Even though Windows 7
recognizes that the system has 8 GB of RAM installed, it can use only
3.48 GB of this RAM. The rest of the RAM is wasted for two reasons:
In the system shown in Figure 5.22, it's reserving a little over 500 MB of addressable space for the system devices. The rest of the RAM is simply not being used.
1.1. Understanding Virtual Memory
Computer users have
wanted more RAM virtually ever since computers were created. It doesn't
matter how much they have; they want more. One solution that was
implemented early in the history of computers is virtual memory.
Virtual memory is hard drive
space used to mimic physical RAM when the physical RAM is running low. A
processor can't access the data stored in virtual memory on the hard
drive space but instead must move it to physical RAM. When the system
needs to access data that is stored on the drive, other data in the
physical RAM is moved onto the hard drive, and the requested data is
swapped back to RAM.
Data is swapped back and forth between the hard drive and physical RAM in 64KB blocks. A 64KB block is also referred to as a page. So this entire process is often referred to as paging or swapping. The file on the disk is referred to as the paging file, and it is treated by Windows 7 as virtual memory.
1.2. Optimizing Virtual Memory
You can optimize the virtual
memory by adjusting the amount of disk space used by Windows 7 for the
paging file. The recommended size of the paging file is 1.5 times the
physical RAM. In other words, if you have 2 GB of RAM, the recommended
size for the paging file is 3 GB; if you have 6 GB of RAM, the
recommended size is 9 GB; and so on.
Windows 7 manages the paging
file by default, and you generally don't need to configure it. There are
two reasons why you may need to modify these settings:
Minimize contention with the C: drive
The paging file is stored
on the C: drive, which is typically also the boot and system partition.
The operating system heavily uses the boot and system partition, so by
moving the paging file to a different physical drive, you can minimize
contention of regular operating system activity and paging.
Minimize space used on the C: drive
If you are running out of space on the C: drive, you can move the paging file another drive.
|
In Windows XP and previous operating systems, if you moved the paging file to a partition other than %systemroot%,
you lost the capability to capture a kernel memory dump file. In
Windows Vista and newer operating systems, you can move the paging file
to other drives without losing functionality. However, you'll need to
modify the registry by adding the DedicatedDumpFile key and modifying some other values.
|
|
Figure 2
shows the Virtual Memory settings page. In the figure, the
Automatically Manage Paging File Size For All Drives option is selected.
This is the default selection when Windows 7 is installed.
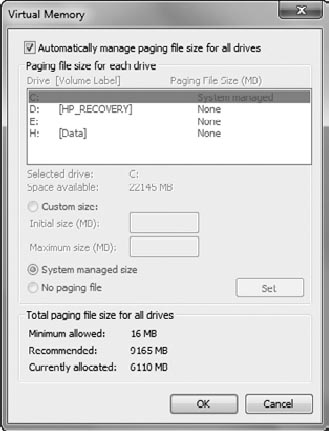
The bottom of the screen
shows information on paging file sizes, including the minimum allowed,
recommended size, and currently allocated.
Click Start, right-click Computer, and select Properties. Select Advanced System Settings. The System Properties page will appear with the Advanced tab showing. In the Performance section, click the Settings button. Select
the Advanced tab of the Performance Options page. Notice the Virtual
Memory section on this page. It will identify the currently allocated
paging file size for all drives in MB. Click the Change button to access the Virtual Memory page. Note
the current state of the check box for Automatically Manage Paging File
Size For All Drives. It is selected by default. Deselect this check box
to reconfigure the paging file. This will allow you to change the
settings manually. If
you have more than one partition, you can use the following steps to
add a paging file to the other partition and manipulate it. Select
another partition and click Custom Size. Enter a number equal to 1.5
times the physical RAM in the Initial Size and the Maximum Size text
boxes. Click Set, and it will configure the paging file always to be the
same size. Select System Managed Size and click Set. Notice Paging File Size is now changed to System Managed. If you want the paging file removed from any partition, select the drive, select No Paging File, and click Set. A message will appear indicating that the changes you've made will not take effect until you reboot. Click OK.
|
1.3. Diagnosing Memory Issues
Memory problems very often cause
stop screens. A stop screen is sometimes referred to as a Blue Screen
of Death (BSOD), but these stop errors aren't really that bad. Yes, your
system is stopping because of a critical error, but it isn't usually
dead. The error can be read, and you can get it operational again.
The blue screen includes a
stop error with a hexadecimal code. For example, a stop error of 0×50
indicates a possible memory error. If you receive this error (or other
errors indicating memory problems), you should access the recovery
screen and run memory diagnostics, as shown earlier.
You may also find a system
that doesn't have enough memory. A common symptom of a system that
doesn't have enough memory is excessive paging. The symptom that the
user will see and hear is disk thrashing. The LED on the drive is
constantly blinking, and the disk can be heard working its little
sectors off. With all this activity swapping data back and forth between
RAM and the hard drive, the system is painfully slow.
If you experience disk
thrashing, you should first check for disk fragmentation. If the system is not fragmented, the system needs more
memory for the work the user is performing.
2. Managing Disks
Disk drives can often cause
problems on any system, and you should be aware of some basic tools
that you can use to resolve basic drive issues. By keeping the disk
drives running optimally, you can often increase the reliability of the
system.
The primary tools you'll use to manage disks are these:
Check Disk
Disk Defragmenter
Diskpart
5.3.2.1. Identifying Bad Sectors
You can select the Check Now
button on the Tools tab to launch the Check Disk program. This program
can check for file errors on any drive and also check the drive for bad
sectors. NTFS will usually locate and repair problems with files on its
own, but it cannot identify bad sectors.
Check Disk can be launched
via Windows Explorer by right-clicking any drive, selecting Properties,
and selecting the Tools tab. When you click Check Now, the Check Disk
dialog box will appear, as shown in Figure 3.
Scan For And Attempt Recovery Of Bad Sectors is not selected by
default, but when this is checked, Check Disk will test the disk
sectors.

When you click Start, the
system will first check to see if the drive is currently being used. The
check can't be done on the system or boot partition in Windows
immediately. If you try to run it on the boot or system partition, it
will prompt you to schedule a disk check, and the check will be done on
the next boot.
If the drive is currently
being used but is not the boot or system partition, the systems will
prompt you to dismount the drive. You can click Force A Dismount, and
the check will then start.
When the scan completes, a
dialog box appears indicating whether any problems were found. It starts
as a small dialog box, but if you click the See Details link, you can
view the complete results of the scan. The results will be similar to Listing 1.
Example 1. Output of Check Disk utility
Volume label is Windows7.

CHKDSK is verifying files (stage 1 of 5)...
  448 file records processed.
File verification completed.
  0 large file records processed.
  0 bad file records processed.
  0 EA records processed.
  0 reparse records processed.
CHKDSK is verifying indexes (stage 2 of 5)...
  528 index entries processed.
Index verification completed.
  0 unindexed files scanned.
  0 unindexed files recovered.
CHKDSK is verifying security descriptors (stage 3 of 5)...
  448 file SDs/SIDs processed.
Security descriptor verification completed.
  41 data files processed.
CHKDSK is verifying Usn Journal...
  15592 USN bytes processed.
Usn Journal verification completed.
CHKDSK is verifying file data (stage 4 of 5)...
  432 files processed.
File data verification completed.
CHKDSK is verifying free space (stage 5 of 5)...
  361873 free clusters processed.
Free space verification is complete.
Windows has checked the file system and found no problems.

  11968511 KB total disk space.
  10457488 KB in 349 files.
       140 KB in 42 indexes.
         0 KB in bad sectors.
     63391 KB in use by the system.
     61904 KB occupied by the log file.
   1447492 KB available on disk.

      4096 bytes in each allocation unit.
   2992127 total allocation units on disk.
   361873 allocation units available on disk.
|
You can run the same CHKDSK
command from the command prompt. This includes the command prompt
accessible within Windows, the WinRE, or the WinPE. When running CHKDSK from the command prompt, you would use the following command:
CHKDSK x: /f /r
CHKDSK is the command. The x: is substituted for the drive letter that you want to check and repair, the /f switch directs it to fix or repair all errors it locates, and the /r switch directs it to check the disk sectors.
2.2. Defragmenting a Drive
Drives become fragmented when
the files that are written to a system cannot be stored in a contiguous
location. Imagine a 10-page report. If you printed this report as 10
separate pages, you could staple them together and it would be a
contiguous report.
However, if you had 10
drawers, but you had room in each drawer for only one piece of paper,
you could store the report in these 10 drawers. Now when you need to
read the report, you'd first have to retrieve it from the 10 drawers. It
would take extra time to retrieve the report before you could actually
read it.
Similarly, when files are
written to the system, there is sometimes limited space to store an
entire file in a single location. Instead, pieces of the file are stored
in different locations, and when it's read, the different pieces are
put together. When this occurs too often, the entire drive is referred
to as fragmented.
Drives that are
excessively fragmented are often subject to disk thrashing. You can hear
the drive constantly whirring and buzzing, but the performance seems
excessively slow. If you do hear disk thrashing, you should check the
drives to see if they are fragmented. If not, disk thrashing usually
indicates the system doesn't have enough memory.
Defragmenting a drive is the process of rearranging the files so that more of them are stored in contiguous locations.
Figure 3 shows the Disk Defragmenter tool.
You can access this by right-clicking a drive in Windows Explorer,
selecting Properties, selecting the Tools tab, and then clicking
Defragment Now.
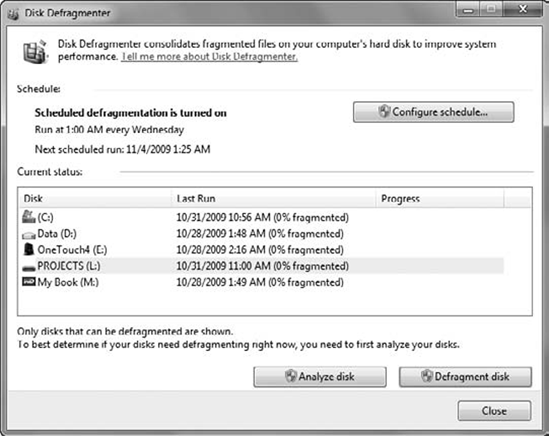
Notice that this screen
includes a Last Run column. Not only does this verify that
defragmentation was run (and when), but it also shows the current
percentage of the disk that is fragmented.
Defragmentation is
automatically scheduled to occur every week on drives that are connected
to your computer. If you add additional drives, such as an external USB
drive, these extra drives will automatically be added to the schedule.
As long as the schedules are not modified, fragmentation is rarely a
problem.
2.3. Running DiskPart
One of the command-line tools you may use to manage disks is DiskPart. The DiskPart command is primarily used to partition disks for advanced tasks.
Another time to use DiskPart
is when the partition of a system disk can't be cleared using the normal
GUI tools in the Disk Management snap-in. Disk Management can be added
as a stand-alone snap-in to a Microsoft Management Console (MMC) or
accessed via Computer Management.
As an example, one of the
systems I upgraded had a built-in RAID-1 (mirror) that I wanted to break
up. Instead of a single RAID-1 partition made up of the two drives, I
wanted to use one drive for the operating system and have the second
drive available for data.
Although I was able to break
the mirror, Disk Management didn't allow me to repartition the second
drive that I wanted to use for data. The partition was identified as an
OEM partition, and Disk Management wouldn't even let me delete it.
Instead, I launched the command prompt, accessed DiskPart, and was able to delete the partition using the /override option and ultimately reformat the entire disk.
One of the important
things to remember when using DiskPart is that you first must select the
disk and then select the partition. You can use the LIST DISK command to identify what disks are available. After you select one using SELECT DISK # (where # is the disk number), you can then use LIST PARTITION
to list the available partitions and select the partition you want to
manipulate.
