The Windows Recovery Environment (WinRE)
includes several tools that can be used to troubleshoot and recover a
system.
You can access the WinRE using the following methods:
Pressing F8 when booting to a Windows 7 installation
Booting with an installation DVD
Using bootable WinRE media
Once you boot into WinRE, you'll have access to the following tools:
The methods to access the WinRE and the available tools are described in the following sections.
1. Accessing the WinRE
The primary method you'll use to
access the WinRE is by pressing the F8 key when the system is booted.
WinRE is automatically included in the installation of Windows 7.
However, if the system is
corrupt, you can also access it using the installation DVD or by
creating your own bootable WinRE CD or USB disk.
1.1. Accessing the WinRE with F8
The WinRE environment
is included in the installation and, if the installation hasn't been
corrupted, it can be accessed by pressing the F8 key on boot. This will
display the Advanced Boot Options screen, as shown in Figure 1.
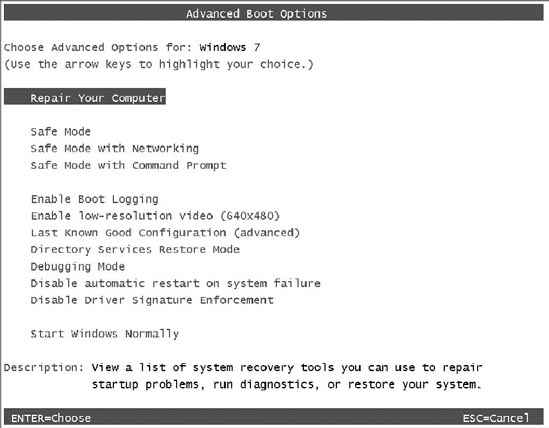
The Repair Your
Computer option is the first selection, and it will launch the WinRE.
You can also access the different Safe Mode options and some other
troubleshooting tools from this screen.
Reboot
the Windows 7 computer, and press F8 as it starts. You need to press
this key right away. If the Windows screen appears, it's too late, and
you'll need to reboot and try again. When the Advanced Boot Options page appears, select Repair Your Computer and press Enter. Select your keyboard type and click Next. Enter a valid user name and password and click OK. The System Recovery Options page will appear.
|
1.2. Accessing the WinRE from the Installation DVD
If the installation is corrupt
and you can't access the WinRE from the Advanced Boot Options screen,
you can use the installation DVD. Place the installation DVD in the
system, and boot to it as if you were installing Windows 7.
|
You need to use an installation
DVD that matches the architecture of the system you're checking. If the
installed system is 64-bit, for example, you'll need to use a 64-bit
installation DVD.
|
|
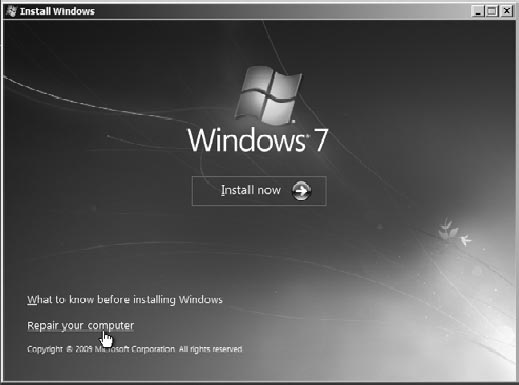
You'll first be prompted to choose a language. After you click Next, the Install Now page appears, as shown in Figure 2. Select Repair Your Computer to launch the WinRE.
1.3. Creating Bootable Media to Access the WinRE
You can also create your own
bootable media to access the WinRE. Although this is a little more
advanced, it will give you easy access to the WinRE so that you can
troubleshoot problems when the installation won't start.
If you created a bootable WinPE disk , you have only a few more steps to create a WinRE disk. The WinRE.wim image file is embedded in the install.wim file on the installation DVD and can be extracted. After extracting it, you can rename it to boot.wim and use it instead of the boot.wim used on a bootable WinPE disk.
Launch the Deployment Tools Command Prompt with administrative permissions. Select Start => All Programs => Microsoft Windows AIK, right-click the Deployment Tools Command Prompt, and select Run As Administrator. If prompted by User Account Control, click Yes to proceed. Create the folders that will store the Windows 7 mounted image with the following command: MD c:\Win7Mount
Extract one of the Windows 7 images from the install.wim file on the installation DVD with the following steps: Insert
the Windows 7 installation DVD in the DVD drive, and determine the
drive letter assigned to the DVD. You can find this by launching Windows
Explorer and browsing to the DVD. The following step assumes the letter is D:, but your system may assign a different letter. Mount an image from the install.wim file with the following command. The install.wim file is located in the Sources
folder of the installation DVD and contains multiple images. This
command will mount the first image. This will take a few minutes to
complete. ImageX /mount d:\sources\install.wim 1 C:\Win7Mount
At this point, the C:\Win7Mount folder includes all the files of a Windows installation.
Extract the Windows RE image using the following steps: Use the following command to create the folder that will hold the WinRE.wim file that is in the mounted Windows 7 image. MD C:\WinRE
Copy the WinRE.wim file from the mounted Windows 7 image with the following command: Copy c:\Win7Mount\Windows\System32\Recovery\WinRE.wim c:\WinRE
At this point, you've finished with the mounted image, so unmount it with the following command: ImageX /unmount c:\Win7Mount
This will remove all of the files from this folder.
Verify that you have a MyPE folder on your C: drive . Make a copy of the MyPE folder named MyRE with the following command: Xcopy c:\MyPE /s c:\MyRE
This will create a copy of the folders including the iso folder. The iso folder includes all of the required files and folders for the WinPE, and you can modify it slightly to use it as a WinRE. You'll need to overwrite the boot.wim file in the iso folder with the WinRE.wim file you extracted from the installation image in step 5. Execute the following command: Copy c:\WinRE\WinRE.wim c:\MyRE\iso\sources\boot.wim
When prompted to overwrite boot.wim, type Y and press Enter. At
this point, you have created the Windows Recovery Environment (WinRE)
folder. You can create a bootable USB drive by following steps 9 and 10
and create a bootable CD-ROM by following steps 11 through 13.
Format your USB drive with DiskPart using the following commands: Launch the command prompt with administrative permissions. If prompted by User Account Control, click Yes. Type DiskPart, and press Enter to access the Disk Partition tool. Type List Disk
to list all the disks on your system. Identify the correct disk number
for your flash drive. You'll use this disk number when executing the
Select Disk command. It's very important that you identify the correct drive. Otherwise, you may delete valuable data on another disk. Enter the following commands to prepare this disk. Replace disk 2 with the actual disk number of your USB drive identified in the previous step. Select disk 2
Clean
Create partition primary
Select partition 1
Active
Format quick fs=fat32
Assign
Exit
At this point, the drive
will be formatted as a FAT32 disk and all the data on the USB disk will
be removed. When you press Enter after typing in Assign, AutoPlay will
recognize the disk and prompt you (assuming AutoPlay is enabled on your
system). Select Open Folder To View Files.
Copy the contents of the entire c:\MyRE\ISO folder to the root of the USB drive. You can use Windows Explorer or the following command. Replace the letter x in the command with the letter assigned to your USB drive. Xcopy c:\MyRE\iso\*.* /e x:\
That's it. You now have a USB drive configured with bootable WinRE. To create a bootable CD-ROM, you'll need first to create an .iso
image from the WinRE folders you've created. If it is not still open,
launch the Deployment Tools Command Prompt with administrative
permissions. Enter the following command on a single line to create the
WinRE .iso image from the MyRE\iso folder. oscdimg -n -bc:\MyRE\etfsboot.com c:\MyRE\iso c:\MyRE\MyRE.iso
The oscdimg command creates an .iso file that can be burned to DVD. The -n switch specifies that long filenames are allowed. The -b switch specifies that a bootable CD is to be created using (using etfsboot.com). Note that there is no space between -b and c:\MyRE. The c:\MyRE\iso clause identifies the Source folder to use when creating the image. Finally, the c:\MyRE\MyRE.iso clause identifies the target file, or the name and location of the image file that ultimately will be burned to CD. Place a writeable CD into the system's CD burner. Launch Windows Explorer, and browse to the C:\MyPE folder. Right-click the MyRE.iso file, and select Burn Disc Image. Click Burn on the Windows Disc Image Burner window.
|
This image allows you to boot to
the Windows Recovery Environment just as you could from the
installation DVD. You'll be prompted to select a keyboard, and the WinRE
will then search for any installed operating system. Once you select
the operating system, the System Recovery Options screen will launch.
