2. Using the WinRE
Once you boot to the WinRE, it will search your system for Windows installations. You'll have three choices from here:
Use Recovery Tools That Can Help Fix Problems Starting Windows
You select an operating
system from the list of choices, and you can select this option. It will
then launch the System Recovery Options screen.
Restore Your Computer Using A System Image You Created Earlier
If you have a system image, you can choose this to restore the previous image.
Load Drivers
If your operating system isn't shown because additional drivers need to be loaded, you can select Load Drivers to load them.
The most common choice is to
launch the WinRE by accepting the defaults (Use Recovery Tools with the
Windows 7 installation) and click Next. This will launch the System
Recovery Options screen, as shown in Figure 3.
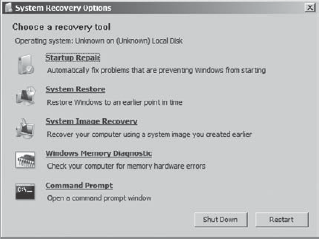
The following sections cover the details of these tools, including how to use them.
2.1. Startup Repair Tool
The Startup Repair tool
can automatically resolve many startup problems. It can also be
launched manually. It will inspect the system for a wide assortment of
problems that can prevent Windows 7 from starting, and it can implement
solutions for them with very little user interaction. This includes
repairing or replacing system and configuration files, solving disk
problems, and launching System Restore to return the system to a
previous state.
If the system fails to start,
Windows 7 will usually boot into this tool automatically. It provides a
few prompts for the user and will then resolve the problems it locates.
While it's not guaranteed to fix everything, it will fix many problems
and should be your first choice in most situations.
Boot into the System Recovery Options menu using one of the available choices. The
Startup Repair process will check your system for problems. If any
problems are identified, they will automatically be repaired. This
process may automatically reboot your computer. You
may be prompted to perform a System Restore. If this prompt appears,
you can choose Restore or Cancel. Click Cancel to allow the Startup
Repair process to complete without a System Restore. When the process is complete, you can view diagnostic and repair details. Click
Finish. This will return you to the Choose A Recovery Tool page, where
you can choose another tool or choose Shut Down or Restart.
|
2.2. System Restore
System Restore
allows the system to be restored to a previous state. If you've used
System Restore in Windows XP or Windows Vista, this will be familiar to
you. System Restore does not affect any documents, pictures, or other
user data. It affects only system files by applying a restore point
created previously.
Restore points are
automatically created on a regular basis as a part of Windows system
protection. Windows creates a file that includes system files and
settings. When a restore point is applied, all of the system files and
settings included in the restore point are applied to return the system
to its previous state.
Restore points are captured at the following times by default:
When an application or update is installed or updated
When a driver is installed or updated
Automatically every seven days if not created from other installs or updates
When manually created by the user by clicking Create on the System Protection tab of the System Properties page
Figure 4
shows the System Protection settings for a Windows 7 system. You can
access this screen by clicking Start, right-clicking Computer, and
selecting Properties. Select System Protection to access the System
Protection tab of the System Properties page. If you click the Configure
button, you can modify the Restore Settings.
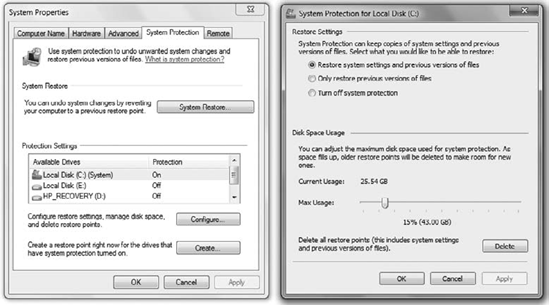
Notice that Restore Settings has three choices:
Restore System Settings And Previous Versions Of Files
This must be enabled for
restore points to be created. If any other settings are selected,
restore points are not available. This requires a minimum of 300 MB of
disk space.
Only Restore Previous Versions Of Files
This will allow previous
versions of files to be restored. Previous versions of files are stored
on a per-drive basis. By default, the drive where Windows is installed
(normally C:) would be enabled, but previous versions for other drives
is not available unless enabled on those drives.
Turn Off System Protection
Neither restore points
nor previous versions of files are available. You can select this if
you are running out of disk space, but it is not recommended. You'll
lose the ability to restore your system to a previous restore point if
this option is selected.
NOTE
System Restore is a
valuable tool if an update causes problems for a system. As an example,
an early update to Windows 7 caused some systems to go into an endless
reboot cycle, and this was the recommended fix. For the systems that had
restore points disabled, the solution was much more complex.
Before applying a restore
point, it is possible to identify the programs that are affected. When
you select the restore point, you can click the Scan Affected Programs
link. This will help you identify specifically what programs or drivers
might be deleted or the programs or drivers that might be restored to
their previous state.
2.2.1. Performing a System Restore
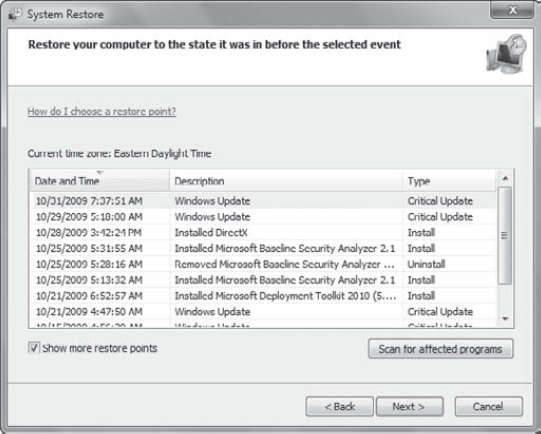
Boot into the System Recovery Options menu using one of the available choices. The Restore System Files And Settings page will appear. Review the information on this screen and click Next. A
list of restore points will appear. This list includes the date and
time of the restore point, a description, and the type (such as Update,
Critical Update, Install, and so on). System Restore automatically
recommends the most recent restore. Older restore points are hidden but
can be seen by selecting the check box Show More Restore Points. Choose
the desired restore point and click Next. The Confirm Your Restore Point page will appear. Review the information and click Finish. The
System Restore will begin. Once the System Restore is complete, a
dialog box will appear indicating that the system has been restored, and
you will be prompted to restart the computer. Click Restart to restart your computer. When
the system restarts, a System Restore dialog box will appear indicating
the system has been restored successfully, with a date and time of the
restore point.
|
2.2.2. Applying a Restore Point Online
You can also apply restore
points when your system is up and operational. For example, if you
installed an application, driver, or update that is causing problems,
but you can boot into the system, you can apply a restore point without
using the WinRE
Click Start, right-click Computer, and select Properties. Select System Protection. The System Properties page will appear with the System Protection tab selected. Review the information on the Restore System Files And Settings page, and click Next. Select the check box Show More Restore Points. Your display will look similar to the following graphic.
Select a restore point and click Next. Review the information on the confirmation page and click Finish. After the restore point is applied, the computer will restart.
|
2.2.3. Using Previous Versions
System Protection includes both restore points and previous versions of files. When Previous Versions is enabled (and it is by default), you can restore a modified file to a previous version of the file.
As an example, I often
use a Microsoft Excel worksheet as a template to create invoices. When I
need to create an invoice, I open the template and begin the invoice. I
should rename this template and save it with a new invoice name, but
occasionally I forget and overwrite the original template. With Previous
Versions, I can restore the original template even if I don't have a
backup of the file.
Figure 5
shows the Previous Versions tab selected. You can access this page by
right-clicking the file in Windows Explorer and selecting Restore
Previous Versions.
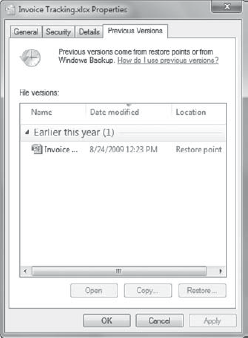
You can select the previous version of the file and then select one of the following choices:
Open
This will open the file so you can inspect it. You can then save it with a different name.
Copy
This will create a new file as a copy of the previous version.
Restore
This will overwrite any changes made to the file and restore the current file to the state of the previous version.
2.3. System Image Recovery
This should be used only as a
last resort. It will perform a complete restore of the system hard disk
from another image. You'll need an image of the system, and only the
files available on that image will be available for this installation.
You should ensure you have a backup of any files before using this method. Although data files may be moved to the Windows.old folder, if any changes are made to the system partition during the reimaging, the Windows.old folder will no longer be available.
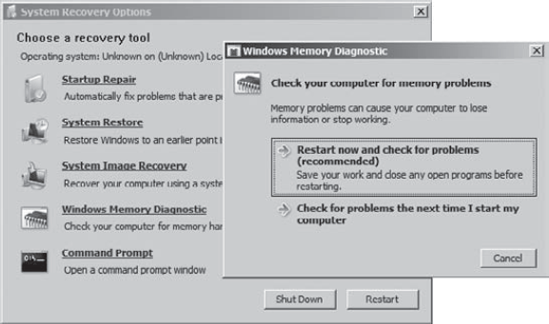
2.4. Windows Memory Diagnostic
The Windows Memory Diagnostic
will check both your installed RAM and the processor cache memory. This
test is the easiest and most effective way to check your memory.
Boot into the System Recovery Options menu using one of the available choices. Click Windows Memory Diagnostic. Select Restart Now And Check For Problems (Recommended), as shown in the following graphic.
The system will restart and automatically boot into the memory test. When
the computer restarts, press F1 to access the options for the test. You
can change the test from Standard to either Basic or Extended and
disable the Cache test. You can also change the number of passes it will
run (enter 0 for an infinite number of passes). If you change options,
press F10 to apply them. You can cancel the change by pressing the
Escape key. The
system will run through two passes of memory tests by default. As it
runs, it will report any memory problems it finds. Ideally, the status
will remain as No Problems Have Been Detected Yet. Once the test completes, the system will automatically restart. When the system restarts and you log on, the results will be displayed.
|
2.5. Command Prompt
You can also access the
command prompt from the WinRE. While you can access many of the normal
command-prompt commands, you'll have access to some extra tools in the
WinRE command prompt. The two extra tools that you might want to explore
are these:
Although these tools are
available, I want to stress that the majority of the repair actions that
you can do manually with them are done automatically using the Startup
Repair process. Unless you want to slow down the process to identify
exactly what happened, use the Startup Repair process as the first step.
These tools allow you to edit the boot configuration data (BCD) store. The BCD replaced the boot.ini file, which was used in Windows XP and earlier versions of Windows.
2.5.1. Using Bootrec
The Bootrec command can be used to repair critical disk structures such as boot records and partition information.
NOTE
If you used the
Recovery Console in Windows XP, you may be wondering how to get to it in
Windows 7. You can't. It's not available. However, some of the common
commands used in the Recovery Console can be executed using Bootrec.
The Bootrec command has four switches you can use:
/FixMbr
The Bootrec /FixMbr
command will write the master boot record of the system partition using
a master boot record compatible with Windows 7. It does not overwrite
the existing partition table. This can be useful if malware or a
hardware problem corrupted the master boot record.
This command is similar to the Fixmbr command used in the Recovery Console.
/FixBoot
The Bootrec /FixBoot command will write a new boot sector onto the system partition using a boot sector that is compatible with Windows 7.
This command is similar to the Fixboot command used in the Recovery Console.
/ScanOS
The Bootrec /ScanOS
command will scan all partitions on the computer and display any
entries that are not currently in the boot configuration data store. You
can then use the BCDEdit command to add the other entries.
/RebuildBCD
The Bootrec /RebuildBCD command will scan all partitions on the computer and allow you to choose which installation to add to the BCD store.
This command is similar to the bootcfg command used in the Recovery Console.
2.5.2. Using BCDedit
The BCDEdit
command can be used to view and make low-level modifications to the
boot configuration data store. The BCD is a store of data that you can
think of as a mini-database. It's used when Windows starts up to
identify the location of operating system files and, if multiple
operating system files are on the system, which one to use by default.
While it's possible to make changes to the BCD with BCDedit, you'll use
the GUI tools like System Configuration to configure the store more
often than you'll actually use BCDedit.
In Windows XP and earlier versions of Windows, the boot.ini file was used to specify different startup settings. The boot.ini has been completely replaced with the BCD store.
You can list (or enumerate) the contents of the BCD store using the bcdedit /enum command from the command prompt. You'll see something similar to the output in Listing 1.
Example 1. Viewing the boot configuration data
Windows Boot Manager
--------------------
identifier            {bootmgr}
device                partition=C:
description           Windows Boot Manager
locale                en-US
inherit               {globalsettings}
default               {current}
resumeobject          {a12c4258-897e-11de-9279-001372e62895}
displayorder          {current}
toolsdisplayorder     {memdiag}
timeout               30

Windows Boot Loader
-------------------
identifier            {current}
device                partition=C:
path                  \Windows\system32\winload.exe
description           Windows 7
locale                en-US
inherit               {bootloadersettings}
recoverysequence      {a12c425a-897e-11de-9279-001372e62895}
recoveryenabled       Yes
osdevice              partition=C:
systemroot            \Windows
resumeobject          {a12c4258-897e-11de-9279-001372e62895}
nx                    OptIn
|
This information is used
during the startup process. The system first loads the Windows Boot
Manager using the BCD store to locate it, and it then calls the Windows
Boot Loader to load Windows 7.
