One of the great strengths of any local area network
is the ability to share resources over the network. The two primary
resources that can be shared are folders and printers. A shared folder
is also referred to as a share, and it includes files that are to be shared among different users.
Files and printers can be shared
on Windows desktop systems (including Windows 7), but within an
enterprise files are more commonly shared on servers. For example, a
Windows Server 2008 or 2008 R2 server could be configured as a file
server to host files shared by users in the network. Users connect to
the shared folders and access the files.
NOTE
When files are hosted on a
central server, they are much easier for administrators to back up. It's
almost impossible for an administrator to back up all of the data on
end-user systems, but if the data is centrally located, it's relatively
easy to schedule regular backups.
The Universal Naming Convention (UNC)
format is commonly used to point to and connect to network resources.
The UNC is composed of a server name and a shared folder or server name
and a shared printer in the format \\ServerName\ShareName. For example, if a server named DC1 hosts a shared folder named Data, the UNC path is \\DC1\Data.
1. Pointing to Network Resources
There are two primary ways
to connect to shares from Windows 7. You can use the Start Search box to
point to the resource or map a drive to point to the resource using
Windows Explorer. The method you choose depends on how often you plan to
connect.
The first method uses the UNC path in the Start Search box in Windows 7. If you pause after entering \\ServerName\, the system will attempt to connect to the server and will then show all the available shares on the servers, as shown in Figure 1. In this figure, the server name is DC1, and it includes several shares that can be accessed by the users.
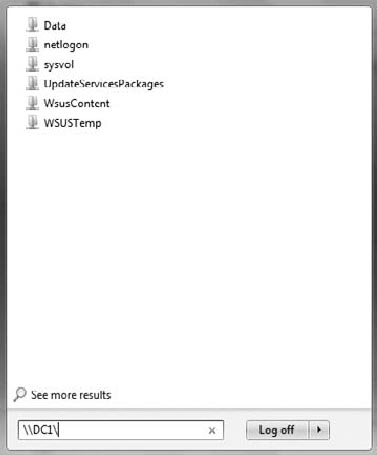
At this point, any of the shares
could be selected, or the rest of the UNC path could be entered. Shares
can be hidden by appending the $ sign to the share name. If the share
is hidden, it won't appear in the share list, but users can still
connect to it if they know the share name. For example, a share named
Project$ is available on DC1 but is not shown in Figure 8.1. However, a user could still connect by entering \\DC1\Project$.
Using the UNC path is useful
if you plan on connecting to the share only once or twice. However, if
you plan on connecting to the share on a regular basis, you can map a
drive letter to the UNC path.
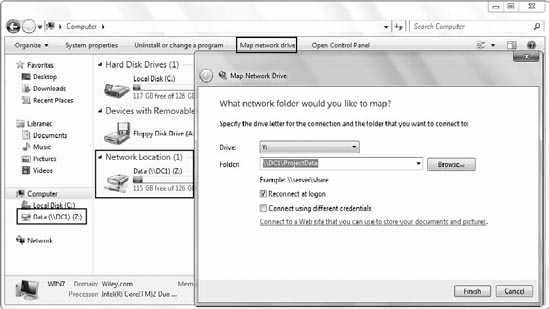
Windows Explorer in
Windows 7 includes the Map Network Drive link on the toolbar that you
can click to display the Map Network Drive window, as shown in Figure 2. In the figure, the UNC path \\DC1\ProjectData is being mapped to drive letter Y:.
|
The Map Network Drive link
in Windows Explorer appears only when Computer is selected in the left
pane. If a drive or folder is selected, the Map Network Drive link
disappears.
|
|
You can select any unused
drive letter and then enter any valid UNC path in the Folder text box.
If you want the mapped network drive to remain even after the system
reboots or users log off, select the check box next to Reconnect At
Logon.
Figure 2 also shows how a mapped drive appears after it has been mapped. In the far left pane within the Computer node, the \\DC1\Data UNC path has been mapped to the Z: drive. The same path is also shown as a Network Location in the figure.
2. Creating Shares on Windows 7
You can also create shares on
Windows 7 systems. This can be useful if users want to share data among
themselves without requiring a server to host the data. Before data can
be shared, the system needs to be configured to enable shared folders.
If the computer is in a private
location (such as in a home or work environment), the network can be set
either to Private or Domain, and folder sharing can then be enabled.
Figure 3
shows the Advanced Sharing Settings, which can be accessed via the
Network and Sharing Center. You can access the Network and Sharing
Center from Control Panel => Network And Internet and then access the screen in Figure 3 by clicking Change Advanced Sharing Settings in the Network and Sharing Center.
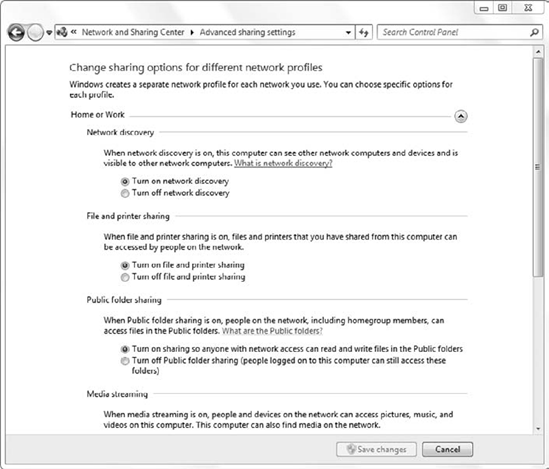
Two settings are directly related to sharing folders in an enterprise:
File And Printer Sharing
This setting must be
turned on to allow any type of file and printer sharing on the computer.
When turned on, the Windows Firewall exceptions are configured to allow
other clients to connect to the system.
If this setting is
turned off, Public Folder Sharing will not work even if Public Sharing
is turned on. This setting also allows users to share individual folders
on their system.
Public Folder Sharing
This setting can be used to enable sharing of the Public folder (as long as File And Printer Sharing is enabled). The Public folder is in the C:\Users\ folder, which is shared as Users. The Users\Public folder includes these subfolders: Public Documents, Public Downloads, Public Music, Public Pictures, Public Recorded TV, and Public Videos.
When this setting is enabled, users can copy data they want to share
directly into the related folder so that it is accessible to other
users.
An important consideration of the Public
folder is that you can't control who can access it. Either everyone can
access it equally when Public Folder Sharing is turned on, or no users
can access it when it is turned off.
NOTE
When File And
Printer Sharing is enabled on a Windows 7 system, it also adds an
exception to the firewall that allows ICMP Echo Requests—pings. In other
words, when the firewall is enabled, pinging the client will fail when
File And Printer Sharing is not enabled.
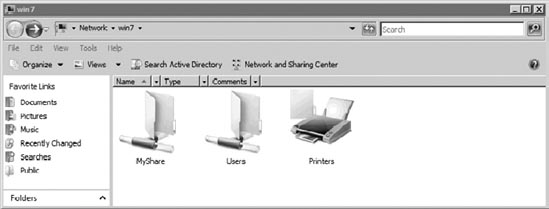
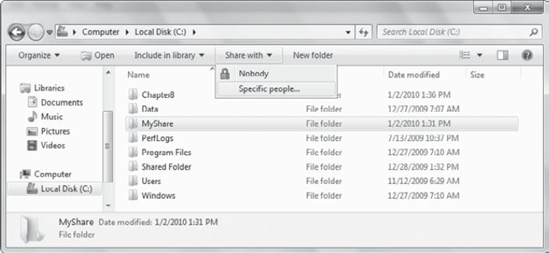
In Windows Vista, the Public folder appears as the Public share. However, in Windows 7, the Users share appears instead of the Public share, as shown in Figure 4. (This figure also shows an additional share named MyShare.) Clients can double-click the Users share to access the Public folder. In other words, for a Windows Vista system named Vista1, the Public folder is accessed with \\Vista1\Public. For a Windows 7 system named Win7, the path to the Public folder is \\Win7\Users\Public.
Within a workgroup,
the Password Protected Sharing and HomeGroup Connections settings can
also be used to control access to the computer. The Password Protected
Sharing option restricts access to shared folders to only users with
user accounts on the computer; however, this setting is not available
when the computer joins the domain. The HomeGroup Connections settings
are not available when the computer is in Domain mode but can be used
when the computer is in a small private network.
Access Control Panel by clicking Start => Control Panel.
Click View Network Status And Tasks to access the Network and Sharing Center.
Click Change Advanced Sharing Settings.
Scroll down to File And Printer Sharing, and select Turn On File And Printer Sharing.
Select
Public Folder Sharing, and select Turn On Sharing So Anyone With
Network Access Can Read And Write Files In The Public Folders.
Launch Windows Explorer by clicking Start => Computer. Browse to the C: drive.
Click New Folder, and name the folder MyShare.
Select the MyShare folder, and click Share With from the toolbar on Windows Explorer. Select Specific People, as shown in the following graphic.
You can add additional users and grant specific permissions from here. Type Everyone in the text box and click Add. The default permission is Read, but you can change this if desired. Click Share.
Review
the information on the Your Folder Is Shared screen, and click Done. At
this point, you could access the share from another system in the
network using the \\computerName\MyShare UNC format.
Click New Folder, and name the folder HiddenShare.
Right-click the HiddenShare folder and select Properties. Select the Sharing tab.
Click Advanced Sharing. Select Share This Folder, and name the share HiddenShare$. Click Permissions. Your display will look like the following graphic.
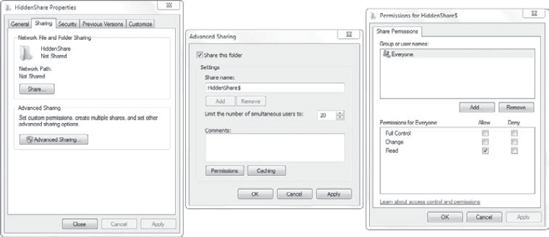
Notice that
Everyone is granted Read permission by default. You can add or remove
users and modify permissions as desired on this screen.
Click
OK on the Permissions dialog box. Click OK on the Advanced Sharing
dialog box, and click Close on the HiddenShare Properties page.
Click Start and type \\LocalHost\ in the Search Programs and Files text box. The Users and MyShare shares appear, but the hidden share is not shown.
Complete the entry to \\LocalHost\HiddenShare$ in the Search Programs And Files box and press Enter. You will connect to the hidden share.
