A user profile
is a set of data that is used to re-create the user's environment each
time a user logs on. It includes several folders such as Contacts, Cookies, Desktop, Downloads, Favorites, and more. It also includes user-specific Registry settings.
As an example, Bob could use a
Windows 7 system and have it configured with a left-hand mouse, the
Windows 7 Landscapes theme, a weather gadget on his desktop, and several
drives mapped to network shares he uses regularly. Each time Bob logs
on, these settings are re-created from his profile. Sally could use the
same computer with a different user account. She can reconfigure all of
these settings, and they will be re-created from her profile each time
she logs on, without affecting the settings for Bob.
Windows 7 profiles are stored in the %systemroot%\Users folder by default. The Users folder includes the standard profiles of any user who has ever logged on to the system and also the All Users profile and the Default User profile.
All Users
The All Users profile
holds settings that affect all users. As an example, when you install an
application, you are often prompted to choose to allow all users access
to the program. When you select All Users, the application modifies the
All Users profile, ensuring the application is available to any user
who logs on to the system.
Default User
This profile is used when
a user first logs on to a system. Windows 7 will copy the Default User
profile to a new folder named with the user's logon name. If Bob logs
on, a folder is created named Bob and
includes all the data from the Default User profile. This new profile is
used to re-create the same environment for the user each time Bob logs
on.
|
There are many
differences in how profiles are implemented in Windows XP and Windows 7.
The changes occurred between Windows XP and Windows Vista. For example,
in Windows XP the profile was located under the %systemroot\Documents And Settings\ folder. This was changed to %systemroot%\Users\ in Windows Vista and Windows 7.
|
|
If you look in the %systemroot%\Users folder, you won't see the Default User folder, but it's there—it's just hidden. By default, the only folders that a user will see in the %systemroot%\Users\ folder are the Public
folder and the profile folders of any users who have logged on. There
are many hidden and system-protected folders that don't show by default,
and you can follow these steps to show them:
Launch Windows Explorer and browse to the %systemroot%\Users\ folder.
Click Organize => Folder And Search Options.
Select Show Hidden Files And Folders.
Deselect
Hide Protected Operating System Files. When prompted, if you're sure
you want to display these files, click Yes. Click OK.
You will now see the All Users folder, the Default User folder, and some other folders.
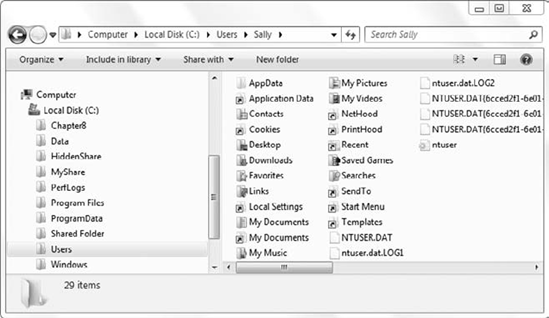
1. Standard Profiles
Profiles stored in the %systemroot%\Users\username
folder are referred to as local user profiles or standard profiles. The
profile includes several folders and a Registry hive. Many of the
folders and data are system files and hidden by default.
Figure 1 shows the user profile with hidden and system files showing.
Folders
The folders hold data and
settings needed by the user. These include desktop icons and shortcuts,
links and shortcuts to other folders, startup applications, and more.
Registry hive
The HKEY_CURRENT_USER
portion of the Registry holds user-defined settings for the desktop,
applications, printers, and more. These are stored in a file named ntuser.dat.
2. Roaming Profiles
Local user profiles work great
if a user logs on to the same system all the time. However, in some
organizations users may frequently log on to different systems. Mapped
network drives, shortcuts on the desktop, and other elements of the
user's profile are often useful if they're available to a user no matter
where the user logs on. Roaming profiles can be implemented to ensure the same profile is available to a user no matter which computer is used.
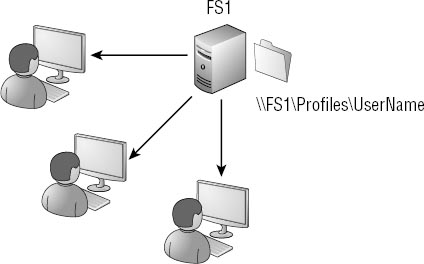
Figure 2
shows how roaming profiles are used. A folder is shared on a server
that is available to the user on the network, and the user's account is
then configured to use this share for the profile.
When the user logs on to a
computer, the profile is retrieved from the network share and copied
onto the local computer. If the user makes any changes, these changes
are copied up to the roaming profile on the network share. If a user
then moves to a different computer and logs on, the profile is copied
down to the different computer.
Roaming profiles can be implemented only in a domain. The two steps used to create a roaming profile are as follows:
1. Create a share on a server.
This share needs to be accessible to users using the UNC path (\\ServerName\ShareName).
If more than one user will use this share, the Authenticated Users
group should be granted Full Control. It's not necessary to create the
folder for each user because this can be created automatically.
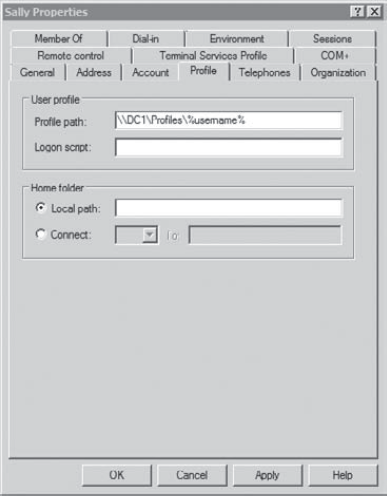
2. Modify the domain user account.
The Profile tab of the user
account Properties page includes a Profile Path text box. The UNC path
to the share is added here and appended with the %UserName% variable, giving a full path of \\ServerName\ShareName\%UserName%.
When the user logs on, a folder will be created within the share with
the appropriate permissions for the user to access the folder.
Start the domain controller and log on. Create a shared folder to store the user profiles with the following steps: Start Windows Explorer by clicking Start => Computer. Double-click the C: drive. Right-click the main Windows pane and click New => Folder. Name the folder Profiles or another name that matches your company's needs. Select Share from the Windows Explorer toolbar. Type Authenticated Users
in the text box, and click Add. (You can also click Find And Search and
use the Active Directory search tool to locate any group.) Change
Reader to Contributor.
Launch Active Directory Users and Computers by clicking Start => Administrative Tools => Active Directory Users And Computers. Locate a user account. Right-click the user account and click Properties. Select
the Profile tab. Enter the UNC path to the share in the Profile Path
text box, as shown in the following graphic. For my test bed, I created
the Profiles share on DC1, so the full path is \\DC1\Profiles\%UserName%. Click OK.
|
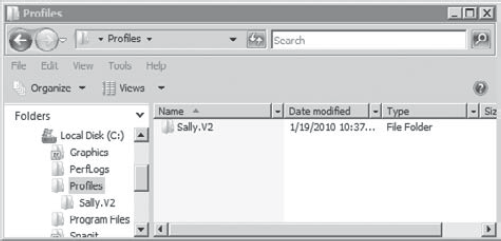
If you look in the Profiles
folder now, you won't see anything. However, the next time the user
logs on, a folder will be created for the user in the UNC path. Figure 9.16 shows an example of what this looks like for a user. Notice that since the %UserName% variable was used, the folder was created using the user name. The V2
indicates to the operating system that this roaming profile is using
the newer format of profiles that was implemented with Windows Vista.
The operating system
also configures the NTFS permissions for the folder. The user and the
system both have full control of the folder, but no other users are
granted any access to the data in the folder.