When Windows 7 is first installed, it is a member of a
workgroup by default. Workgroups are used in small offices, home
offices, and home networks to allow users to share resources among
themselves.
However, networks of more than 10
users implement domains. A domain is easier to manage and provides
better security than a workgroup. One important benefit of a domain is
that it provides single sign-on capabilities. In a domain, each user has
one account that they can use to log on to almost any computer in the
domain. In a workgroup, users need a separate account for each computer.
A Windows domain includes at least one server acting as a domain controller and hosting Active Directory Domain Services
(AD DS). Desktop computers (such as Windows 7 computers) are then
joined to the domain so that users can access the domain resources.
AD DS includes objects such as
users, computers, and groups. In order for a user to log on to the
domain, the user needs a user account. In addition, the user must log on
to a computer that is joined to the domain. If the computer isn't a
member of the domain, the user won't be able to log on even if the user
has a domain account.
That being said, it's
important to know how to join a computer to a domain. In the following
section, you'll have an opportunity to create a virtual test environment
that includes a single domain controller hosting a domain. You can then
use this to join a Windows 7 computer to the domain.
1. Creating a Test Bed
A test environment (or test
bed) can be used for testing, learning, experimenting, and practicing.
It includes one or more systems that can be completely isolated,
connected to each other, and in some instances given limited
connectivity to the live network. A virtual test bed is one or more
virtual systems created in a virtual environment such as Microsoft
Virtual PC or Windows Virtual PC.
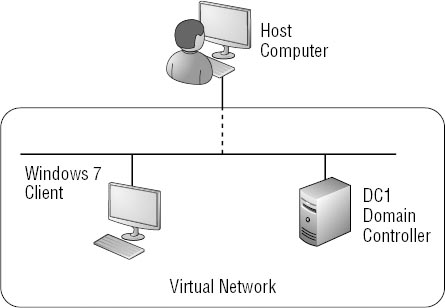
Figure 1
shows a virtual network hosted on Windows 7. It includes two virtual
systems—one running Active Directory as a domain controller and one
running Windows 7 as a client in the domain.
Windows 7 can run both
Microsoft Virtual PC and Windows Virtual PC. Either of these products
can be used to create a test bed on your local Windows 7 system. As a
reminder, Microsoft Virtual PC is the older product run on Windows XP
and Windows Vista. Windows Virtual PC (VPC) is the newer product that
can also host Windows XP Mode to run virtualized applications.
Your system should have at
least 3 GB of RAM for satisfactory performance. You can use 1 GB (1024
MB) for the virtual server running Windows Server 2008, 1 GB for the
virtual desktop running Windows 7, and 1 GB for the host operating
system. If necessary, you can use as little as 512 MB for Windows Server
2008 VPC, though the performance will be slow.
More RAM is always
better. I'm running a 64-bit system with 6 GB of RAM, so I have given
each of the VPCs 1.5 GB (1536 MB), leaving 3 GB for the host.
1.1. Creating a Domain
A domain includes a server
running Active Directory Domain Services. The domain controller could be
running Windows 2000 Server or Windows Server 2003, but it's more
likely you'll be working with Windows Server 2008 and Windows Server
2008 R2 servers in your domain today.
You can download a trial edition of Windows Server 2008 from Microsoft's download site (www.Microsoft.com/downloads) by searching on "Windows Server 2008 Enterprise Eval." You need to download the x86-based version (32-bit).
NOTE
Windows Virtual PC
and Microsoft Virtual PC do not support x64-based operating systems. You
can run VPC on a 64-bit host, but you can only add x86-based operating
systems as virtual machines to VPC.
Before starting Exercise 1, you should have accomplished the following steps on your Windows 7 system:
Install Windows Virtual PC on the system.
Create
a VPC machine named DC1 with at least 512 MB of RAM (1536 MB if
possible), networking deselected, and a dynamically expanding virtual
hard disk. Note that this step doesn't install Windows Server 2008 but only creates the VPC.
Obtain an evaluation copy of Windows Server 2008 Enterprise edition. An .iso image can be downloaded from www.Microsoft.com/downloads and burned to a DVD.
Start Windows Virtual PC by clicking Start => All Programs => Windows Virtual PC => Windows Virtual PC. Insert the Windows Server 2008 Enterprise Edition DVD in the DVD drive. Start
the DC1 VPC machine by double-clicking it. It will automatically begin
booting from the DVD. If necessary, you can click the Ctrl+Alt+Del
selection on the VPC menu to force a boot cycle. When the Install Windows screen appears, select your language, time and currency, and keyboard. Click Next. Click Install Now. The
Type Your Product Key For Activation screen will appear. Deselect the
Automatically Activate Windows When I'm Online check box. Click Next.
When prompted again to enter your product key, click No. Select
Windows Server 2008 Enterprise (Full Installation). Select I Have
Selected The Edition Of Windows That I Purchased, and click Next. Review the software license terms and select I Accept The License Terms. Click Next. Click Custom (Advanced) to start the installation. Select Disk 0 Unallocated Space and click Next. The installation will begin at this point. While the installation is running, select Tools =>
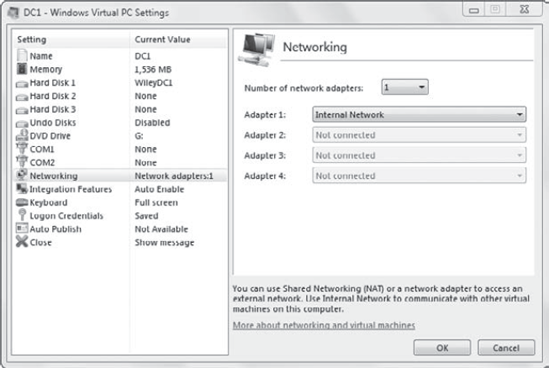
Settings from the Windows Virtual PC menu. You will need to hold down
the Ctrl+Alt+right-arrow keys to allow your mouse to escape the VPC
window. Select
Networking. Adapter 1 should be listed as Not Connected. Change this to
Internal Network, as shown in the following graphic. Click OK. This
will allow the virtual systems to connect to each other but not with the
network or Internet.
The
installation process will complete after several minutes, and the VPC
will reboot. When prompted to change the password, click OK. Enter P@ssw0rd
in the New Password and Confirm Password text boxes. Press Enter or
click the right arrow. When prompted that the password has been changed,
click OK. When
the desktop appears, the Initial Configuration Tasks screen will start.
Use the Ctrl+Alt+right-arrow keys to allow your mouse to escape the VPC
window. Select Tools => Install Integration Components from the Windows Virtual PC menu. Review the information in the dialog box, and click Continue. If the installer doesn't start automatically, click Start => Computer. Double-click the DVD drive and double-click Setup. Review the information on the Welcome page, and click Next. When installation completes, click Finish. When prompted to restart the computer, click Yes.
|
This evaluation edition is a
fully functional copy of Windows Server 2008 edition, but the
evaluation period expires after 60 days. You can renew this evaluation
period up to three times for a total of 240 days by entering the
following command at the command prompt with elevated permissions:
Slmgr.vbs -rearm
KB article 948472, which includes full details on rearming Windows Server 2008, can be viewed here: http://support.microsoft.com/kb/948472.
Exercise 2 shows how to configure a Windows Server 2008 server.
Start DC1 created in Exercise 9.1, and log on with the Administrator account and a password of P@ssw0rd. The Initial Configuration Tasks screen will appear. Click
Set Time Zone. If the time zone is incorrect for your location, click
Change Time Zone and select the correct time zone. Click OK twice. Click
Configure Networking. Right-click Local Area Connection and select
Properties. Deselect Internet Protocol Version 6 (TCP/IPv6). It's not
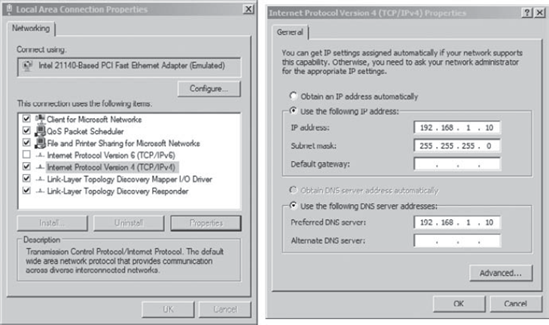
needed for a small virtual network. Select
Internet Protocol Version 4 (TCP/IPv4), and click Properties. You can
configure any TCP/IP settings desired, but exercises in this book assume
the following settings are being used: Your display will look similar to the following graphic.
Click OK. Click Close. Close Network Connections. On the Initial Configuration Tasks screen, click Provide Computer Name And Domain. Click Change. Type in DC1 as the Computer Name and click OK. When prompted that you'll need to restart your computer, click OK. Click Close and click Restart Now.
|
The system is now configured
as a virtual Windows Server 2008 server. The next step is to promote it
to a domain controller as the first domain controller in a domain, as
shown in Exercise 3.
Domain names need to have at least two parts such as Microsoft.com or Wiley.com.
However, they don't need to have a legal top-level domain name such as
.com, .org, or .net. You can use a test bed domain name of test.bed if
desired. For examples in the book, I'm using wiley.com as the domain name.
Start DC1 and log on with the Administrator account. Click Start, type DCPromo in the Start Search box, and press Enter. After a moment, the DCPromo Wizard will start. Click Next. Click Next on the Operating System Compatibility screen. Select Create A New Domain In A New Forest, and click Next. Enter a fully qualified domain name for the domain, such as wiley.com. Click Next. Select Windows Server 2008 from the drop-down menu as the Forest Functional Level. Click Next. The
Additional Domain Controller Options page will appear. It will have DNS
Server and Global Catalog both selected. Leave them selected and click
Next. A warning will appear because DNS hasn't been created yet. This is
normal. Click Yes to continue. Accept the default locations for Active Directory files, and click Next. Type P@ssw0rd in the Password and Confirm Password text boxes for the Directory Services Restore Mode Administrator Password. Click Next. Review the information on the Summary screen, and click Next. Select Reboot On Completion. Active Directory will be installed and the server will reboot.
|
To complete your virtual network, you'll also need to add a Windows 7 VPC machine.
Create a VPC
machine named Win7 with at least 1024 MB of RAM (1536 MB if your system
has enough RAM), networking deselected, and a dynamically expanding
virtual hard disk.
Install Windows 7 on the VPC.
Configure the networking for the Windows 7 VPC machine using the following settings.
1.2. Joining the Domain
Once you've created a domain
by promoting a server to a domain controller, you can add the Windows 7
client to the domain. Adding a Windows 7 client will result in the
following:
A computer object will be created in the domain.
A
password will be established for the computer to authenticate in the
domain. This password will automatically be changed periodically.
Users will be able to log on using a domain account and access domain resources.
Group Policy objects will be applied to the computer and to users logging on to the computer.
Exercise 4
shows how to join a Windows 7 computer to a domain. If you're using the
virtual network, both the domain controller and the Windows 7 client
need to be running. It's critical that the Windows 7 client can reach
the DNS server that is running on the domain controller. The Windows 7
VPC should have the Preferred DNS address configured with the address of
the domain controller .
Start Windows 7 and log on. Click Start, right-click Computer, and select Properties. Click Advanced System Settings. Select the Computer Name tab. On
the Computer Name/Domain Changes page, select Domain and enter the name
of the domain. Click OK. You'll be prompted to enter the credentials
for an account in the domain that has permission to join the domain.
Your display will look similar to the following graphic.

Enter
the credentials of a user account that has permission to join the
domain (such as the Administrator account), and click OK. After a
moment, a dialog box will appear welcoming you to the domain. Click OK. You'll be prompted that you must restart the computer to apply the changes. Click OK. Click Close. When prompted to restart the computer, click Restart Now.
|
At this point, you have a
virtual network that includes a domain controller and a Windows 7 server
that has been joined to the domain.
