6. Advanced Group Policy Settings
Occasionally, you may
need to modify the default Group Policy behavior as applied to users and
computers within the domain. When necessary, you can use the following
four settings for some special circumstances.
Block Inheritance
Enforced
Loopback Processing
Filtering
Use of these settings
should be the exception. In other words, their usage should be minimal.
Group Policy can be complex on its own, but when you start modifying the
default behavior with these exceptions, it can make the environment
even more complex and harder to maintain.
6.1. Block Inheritance
It's possible to block
the inheritance of all GPOs for an OU. For example, you could create an
OU for testing purposes and decide that you don't want to allow GPOs
from the domain or parent OUs to apply. You can enable the Block Inheritance setting on the OU, as shown in Figure 12. In the figure, block inheritance has been enabled on the Testing OU.
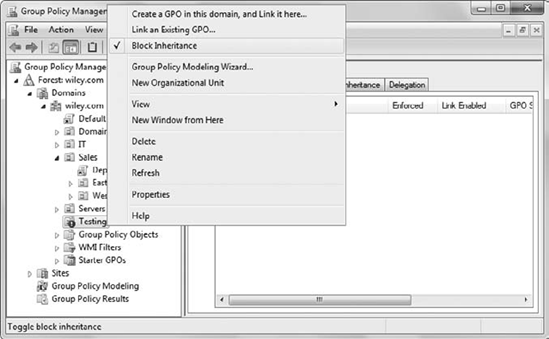
You can enable block
inheritance by right-clicking the OU and selecting Block Inheritance.
Once this is set, there will be an icon of an exclamation point in a
blue circle to indicate block inheritance is enabled.
When using block inheritance, there are two important points to remember:
6.2. Enforced
Very often you'll want to
configure settings and ensure that they are not overwritten or blocked.
Normally, the last GPO applied wins, but you can use the Enforced
setting to override this default behavior. In other words, if the enforced
GPO is the first one applied and other GPOs have conflicting settings,
the GPO with the Enforced setting will always win. In addition, if any
OUs have the Block Inheritance setting enabled, the GPO configured with
the Enforced setting will not be blocked.
As an example, you may have
configured different security settings in the Default Domain Policy that
you want to ensure are applied to all users and computers in the
domain. You don't want the settings overwritten by conflicting GPOs or
by the Block Inheritance setting on an OU.
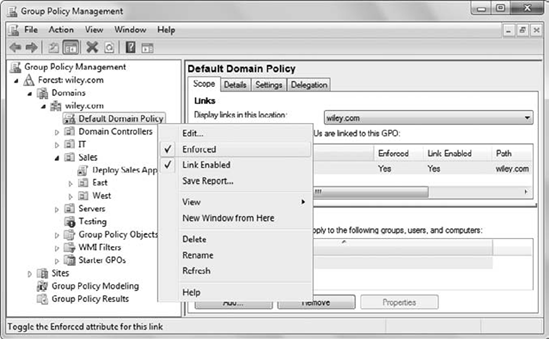
Figure 13
shows the Default Domain Policy GPO set to Enforced. This setting is
enabled by right-clicking the GPO and selecting Enforced. A GPO that has
the Enforced setting will have an icon of a lock to indicate that
Enforced is enabled.
6.3. Loopback Processing
Loopback Processing
is a Group Policy setting that will cause the computer Group Policy
settings to take precedence over the user settings. Normally, the order
in which GPOs are applied is as follows:
Computer turns on and computer GPOs are applied.
User logs on and user GPOs are applied.
Because the user logs on after
the computer starts, the user settings are applied last and the user
settings take precedence. However, loopback processing allows this
behavior to be reversed. In other words, you can use the Loopback
Processing setting to have the computer settings take precedence over
the user settings.
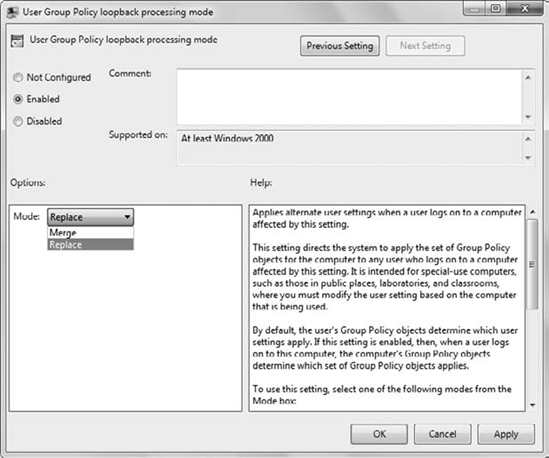
Figure 14 shows the User Group Policy Loopback Processing Mode setting. The Loopback Processing setting is in the Computer Configuration => Policies => Administrative Templates => System => Group Policy node.
When configuring loopback processing, you have the choice of using Replace or Merge.
When configuring loopback processing, you have the choice of using Replace or Merge.
- Replace
The computer settings defined in the computer's GPOs completely replace the settings that would normally apply to the user.
- Merge
The computer settings
defined in the computer's GPOs are combined with the user settings that
apply to the user. If there are any conflicts, the computer settings in
the computer's GPOs take precedence.
Exercise 4
demonstrates the default behavior of Group Policy and then shows how
this can be reversed with loopback processing. In this exercise, you'll
perform the following big-picture steps.
Create two test OUs named TestComputer and TestUser.
Place a computer in the TestComputer OU and a user in the TestUser OU.
Create a GPO to remove the Games link and link it to the TestComputer OU using the settings in the Computer Configuration node.
Log on to the computer, and verify that the Games link is still there.
Move the user account to the TestComputer OU, and verify that the GPO removes the Games link.
Move the user account back to the TestUser OU, and verify that the Games link returned.
Enable loopback processing on the GPO applied to the TestComputer OU. Verify that the Games link is removed.
Note that this exercise
uses only one simple setting—Remove Games Link From Start Menu. However,
by moving the accounts so that they move in or out of the scope of the
GPO, you can see how the GPO applies. In addition, this shows the
subtlety of how the User Configuration and Computer Configuration
settings apply to users or computers in the scope of the GPO, as
discussed earlier. Last, it shows how loopback processing can modify the
default behavior.
Log
on to the domain controller, and launch Active Directory Users and
Computers via the Administrative Tools menu. Create two OUs with the
following steps: Right-click the domain and click New => OU. Name the OU TestComputer. Right-click the domain and click New => OU. Name the OU TestUser. Locate
the Windows 7 computer account of the computer you'll use. The computer
account will be in the Computers container unless it has been moved.
Drag and drop it into the TestComputer OU. Locate
a Windows 7 user account you'll use to log on to the computer. You can
use Administrator account for the domain if you're using a virtual
environment. Drag and drop it into the TestUser OU. Keep Active Directory Users and Computers open.
Launch
the Group Policy Management console via the Administrative Tools menu.
Create a GPO named RemoveGames linked to the TestComputer OU with the
following steps: Browse
to the Test Computer OU. Right-click the TestComputer OU, and select
Create A GPO In This Domain And Link It Here. Name the GPO TestRemoveGames. Expand TestComputer. Right-click the TestRemoveGames GPO and select Edit. Browse to the User Configuration Policies Administrative Templates Start Menu And Taskbar node. Double-click Remove Games Link From Start Menu. Select Enabled and click OK. Leave the GPO open to modify later in this exercise.
Log on to the Windows 7 computer using the test account. Click Start, and you'll see that the Games link still appears. The
GPO applied to the computer in the TestComputer OU doesn't affect the
user because the user account isn't in the scope of the GPO. Return to the domain controller. Drag and drop the user account from the TestUser OU to the TestComputer OU. Return to the Windows 7 system and launch a command prompt. Enter GPUpdate /Force
to force Group Policy to be updated now (instead of waiting for the
90–120 minutes refresh cycle). When it completes, click Start. You'll
see that the Games link has disappeared. Because the user account is
now in the scope of the GPO, the user settings from the GPO apply. Return to the domain controller. Drag and drop the user account from the TestComputers OU back into the TestUsers OU. Return to the Windows 7 system and access the command line. Enter GPUpdate /Force again to update Group Policy. When it completes, click Start and verify that the Games link has returned. Modify the TestRemoveGames GPO to use loopback processing with the following steps: Return to the domain controller, and access the Group Policy Management Editor with the TestRemoveGames GPO open. Browse to the Computer Configuration => Policies => Administrative Templates => System =>
Group Policy node. Double-click the User Group Policy Loopback
Processing Mode setting. Select Enabled and select Merge. Click OK.
Return to the Windows 7 system and access the command line. Enter GPUpdate /Force again to force Group Policy. When it completes, click Start and verify that the Games link is no longer there. Access
Active Directory Users and Computers on the domain controller, and
return the user and computer accounts to their original locations. If
you're using the virtual environment, the Administrator account should
be returned to the Users container, and the Windows 7 account should be
returned to the Computers container.
|
6.4. Filtering
GPOs normally apply
to all users in the Authenticated Users group within the scope of the
GPO. When users log in to a domain and are authenticated, they are
automatically added to the Authenticated Users group, and the settings
from the Default Domain Policy will apply to all users.
GPO filtering allows you to change the default behavior so that the GPO applies only to a specific group of users. Figure 15
shows the permissions for a Group Policy. The two most important
permissions to understand are Read and Apply Group Policy, and you can
see that these permissions apply to the Authenticated Users group.
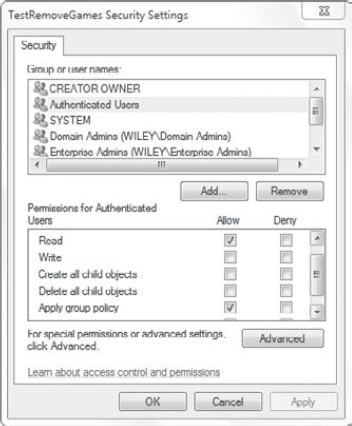
You can access the Security page with the following steps.
Select the GPO in Group Policy Management.
Select the Delegation tab.
Select Authenticated Users.
- Read
This permission allows the
settings in the GPO to be read. If only Read permission is applied, the
GPO can be read but it won't be applied.
- Apply Group Policy
This permission allows the
settings in the GPO to be applied as long as the Read permission is also
applied. If this setting is set to Deny for a group, the GPO will not
apply to the group.
Other groups, such as the
Domain Admins and Enterprise Admins, are granted other permissions that
allow members to manage the GPO. These groups aren't assigned Apply
Group Policy directly. However, since members of these groups become a
member of the Authenticated Users group when they log on, GPOs will also
apply to users in these groups.
What if you don't want a GPO to
apply to a specific group, such as members of the Domain Admins group?
You can then assign Deny Apply Group Policy to this group. Just as Deny
takes precedence in NTFS, Deny takes precedence with GPO permissions.
On the other hand, you may want
the GPO to apply only to a specific group. You can remove the
Authenticated Users group, add another group, and assign the Read and
Apply Group Policy permissions for the target group.
For example, if you want a
GPO to apply only to a G_ITAdmins group that you've created, you would
remove the Authenticated Users group and add the G_ITAdmins group.
Instead of adding groups
from the permissions screen, you can also add groups from the Delegation
tab. When adding groups to this tab, you're prompted to assign one of
three permissions:
- Read
Only Read permission is assigned. Apply Group Policy is not assigned.
- Edit Settings
Read, Create All Child Objects, Delete All Child Objects, and some special permissions are assigned.
- Edit Settings, Delete, Modify Security
Read, Create All Child
Objects, Delete All Child Objects, and some special permissions that
allow users to modify permissions are assigned.
It's important to note that
none of the selections from the Delegation tab will automatically assign
both Read and Apply Group Policy. If you use this tab, you'll also need
to modify the permissions from the Security page shown earlier in Figure 15.
You can also use the Scope tab of a Group Policy to modify the security filtering. Figure 16 shows the Scope tab selected for a GPO. Notice in the Security Filtering section that the Authenticated Users group is shown.
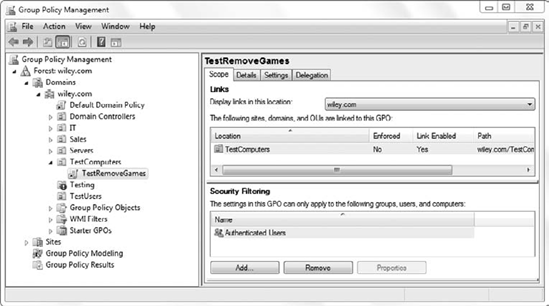
To filter a GPO using
Security Filtering, you would remove the Authenticated Users group by
selecting it and clicking Remove and add another group by clicking Add.
The Read and Apply Group Policy permissions will be applied to any group
you add here.
7. WMI Filtering
Any GPO can have a single
Windows Management Instrumentation (WMI) filter applied to it. A WMI
filter can be used first to inspect the system to check for a condition,
and if the condition is met, the GPO can be applied.
As an example, you may want to
deploy a GPO only to Windows XP computers but not to Windows 7
computers. A WMI filter could be created and linked to the GPO. Before
the settings are applied, the WMI filter determines whether the system
is running Windows XP and applies the GPO settings for only the XP
computers.
WMI filters use WMI Query
Language (WQL), which is beyond the scope of this book. However, you can
usually find a sample WQL script to include in a WMI filter if needed.
The most important thing to remember is that the scope of the GPO can be
modified by linking the WMI filter to the GPO.
Here are some examples of what a WMI filter is used to check:
The version of the operating system
How much space is available on a disk drive
Specific services running on a system
The time zone of a system
The existence of a specific hot fix
The existence of specific software
The make or model of the computer
8. Using Group Policy Results
Group Policy Results
is a valuable tool that can be used to troubleshoot Group Policy. It
allows you easily to determine what policies are being applied to a
specific user when logged on to a specific computer. In addition, when
there are conflicting settings, it helps you determine the winning GPO
and applied setting.
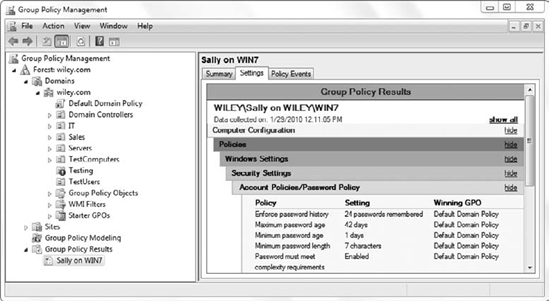
Figure 17
shows a partial Group Policy Results report. It was run for a user
named Sally on a computer named Win7 and is named Sally on WIN7. The
report is formatted as a dynamic HTML page, allowing you to expand or
hide elements of the report.
The report includes three tabs:
- Summary
This page has sections
for Computer Configuration and User Configuration. It identifies all of
the GPOs that were applied and also lists any GPOs that may have been
denied. A GPO could be denied because of Block Inheritance.
- Settings
This tab lists all of the
settings that are being applied. Details include the policy setting and
the winning GPO that is applying the setting.
- Policy Events
Group Policy–related
events are listed here. These are the same events that can be viewed
using Event Viewer but are filtered to show only Group Policy–related
events.
You should be aware of a few restrictions when running Group Policy Results:
The computer must be a
member of the domain and currently reachable on the network. WMI is
used to query the computer, and if it is down or unreachable, you can't
create a report.
Only
users who have logged on to the computer and have profiles on the
computer can be included. WMI is used to identify who these users are,
and you can select one of the users from a list.
9. Using Group Policy Modeling
Group Policy Modeling can be
used when designing Group Policy. It helps domain administrators
determine what the effect might be if a specific user logs on to a
specific computer in different situations.
For example, you may be
considering moving users or computers to different OUs. You could use
the Group Policy Modeling tool to run a report to determine what the
effective GPOs and GPO settings will be if this change is made.
You can also simulate the effect of the following situations:
Loopback processing is enabled.
Users or computers are in different security groups.
A WMI filter is applied.
A user logs on with a slow network connection.
