3. RSAT and the Group Policy Management Console
The Remote Server Administration Tools (RSAT)
for Windows 7 can be installed on a Windows 7 computer to enable IT
administrators to manage roles and features on servers in the domain.
Windows Server 2003, Windows Server 2008, and Windows Server 2008 R2
servers can all be managed using RSAT.
|
There are different
versions of RSAT for Windows Vista and Windows 7. The Windows 7 version
includes the ability to manage up to Windows Server 2008 R2, whereas the
Windows Vista version includes only the ability to manage roles and
features up to Windows Server 2008.
|
|
RSAT includes the
Group Policy Management console, which is the primary tool used to
manage Group Policy. The GPMC is automatically installed on a domain
controller when it is promoted. However, additional settings are
available on a Windows 7 and Windows Server 2008 R2 GPMC that you won't
see on the GPMC installed on Windows Server 2008.
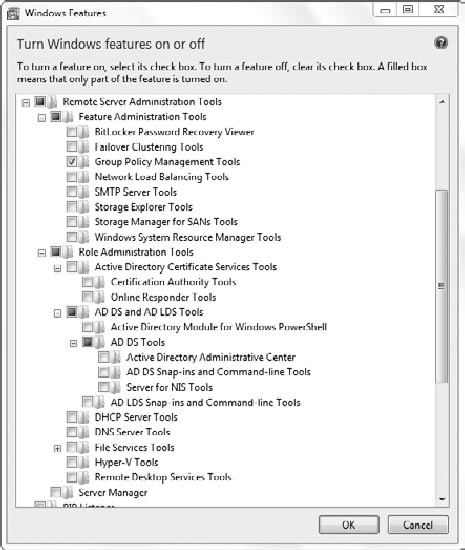
After installing RSAT on a Windows 7 computer, you enable the desired features via Control Panel. Figure 10
shows the Windows Features dialog box with all of the Remote Server
Administration Tools. In the figure, only Group Policy Management Tools
are added, but as you can see there are many more tools you can add.
You can download RSAT for free from Microsoft's download site (http://www.Microsoft.com/downloads)
by searching on "RSAT Windows 7." Both 32-bit and 64-bit versions are
available. The 32-bit version includes the x86 prefix, and the 64-bit
version includes the amd64 prefix. You should download the version to
match the architecture of your Windows 7 system.
After downloading RSAT, you can follow the steps in Exercise 2
to install it on a Windows 7 system and enable the GPMC. While this
activity adds only the GPMC, you can easily install additional features
from the Windows Features dialog box.
Launch Windows Explorer and locate the RSAT file you downloaded. Double-click the file to open it. When prompted to install an update (KB958830), click Yes to continue. Review the license terms, and select I Accept. When the installation completes, click Close. Microsoft Help will launch with information on RSAT. Click Start => Control Panel => Programs. Click Turn Windows Features On Or Off. Expand
the Remote Server Administration Tools, and select Group Policy
Management Tools. If desired, select additional tools to install. Click
OK. After a moment,
the installation will complete. The Group Policy Management console will
be available via the Administrative Tools menu. Launch the GPMC using one of two methods. Click Start, type Group in the Start Search box, and press Enter. If Administrative Tools is on the Start menu, click Start => Administrative Tools => Group Policy Management.
|
|
You can add the Administrative
Tools menu to the Start menu with the following steps. Right-click Start
and select Properties. Click Customize from the Start Menu tab. Scroll
down to the bottom, and select Display On The All Programs Menu And The
Start Menu. Click OK twice.
|
|
As long as you're logged on
to a domain account with permissions to at least read Group Policy in
the domain, you'll be able to launch and view the Group Policy
Management console. Members of the domain Administrators, Domain Admins,
and Enterprise Admins groups will be able to create and apply GPOs.
Exercise 3 shows how to navigate the GPMC and a GPO.
Launch Group Policy Management by clicking Start => Control Panel. Enter Admin in the Control Panel Search text box and select Administrative Tools. Double-click Group Policy Management. Expand Forest =>
Domains and your domain. Right beneath your domain name, you'll see the
Default Domain Policy. This policy applies to all users and computers
in the domain. Expand
Domain Controllers. You'll see the Default Domain Controllers Policy.
This policy applies to the Domain Controllers OU. Because only domain
controllers should be in the Domain Controllers OU, this policy will
typically be applied only to domain controllers. With
Domain Controllers selected, select the Group Policy Inheritance tab in
the main window. Your display will look similar to the following
graphic. You can see that this OU has two GPOs that will apply. The
Default Domain Controllers Policy is directly linked to the OU, and the
Default Domain Policy is inherited.

The Precedence
column identifies which GPO takes precedence. Because the Default Domain
Controllers Policy is applied after the Default Domain Policy, the
Default Domain Controllers Policy takes precedence and has a Precedence
value of 1. Expand
any of the OUs by clicking the plus (+) sign. If a GPO is linked to the
OU, it will show, but all OUs won't have GPOs directly linked. Expand
Group Policy Objects. You'll see the Default Domain Controllers Policy,
the Default Domain Policy, and any other GPOs that have been added
after the domain was created. Right-click
Group Policy Objects and select New. You can name the GPO whatever you
like, such as Practice GPO. Click OK. Note that while this GPO is
created, it's not linked to a site, domain, or OU, so it will not apply
to any clients. Right-click
the GPO and select Edit. This launches the Group Policy in the Group
Policy Management Editor. You can browse through the settings the same
way you can browse through the Local Computer Policy.
|
4. User vs. Computer Settings
As you've seen, Group Policy objects have two primary nodes:
- Computer Configuration
This node includes
settings that apply to computers, no matter which user is logged on.
These settings apply only if the computer is in the scope of the GPO.
- User Configuration
This node includes
settings that apply to a user, no matter which computer the user logs on
to. These settings apply only if the user is in the scope of the GPO.
On the surface, the
settings that apply are simple to understand. Computer settings apply to
computers, and user settings apply to users. However, there are a
couple of subtleties that sometimes elude administrators.
It's common for a user object and a computer object to be in the same
OU. But if the objects are in different containers, the settings are
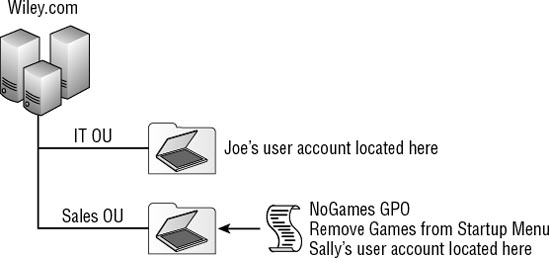
applied differently. For example, look at Figure 11.
The User account for Joe is in the IT OU, and he's logging on to a
computer in the Sales OU. The Sales OU has a GPO named NoGames that has
enabled Remove Games Link From The Start Menu in the User Configuration
node. This setting is located in the User Configuration => Policies => Administrative Templates => Start Menu And Taskbar node.
Because Joe's user
account is in the IT OU, the User Configuration settings on the Sales OU
GPO don't apply to his account. The link to the Games menu will remain
on his computer.
On the other hand, if Sally logs
on to the same computer, the Games link will be removed because her user
account is in the Sales OU.
|
Exercise 4
demonstrates how Group Policy works when the user object is in one OU
and the computer object is in another OU. It also demonstrates how you
can reverse the default behavior using loopback processing.
|
|
If there are any conflicting
settings between the User Configuration and the Computer Configuration
nodes, the User Configuration settings will take precedence. To make
this clear, it's important to know when GPOs are applied, and then you
can use the simple rule of the last GPO applied wins.
Computer GPOs applied
When the computer first
boots, the computer account retrieves all applied GPOs. If there are
any conflicts with any of these settings, the last setting applied wins.
The logon screen appears when Group Policy has been applied.
In addition, the computer
will check for updates or changes to computer Group Policy settings
every 90–120 minutes (90 minutes with a random offset of 30 minutes).
User GPOs applied
When a user first logs on,
all the GPO settings that apply to the user are retrieved. If there are
any conflicts with any of these settings, the last setting applied wins.
If there are any conflicts with the computer settings, the user
settings win. The desktop appears when Group Policy has been applied.
In addition, a system will
check for updates or changes to user Group Policy settings every 90–120
minutes (90 minutes with a random offset of 30 minutes).
|
You can improve
performance of Group Policy by disabling either the User or Computer
Configuration settings. For example, if there aren't any computer
settings in a GPO, you can right click over the policy in the Group
Policy Editor, select Properties, and then select the Disable Computer
Configuration Settings checkbox.
|
|
5. Forcing Group Policy Updates
When testing Group Policy
changes, you usually don't want to wait for the default refresh time. In
other words, when you modify a GPO, you don't want to wait 90 to 120
minutes to see if the setting has been applied as you configured it.
Instead, you can use the GPUpdate command from the command line.
GPUpdate is
commonly used to reapply all GPO settings for the currently logged-on
user and computer. Many of the common switches used with GPUpdate are listed in Table 1.
Table 1. GPUpdate switches
| Switch and Example | Comments |
|---|
| /Force
GPUpdate /Force | Reapplies all Group Policy settings. |
| /Target
GPUpdate /Target: Computer
GPUpdate /Target: User | Instead of reapplying both user and computer Group Policy settings, you can apply only the computer or user settings. |
| /Logoff
GPUpdate /Logoff | Causes
a logoff after the Group Policy settings have been updated if the
settings require a logon to be applied. This is good for some settings
that are processed only when the user logs on, such as Software
Installation and Folder Redirection settings. It has no effect if GPO
settings do not require a logon to be applied. |
| /Boot
GPUpdate /Boot | Causes
a computer restart after the Group Policy settings are applied if the
settings require a restart to be applied. This is good for some settings
that are processed only when the computer starts, such as Software
Installation settings. It has no effect if GPO settings do not require a
reboot to be applied. |
|
When using GPUpdate to update all GPO settings, it's best to use the /force command. Although documentation indicates that GPUpdate without the /force command will retrieve GPO settings that have changed, the results aren't consistent in practice. However, when you use the GPUpdate /force command, it will consistently update all of the settings. |
