2. Adding Drivers to a Boot Image
A boot image is like any other operating system. If
the hardware that it boots up on has hardware that has no native driver
support, then the device won't work. For an OSD boot image, that can be a
bit of a problem. What if there is no network card driver? You won't be
able to download an installation image. What if there is no mass
storage controller driver? You won't be able to see the hard disks and
therefore won't be able to install the operating system. A boot image
can be updated with drivers to allow access to those devices that would
otherwise be unavailable.
ConfigMgr allows you to do something that will be
familiar if you have worked with the Microsoft Deployment Toolkit.
Drivers can be imported into ConfigMgr and then added to a boot image.
The next sections will deal with the process of importing drivers into
ConfigMgr and updating the boot images.
This is a simple enough task. The hardest part can be
finding the right drivers and extracting them. You are looking to find a
folder that contains an INF and a SYS file. Sometimes you have to
extract a self-decompressing executable file or search through a cabinet
file.
In this exercise we are keeping a copy of the extracted drivers in the D:\Drivers folder, which can be found on the network as \\dep1oysrv\drivers$.
It is a good idea to have some sort of folder structure and naming
standard. This approach makes it easy to find OEM drivers and specific
versions, and enables you to keep track of, maintain, and/or replace
driver versions as manufacturers release them. It will also allow you to
maintain x86 and x64 drivers as well as drivers from different
manufacturers for similar but slightly different chipsets.
To add drivers to ConfigMgr, take the following steps:
Select the Drivers folder, right-click, and select Import. This opens the Import New Driver Wizard, which is shown in Figure 5.
You
have two options here. If you are adding many drivers you can choose
the "Import all drivers in the following network path (UNC)" option. You
can see that \\dep1oysrv\ drivers$\X64 is selected.
All folders within the specified UNC path will be searched for drivers.
This makes the process nice and easy. In this example we have two
folders in \\deploysrv\drivers$\. X64 contains all of the
64-bit drivers. We want to import them and categorize them as 64-bit
drivers. That will make it easier to update 64-bit boot images with just
the 64-bit drivers. There is also an X86 folder, allowing us to do the
same with 32-bit drivers.
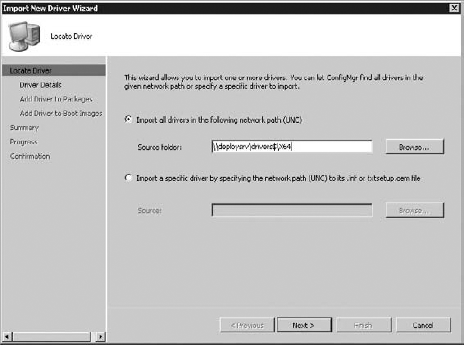
If you are adding just a single driver, then you can specify the exact folder where the driver's INF or txtsetup.oem file can be found. This will only import that driver instead of wasting time processing drivers that were already imported.
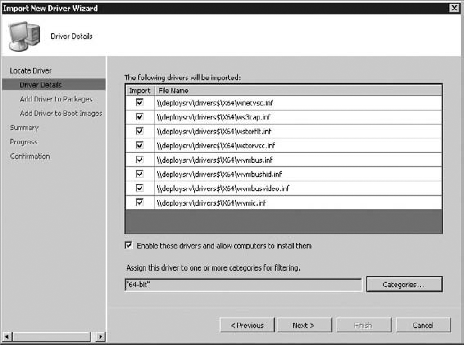
The Driver Details screen, in Figure 6,
displays every driver that was found in the location that you
specified. You can see that a check box beside each driver is selected
by default, indicating that the driver is to be imported. Clear this
check box if you do not want that driver. A check box at the bottom of
the list also informs us that, by default, these drivers will be enabled
and that computers will be able to install them. Clear this if you
want. At the bottom, click the Categories button to add the selected
drivers to a category. You can create new categories as well. You can
see that we have added the imported drivers to the 64-bit category,
making drivers easier to manage based on category.
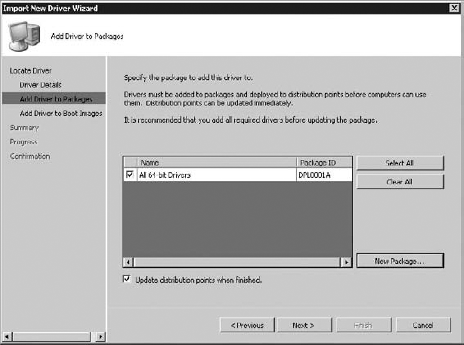
On the next screen, shown in Figure 7,
add your imported drivers to a driver package. You will want to do this
to allow drivers be added to newly built computers. You can select an
existing package or you can create a new package. A new package called
All 64-bit Drivers was created in \\deploysrv\packages$\Drivers\X64. Check the "Update distribution points when finished" check box at the bottom to save a few clicks.
|
Depending on your ConfigMgr architecture, some
distribution points might be in remote locations at the other end of
congested WAN links. You should work with ConfigMgr and network
administrators to decide how and when distribution points will be
updated. For example, would you want to replicate a large file across a 1
MB link while people are trying to work? This might be a scenario where
schedules will be used to update the distribution points.
|
Figure 8
shows the Add Driver To Boot Images screen. Here, decide if you want to
add your newly imported drivers to one or more existing boot images. We
will update the 64-bit boot image that we created earlier and check the
"Update distribution points when finished" check box. The newly updated
boot image will be automatically installed on the distribution points
when this wizard is complete.

|
Microsoft strongly recommends that only network and
mass storage controller drivers be added to boot images. Adding every
possible driver will unnecessarily increase the size of the boot image.
To do this, you would not add the drivers to the boot image during a
mass import. Instead, you would skip the Add Driver To Boot Images
screen, finish the import, categorize the drivers by function, and add
the network and mass storage controller drivers to your boot images.
|
When
the import is complete, you will be able to see your drivers in the
Drivers folder. You can select drivers and add them into other
categories such as Networking or Mass Storage Controllers. Verify that
the driver package was created in Driver Packages.
You
should repeat this process with the x86 or 32-bit drivers if you think
that there is a possibility that you will work with 32-bit machines in
the future.
|
Every time you modify a boot image, you need to
remember to update the distribution points. Failing to do so will mean
that you and users will continue to use the old boot image.
You can expand a package and view Package Status to
see the replication status of a package. The Targeted value shows how
many distribution targets are assigned with the package, and the
Installed value shows how many distribution points have the package.
|
Take
the time to view the properties of your boot images when they are
created. The Windows PE tab is especially interesting. Normally, the
ConfigMgr boot images disable the use of the command prompt. This can
make troubleshooting driver and network access issues very difficult.
You can enable this by checking the Enable Command Support (Testing
Only) check box. The bottom of this tab also allows you to update the
background for your boot image with a graphic of your choice, such as an
organization or IT department logo.
