Disk drives and devices with removable storage are formatted with a
filesystem. The filesystem allows you
to create and manage files. The format of the disk that you are working
with determines the file security options that are available. You can
format disks by using either File Allocation Table (FAT) or NT File System (NTFS). As discussed in the following
sections, FAT and NTFS are a bit different in the way they work.1. FAT Versus NTFS
Both FAT and NTFS come in several different variations, and in
some cases, the type of device you are working with determines which
variation is used. With FAT, the number of bits used with the allocation
table determines the variant you are working with and the maximum volume
size. You’ll find that USB flash devices and MP3 players with 4 GB or
less of storage are usually formatted with the 16-bit version of FAT. FAT16, also known simply as FAT,
defines its file allocation tables using 16 bits. FAT16 is used because
it is the most efficient version of FAT for volume sizes of up to 4
GB.
If you use devices with removable storage that have storage larger
than 4 GB, such as a removable hard disk, the device will in most cases
use the 32-bit version of FAT, known as FAT32. FAT32 defines its
file allocation tables using 32 bits, which allows you to have volumes
larger than 32 GB. Devices with removable storage use FAT because it has
no security controls, allowing you to access your data on multiple
computers simply by connecting your device to those computers.
On the other hand, NTFS allows you to control access to files and
folders by assigning permissions. At home, your computer will typically
have file access permissions only for accounts configured on the local
computer. At the office, your computer will typically have file access
permissions for accounts configured on the local computer as well as
accounts configured for your network. Although NTFS supports just about
any volume size you’ll want to work with, you can’t necessarily move
devices formatted with NTFS from one computer to another and gain access
to all the data on these devices. You may not be able to do this because
NTFS access permissions are set using accounts that are specific to a
single computer, to a network, or to both.
2. File Attributes
All files and folders, whether on FAT- or NTFS-formatted
disks, can be marked with attributes that give you
limited control over how a file or folder is used. The file attributes you can use are:
Read-only
Specifies that the file or folder is read-only and cannot be
modified.
Hidden
Specifies that the file or folder is hidden and can
be viewed only if the folder option “Show hidden files, folders,
and drives” is enabled.
System
Identifies a system file or folder that can be viewed only
if the folder option “Hide protected operating system files” is
disabled.
You can view or change the Read-Only and Hidden attributes on a
file or folder by completing the following steps:
In Windows Explorer, right-click the file or folder and select
Properties to display its Properties dialog box.
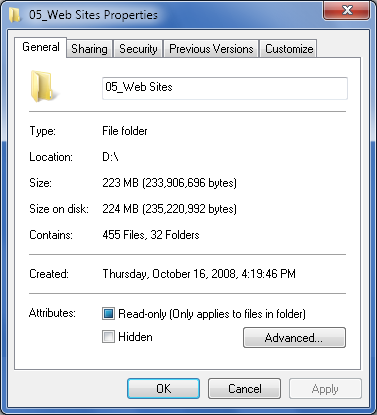
On the General tab, shown in Figure 1, select the
Read-only checkbox to make a file or folder read-only. Clear the
Read-only checkbox to allow a file or folder to be read and
modified.
To hide a file or folder so that it can be viewed only if the
folder option “Show hidden files, folders, and drives” is enabled,
select the Hidden checkbox. Otherwise, clear this checkbox to allow
a file or folder to be viewed normally.
Click OK to save your changes.
Generally, Windows 7 manages the System attribute. Windows 7 marks
files and folders that you shouldn’t modify as system files. You can
view files and folders marked with the hidden and system attributes by
completing the following steps :
In Windows Explorer, click Organize on the toolbar and then
select Folder and Search Options.
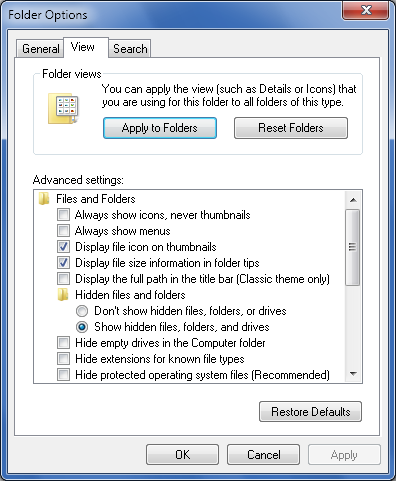
On the View tab, shown in Figure 2, select “Show hidden
files and folders” to show hidden files and folders.
To show system files and folders, clear the “Hide protected
operating system files” checkbox.
Click OK to save your settings.
Although these attributes can be set on files and folders, anyone
with access to a disk or device can override or change these settings.
This means that without additional permission controls, these attributes
provide no safeguards for file access or deletion that someone can’t
override easily.
3. NTFS Permissions
Access flags are your only choice for controlling how
files or folders are used with FAT, but NTFS allows you to control the
way files are used with both access flags and NTFS permissions. NTFS
permissions provide granular control over the way files and folders are
used. When you strip away all the needless stuff you really shouldn’t
worry about, NTFS permissions boil down to these five things:
Basic permissions
Top-level permissions that you can assign to user
and group accounts
Special permissions
Low-level permissions that you can assign to user and group
accounts
Ownership permissions
Permissions that identify a file or folder’s highest
permission holder
Inherited permissions
Permissions that are inherited from the folder in
which a file or folder is stored
Effective permissions
Permissions in effect for a particular user or group
based on the combination of all permissions assigned to that user
or group
You assign basic permissions and other permissions to the various
user and group accounts available on your computer or on your network.
Accounts on your computer include those accounts created by the
operating system as well as accounts you’ve created. Local accounts on
your computer are named using the following syntax:
ComputerName\AccountName
This means that if your computer is named DadsComputer and your
user account is Dad, you’ll see the account referenced as
DadsComputer\Dad.
Network accounts are named using the following syntax:
DomainName\AccountName
This means that if your workplace domain is TheOffice and your
user account is WilliamS, you’ll see the account referenced as
TheOffice\WilliamS.
If you want to manage permissions for multiple users, you will
typically do this using group accounts. Your computer has several
standard group accounts, including Administrators and Users. Any user
that is a member of your computer’s Administrators group has
administrator access permissions on your computer. Any user that is a
member of your computer’s Users group has user access permissions on
your computer. On a domain, your network has Administrators and Users
groups that apply to the entire network as well.
