3. Using a Remote Desktop Connection
If you've
enabled incoming remote connections on your PC at home or in the office
and verified that your network and firewall have the welcome mat out
(for visitors with suitable credentials only, of course), you're ready
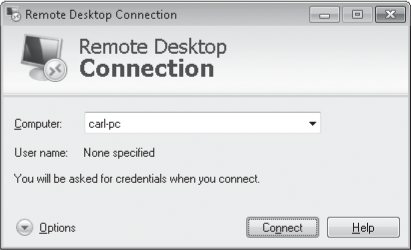
to begin using Remote Desktop Connection. In the Start menu search box,
type remote and then click Remote Desktop Connection. A dialog box like the one shown in Figure 1 appears. In the Computer box, type the name of the remote computer or its IP address.
Note:
After a successful connection to a remote desktop,
the name of the remote computer is added to the drop-down list in the
Computer box. Thereafter, you can simply select it from the list (if it
isn't already selected) instead of typing the name each time.
In addition, if
Remote Desktop Connection is pinned to your taskbar or Start menu (or if
it's in the Start menu's recently used list), the name of each computer
to which you've successfully connected appears on the Jump List. By
using the Jump List and saved logon credentials, you can bypass this
dialog box completely.
|
Your firewall blocks outbound access
If you use a
third-party firewall that blocks unknown outbound traffic to the
internet, it prevents your initial attempt to connect to your remote
desktop. Configure the firewall to enable Mstsc.exe (the file name of
the Remote Desktop Connection program) to make outbound TCP connections
on port 3389.
|
If you're willing to
accept the default settings (about which we'll go into great detail
later in this section), you can click Connect at this point. Here's what
happens next.
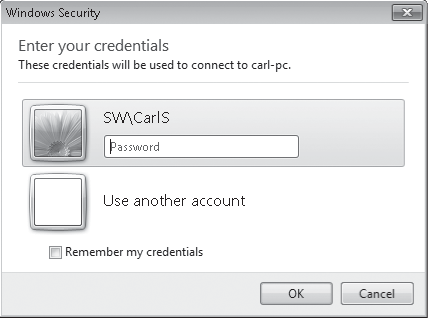
Are both your client
computer and the remote computer running Windows 7, Windows Vista, or
Windows Server 2008? In that case, your connection uses Network Level
Authentication and displays the Windows Security dialog box shown here.
After you enter your credentials and they're approved, Windows initiates
the Remote Desktop Connection.
When you connect to a
computer running Remote Desktop on an older version of Windows (such as
Windows XP or Windows Server 2003), the procedure is different. Windows
opens a Remote Desktop window (or switches to full screen) and initiates
a session to the remote computer, changes the background of the Remote
Desktop Connection window to match the settings on the remote machine,
and then displays a logon dialog box. When you enter approved
credentials, you're given access to your desktop.
If the account you used
for the remote connection is already logged on to the remote computer—or
if no one is logged on to the remote computer—the remote computer's
desktop appears on your computer, either in a window or a full-screen
display.
If a different user account
is logged on to the remote computer, Windows lets you know that you'll
be forcing that person to log off and gives you a chance to cancel the
connection. On the other end, the logged-on user sees a similar
notification that offers a short time to reject the remote connection
before it takes over. It's important to note that only one user at a
time can control the desktop of a computer running Windows. Whoever is
currently logged on has the final say on whether someone else can log
on.
While you're connected
to the remote computer, the local display (if it's turned on) does not
show what you see on the client computer, but instead shows the Welcome
screen. A person who has physical access to the remote computer can't
see what you're doing (other than the fact that you are logged on
remotely).
3.1. Changing Screen Resolutions and Display Settings
When you connect to a remote
computer using Remote Desktop Connection, the remote computer takes
over your entire screen. It uses the resolution of the client computer,
regardless of the resolution set on the remote computer. Along the top
of the screen, in the center, a small title bar appears. This title bar lets you switch between your own desktop and the remote desktop. The Minimize, Maximize, and Restore buttons work as they do in other programs.
The Pushpin button
locks the title bar in place. If you click the pushpin, the title bar
disappears completely, retracting into the top of the screen. To make
the title bar reappear, "bump" the mouse pointer to the top edge of the
screen. To keep the title bar visible at all times, click the pushpin
again. The Close button disconnects the remote computer (but does not
log you off the remote computer) and closes Remote Desktop Connection.
You can pick up where you left off by reopening Remote Desktop
Connection and reconnecting or by logging on locally at the remote computer.
|
If the title bar covers a
part of the screen that you need to see, you can move it instead of
hiding it altogether with the pushpin button. Simply slide it left or
right.
|
You might prefer to use less than your full screen resolution for the remote
desktop. (This option is especially useful if you have a large monitor
and the work you want with Remote Desktop is just another task among
several.) You must set the resolution—along with a number of other
options—before you connect to the remote computer. After you start
Remote Desktop Connection, click the Options button (shown in Figure 18-11) to expand the dialog box. Then click the Display tab, which is shown in Figure 2.
You can set the screen resolution to any size that is supported on the
client hardware, from 640 by 480 up to the current resolution of the
client computer (not the remote computer). Set it to full screen by
moving the slider all the way to the right.
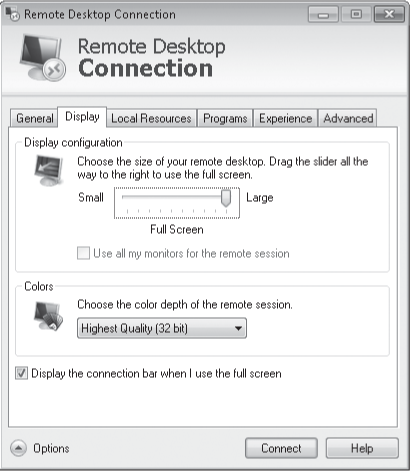
If you have a multimonitor setup at your local computer, you might be excited to learn that Remote Desktop allows the use of multiple
monitors. To configure the connection for use with more than one
monitor, select Use All My Monitors For The Remote Session.
3.2. Accessing Local Resources
While you use
Remote Desktop Connection, it's immediately apparent that you have
control of the remote computer. You see its desktop, Start menu, and so
on. That's terrific if the remote computer has everything you need. But
you'll often want to use local resources and information from the client
computer as well as from the remote computer. In addition, you might
want to move information between the two computers. With Remote Desktop
Connection, you can do so easily by clicking the Options button to
expand the Remote Desktop Connection dialog box to its full size, and
then adjusting any of the options on the Local Resources tab, shown in Figure 3.
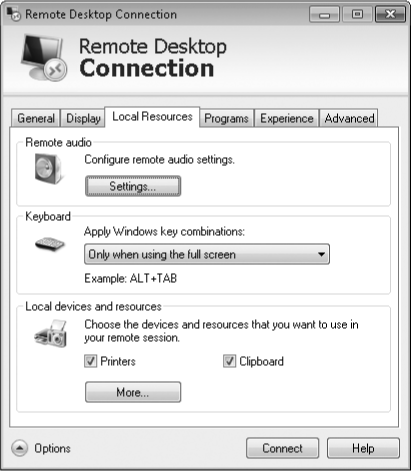
The following options are available:
Remote Audio
If your music collection is on the remote PC and you want some tunes at
your current location, click Settings and select Play On This Computer.
If you want both computers to be silent, choose Do Not Play. After
clicking Settings, you can also tell Remote Desktop Connection whether
to pay attention to the microphone (or other audio input) on the client
computer.
Keyboard When you press a Windows keyboard shortcut such as Alt+Tab, do you want to treat the Remote Desktop session as a window on the client computer, or do you want the remote session to handle your keyboard shortcuts?
Printers When this option is selected, your local printers appear in the remote computer's Printers folder. Their entries have "(from clientcomputername)" appended to each printer name. To print to a local printer, select its name in the Print dialog box from any application.
Clipboard
When you copy or cut text or graphics on either the remote computer or
the local computer, it's saved on the Clipboard in both locations. The
Clipboard contents are then available for pasting in documents on either
computer. Similarly, you can cut or copy files or folders from a
Windows Explorer window on either computer and paste them into a folder
on the other computer. Clear this option if you want to keep the
contents of the two Clipboards separate.
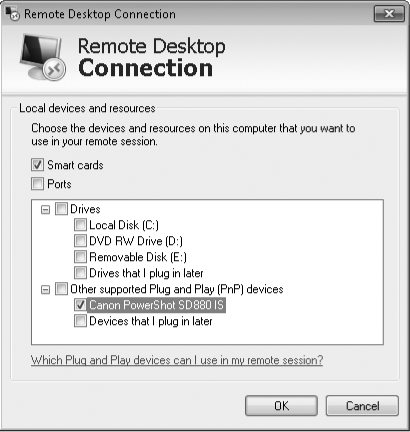
The More button leads
to additional devices in the Local Devices And Resources category. Smart
cards are automatically enabled, and serial ports are disabled by
default. Local drives and Plug and Play devices are also disabled by
default. They can be enabled individually in this dialog box, as shown
in Figure 4.
These options are most useful if you're expecting to do most or all of
your work with the Remote Desktop session in full-screen view and you
don't want to continually flip back to your local desktop for file
management tasks.
|
You receive a security warning when you try to log on remotely
Remote Desktop
Connection considers any connections to local hard drives to be a
potential security risk. As a result, you'll see an extra security
dialog box ("Do you trust this remote connection?") if you choose to
make any local drives or Plug and Play devices available on the remote
desktop. If you're comfortable with
the configuration you've chosen, click Connect. If you want to adjust
the connect settings, click the Details button to expand the dialog box.
Then clear the check box for any category of resources.
|
3.3. Using the Keyboard with Remote Desktop Connection
When the
Remote Desktop Connection window is active, almost every key you press
is passed to the remote computer. Certain key combinations, however, can
be processed by the client computer, depending on the setting you make
in the Keyboard section of the Local Resources tab of the Remote Desktop
Connection dialog box (shown in Figure 3). You can specify that the key combinations shown in the first column of Table 1 are sent to the remote computer all the time, only when the remote desktop is displayed in fullscreen mode, or never.
Table 1. Special Keys in Remote Desktop Connection
| Key Combination for Local Session | Equivalent Key Combination for Remote Desktop Session | Description |
|---|
| Alt+Tab | Alt+Page Up | Switches between programs |
| Alt+Shift+Tab | Alt+Page Down | Switches between programs in reverse order |
| Alt+Esc | Alt+Insert | Cycles through programs in the order they were started |
| N/A | Ctrl+Alt+Break | Switches the remote desktop between a window and full screen |
| Ctrl+Alt+Delete | Ctrl+Alt+End | Displays the Windows Security screen |
| Ctrl+Esc | Alt+Home | Displays the Start menu |
| Alt+Spacebar | Alt+Del | Displays the Control menu of the active window (does not work when using Remote Desktop in full-screen mode) |
| Shift+Print Screen | Ctrl+Alt+Plus Sign (on numeric keypad) | Captures a bitmap image of the remote desktop, and places it on the remote computer's Clipboard |
| Alt+Print Screen | Ctrl+Alt+Minus Sign (on numeric keypad) | Captures a bitmap image of the active window, and places it on the remote |
If you select On This Computer, key combinations from the first column of Table 1
are always applied to the client computer. To get the equivalent
function on the remote computer, press the key combination shown in the
second column. The same is true if you select Only When Using The Full
Screen and the remote session is displayed in a window.
If you select On The
Remote Computer, key combinations from the first column are applied to
the remote computer. Key combinations in the second column are ignored
(unless they have some function in the active application on the remote
desktop). The same is true if you select Only When Using The Full
Screen and the remote session is displayed in fullscreen mode. One
exception is the Ctrl+Alt+Delete combination, which is always applied to
the client computer. Regardless of your Local Resources tab setting,
you must press Ctrl+Alt+End to obtain the same result on the remote
computer. As an alternative, in the remote session open the Start menu
and choose Windows Security.
