5. Stopping or Changing Sharing of a File or Folder
If you want to stop
sharing a particular shared file or folder, select it in Windows
Explorer and click Share With, Nobody. Doing so removes access control
entries that are not inherited. In addition, the network share is
removed; the folder will no longer be visible in another user's Network
folder.
To change share permissions, choose Share With, Specific People. In the File Sharing dialog box ,
you add users, change permissions, or remove users. (To stop sharing
with a particular user, click the arrow by the user's name and choose
Remove.)
6. Setting Advanced Sharing Properties
With Advanced
Sharing, you configure network shares independently of NTFS
permissions. (For more information about this distinction, see the
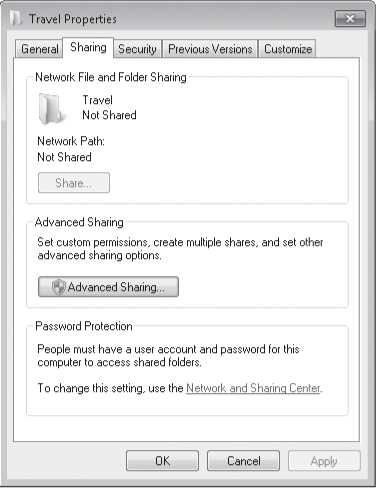
sidebar, How Shared Resource Permissions and NTFS Permissions Work Together on Section 18.2.6.) To open Advanced Sharing, right-click a folder, choose Properties, and click the Sharing tab. Or, if the Sharing wizard is disabled, select a folder and on the toolbar (or right-click menu) choose Advanced Sharing. Both methods display the Sharing tab, which is shown in Figure 3.
Note:
The Sharing tab is part of the properties dialog box for
a folder, but not for files. Also, when the Sharing wizard is disabled,
the Share button appears on the toolbar only when you select a single
folder. Only the Sharing wizard is capable of making share settings for
files and for multiple objects simultaneously.
To create or modify a network share using advanced settings, follow these steps:
On the Sharing tab, click Advanced Sharing to display the Advanced Sharing dialog box.
Select Share This Folder.
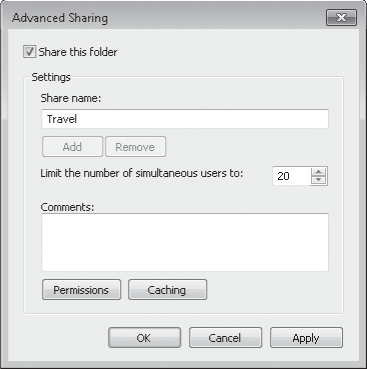
Accept or change the proposed share name.
Note:
If the folder is
already shared and you want to add another share name (perhaps with
different permissions), click Add and then type the name for the new
share.
The
share name is the name that other users will see in their own Network
folders. Windows initially proposes to use the folder's name as its
share name. That's usually a good choice, but you're not obligated to
accept it. If you already have a shared folder with that name, you'll
need to pick a different name.
Type a description of the folder's contents in the Comments box.
Other
users will see this description when they inspect the folder's
properties dialog box in their Network folder (or use Details view).
To limit the number of users who can connect to the shared folder concurrently,
specify a number in the box. Windows 7 permits up to 20 concurrent
network connections, which means that up to 10 users can access a share
at one time. (If you need to share a resource with more than 10 users at once, you must use Windows Server.)
Click Permissions.
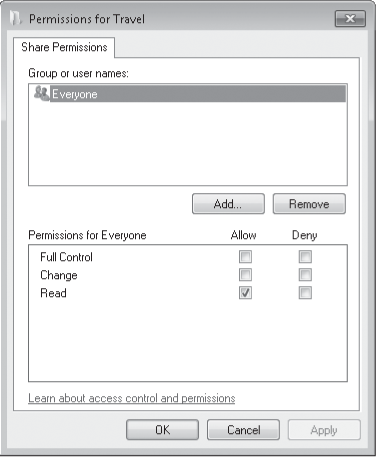
The default shared resource permission associated with a new share is Read access to Everyone.
Warning:
When you share a folder, you also make that folder's subfolders
available on the network. If the access permissions you set for the
folder aren't appropriate for any of its subfolders, either reconsider
your choice of access permissions or restructure your folders to avoid
the problem.
In the Group Or User Names list, select the name of the user or group you want to manage.
The shared resource permissions for the selected user or group appear below in the permissions list.
Select Allow, Deny, or neither for each access control entry:
Full Control
Allows users to create, read, write, rename, and delete files in the folder and its subfolders. In addition, users can change permissions and take ownership of files on NTFS volumes.
Change Allows users to read, write, rename, and delete files in the folder and its subfolders but not create new files.
Read Allows users to read files but not write to them or delete them.
If you select neither Allow nor Deny, it is still possible that the user or group
can inherit the permission through membership in another group that has
the permission. If the user or group doesn't belong to another such
group, the user or group is implicitly denied permission.
Note:
To remove a name from
the Group Or User Names list, select it and click Remove. To add a name
to the list, click Add to open the Select Users Or Groups dialog box,
where you can enter the names of the users and groups you want to add.
The implementation of shared resource permissions
and NTFS permissions is confusingly similar, but it's important to
recognize that these are two separate levels of access control. Only
connections that successfully pass through both gates are granted
access.
Shared resource permissions control network
access to a particular resource. Shared resource permissions do not
affect users who log on locally. You set shared resource permissions in
the Advanced Sharing dialog box, which you access from the Sharing tab of a folder's properties dialog box.
NTFS permissions
(also known as discretionary access control lists, DACLs) apply to
folders and files on an NTFS-formatted drive. For each user to whom you
want to grant access, you can specify exactly what that user is allowed
to do: run programs, view folder contents, create new files, change
existing files, and so on. You set NTFS permissions on the Security tab
of the properties dialog box for a folder or file.
It's important to recognize that the two types of permissions
are combined in the most restrictive way. If, for example, a user is
granted Read permission on the network share, even if the account has
Full Control NTFS permissions on the same folder, the user gets only read access when connecting over the network. In effect, the two sets of permissions
act in tandem as "gatekeepers" that winnow out incoming network
connections. An account that attempts to connect over the network is
examined first by the shared resource permissions gatekeeper. The account is either bounced out on its caboodle or allowed to enter with
certain permissions. It's then confronted by the NTFS permissions
gatekeeper, which might strip away (but not add to) some or all of the
permissions granted at the first doorway.
In determining the effective permission for a particular account, you must also consider the effect of group
membership. Permissions are cumulative; an account that is a member of
one or more groups is granted all the permissions granted explicitly to
the account as well as all permissions granted to each group of which
it's a member. The only exception to this rule is Deny permissions,
which take precedence over any conflicting Allow permissions.
