Convenient as it is, HomeGroup isn't appropriate for
all networks. First, it's designed for use in a home, where you fully
trust everybody. Hence, it has limited abilities for applying different
access requirements to various objects and on various users. Second,
HomeGroup works only on computers running Windows 7. Computers running
earlier versions of Windows or other operating systems must use
different methods for sharing and accessing network resources.
These methods are
fully supported in Windows 7 and can be used alongside HomeGroup if
desired. The underlying system of share permissions and NTFS permissions
for controlling access to objects remains in Windows 7.
1. Understanding Sharing and Security Models in Windows
Much like Windows Vista, Windows 7 offers two ways (aside from HomeGroup) to share file resources, whether locally or over the network:
Public folder sharing
When you place files and folders in your Public folder or its
subfolders, those files are available to anyone who has a user account
on your computer. (The Public folder replaces the functionality of the
Shared Documents folder in Windows XP.) Each person who logs on has
access to his or her own profile folders (Documents, Music, and so on),
and everyone who logs on (including members of the Guests group) has access to the Public folder. Settings
in Advanced Sharing Settings (accessible from Network And Sharing
Center), determine whether the contents of your Public folder are made
available on your network, and whether a user name and password is
required for access. If you turn on password-protected sharing, only
people who have a user account on your computer (or those who know the
user name and password for an account on your computer) can access files
in the Public folder. Without password-protected sharing, everyone on
your network has access to your Public folder files if you enable
network sharing of the Public folder. "Any folder" sharing
By choosing to share folders or files outside of the Public folder, you
can specify precisely which user accounts will be able to access your
shared data, and you can specify the types of privileges those accounts
enjoy. You can grant different access privileges to different users. For
example, you might enable some users to modify shared files and create
new ones, enable other users to read files without changing them, and
lock out other users altogether.
You don't need to
decide between sharing the Public folder and sharing specific folders
because you can use them both simultaneously. You might find that a mix
of sharing styles works best for you; each has its benefits:
Sharing specific
folders is best for files that you want to share with some users but not
others—or if you want to grant different levels of access to different
users. Public
folder sharing provides a convenient, logical way to segregate your
personal documents, pictures, music, and so on from those that you want
to share with everyone who uses your computer or your network. Public
folder sharing is the easiest to set up, although with the benefit of
the Sharing wizard, sharing a specific folder certainly isn't complex.
|
Windows veterans know that, in a workgroup environment, Windows XP has two sharing models, dubbed Simple File Sharing and classic sharing.
Simple File Sharing
is the default sharing model on all editions of Windows XP, except on
computers that are joined to a domain. In fact, with Windows XP Home
Edition, Simple File Sharing is the only
way to share files over a network. As it turns out, Simple File Sharing
is a little too simple, as it is notoriously inflexible and not very
secure. With Simple File Sharing, you can share only folders, not files.
When you do, they're available to all network users; you can't specify
different access permissions for different users. And your choice of
permissions for a shared folder is limited: full control or read only.
On the other
hand, classic sharing (which is largely unchanged from the sharing model
used in Microsoft Windows NT and Microsoft Windows 2000) can be quite
complex. Although classic sharing has tremendous flexibility, it also
causes lots of confusion. This confusion often leads to configuration
errors that end up with files being inaccessible to legitimate users or
wide open to anybody who stumbles onto your computer. Further
complicating matters is the poorly understood relationship between share
permissions (which control network access to shared objects) and
discretionary access control lists (DACLs) or NTFS permissions (which
control all access to a secured object, from network and local users
alike).
The same
technologies that underlie Simple File Sharing and classic file sharing
in Windows XP—namely, DACLs, share permissions, and user rights—power
sharing in Windows 7. Yet the implementation—primarily through
HomeGroup, the Sharing wizard, and Network And Sharing Center—is
radically different.
|
2. Configuring Your Network for Sharing
If you plan to share
folders and files with other users on your network, you need to take a
few preparatory steps. (If you plan to share only with others who use
your computer by logging on locally, you can skip these steps.)
Be sure that all computers use the same workgroup name. If all
computers on your network use Windows 7 or Windows Vista, this step
isn't absolutely necessary, although it does improve network discovery
performance. However, if you have a mixed network that includes some
computers running Windows XP or other earlier versions of Windows, it's
essential for enabling computers on the network to see each other.
Be sure that your network's location is set to home Network or Work Network. This setting provides appropriate security for a network in a home or office. Be sure that Network Discovery is turned on.
This should happen automatically when you set the location to Home
Network or Work Network, but you can confirm the setting—and change it
if necessary—in Advanced Sharing Settings, which is shown in Figure 18-5. To open Advanced Sharing Settings, in Network And Sharing Center, click Change Advanced Sharing Settings. Alternatively, in the Start menu search box, type sharing and then click Manage Advanced Sharing Settings. Select your sharing options, as described below. You set network sharing options in Advanced Sharing Settings, which is shown in Figure 1. File and printer Sharing
Turn on this option if you want to share specific files or folders, the
Public folder, or printers; it must be turned on if you plan to share
any files (other than media streaming) over your network. The
mere act of turning on file and printer sharing does not expose any of
your computer's files or printers to other network users; that occurs
only after you make additional sharing settings. public Folder Sharing
If you want to share items in your Public folder with all network users
(or, if you enable password-protected sharing, all users who have a
user account and password on your computer), turn on Public folder
sharing. If you do so, network users will have read/write access to
Public folders. With Public folder sharing turned off, anyone who logs
on to your computer locally has access to Public folders, but network
users do not. Media Streaming
Turning on media streaming provides access to pictures, music, and
video through streaming protocols that can send media to computers or to
other media playback devices. File Sharing Connections
Unless you have very old computers on your network, leave this option
set to 128-bit encryption, which has been the standard for most of this
century.
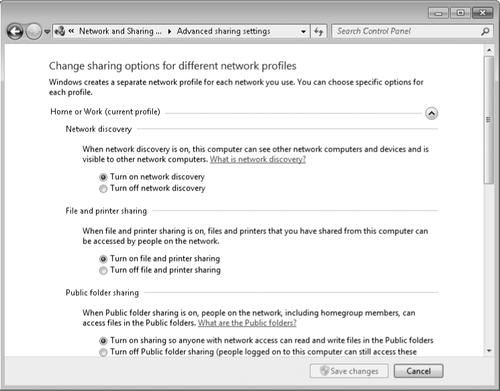
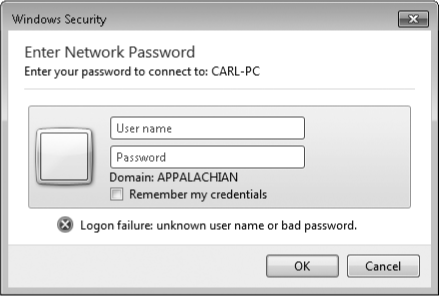
Password protected Sharing When password-protected
sharing is turned on, network users cannot access your shared folders
(including Public folders, if shared) or printers unless they can
provide the user name and password of a user account on your computer.
With this setting enabled, when another user attempts to access a shared
resource, Windows sends the user name and password that the person used
to log on to his or her own computer. If that matches the credentials
for an account on your computer, the user gets immediate access to the
shared resource (assuming permissions to use the particular resource
have been granted to that user account). If either the user name or the
password does not match, the user will be asked to provide credentials
in a dialog box like the one shown next.
With password-protected sharing turned off, Windows does not require a user name and password of network
visitors. Instead, network access is provided using the Guest account.
This is essentially the same as Simple File Sharing in Windows XP. HomeGroup Connections
If you use a homegroup for sharing, it's generally best to use the
default setting, Allow Windows To Manage Homegroup Connections
(Recommended). With this setting, when a user at a computer that is also
a homegroup member attempts to use a shared resource on your computer,
Windows connects using the HomeGroupUser$ account. When
a user connects from a computer that is not a homegroup member, Windows
first tries to authenticate using that person's logon credentials; if
that fails, Windows uses Guest (if password-protected
sharing is off) or prompts for credentials (if password-protected
sharing is on). If you select Use User Accounts And Passwords To Connect
To Other Computers, homegroup computers also work like non-homegroup
computers instead of using the Home-GroupUser$ account.
Set up user accounts.
If you use password-protected sharing, each person who accesses a
shared resource on your computer must have a user account on your
computer. They could, of course, use somebody else's existing account as
long as they know the user name and password. However, they'll be
required to enter that information each time they access the shared
resource. Although it requires some extra preparation time up front, in
the long run, you'll find it much easier to share resources over the
network if, on each computer that will have shared resources, you create
a user account for each user who will access those resources. Use the
same user name as that person uses on his or her own computer, and the
same password as well. If you do that, network users will be able to
access shared resources without having to enter their credentials after
they've logged on to their own computer.
If you're in a group of trusted users who have similar needs for access
to shared resources on your computer, you can forego the considerable
hassle of setting up identical accounts for each user on each computer.
Instead, on the computer with shared resources, create a standard user
account for accessing shared resources. (Call it Share, for example.)
You must assign a password to this account.
If the sharing computer is
in a homegroup, use HomeGroup in Control Panel to share the libraries
you want to share. These folders are automatically available to the user
named Share, because that account is a member of the HomeUsers group.
If the computer is not in a homegroup (or if you want to share folders
or files that are not in a library), you must share each object with the
Share account. In Advanced Sharing Settings, be sure that File And Printer Sharing and Password Protected Sharing are turned on.
You can then access the shared items from another computer on your network.
When prompted, a user must enter the user name (Share, in our example)
and its password. This method works well for any type of client that
needs access to your computer's shares, including computers running OS
X, Linux, and earlier versions of Windows.
|
