Unlike Windows XP, which provides a radically different logon experience for computers joined to a domain
compared with those in a workgroup or not connected to a network, the
process is similar for all users of Windows 7. The key differences:
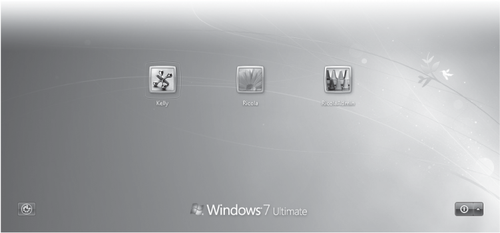
By default, on a computer joined to a domain, users must press Ctrl+Alt+Delete before the logon screen appears. This requirement can be removed from domain computers or added to others, as described in the following tip. The Welcome screen for a workgroup or standalone computer shows an icon for each account on the computer, as shown in Figure 1. By contrast, after pressing Ctrl+Alt+Delete, a domain user sees only one user account, along with a Switch User button
that enables you to log on using an account other than the one shown.
(This is the same screen that a workgroup user with a password-protected
account sees after clicking his or her account name.)
|
On a domain-based computer, if you don't want to be bothered by pressing Ctrl+Alt+Delete to reach the logon screen, make the following change:
Open User Accounts in Control Panel, and then click Manage User Accounts to open Advanced User Accounts. In the User Accounts dialog box that appears, click the Advanced tab. Under Secure Logon, clear Require Users To Press Ctrl+Alt+Delete.
Be aware that doing so
removes a security feature. Because the design of the Windows security
system prevents any other application from capturing this particular key
combination, pressing Ctrl+Alt+Delete ensures that the next screen that
appears, the logon screen, is displayed by the operating system and not
by a rogue application that's trying to capture your password, for
example.
|
|
On a computer joined to a domain, by default the name and picture of the last user who logged on appears on the logon
screen. On a system that's used primarily by a single user, this is a
convenient feature that allows the user to log on again without typing
his or her name each time. For a computer that's shared by many users,
you might prefer not to show the last user. You can prevent the
last-used name from appearing by typing secpol.msc at an elevated
command prompt to open Local Security Policy. In Local Security Policy,
open Local Policies\Security Options. Then enable the policy setting
named Interactive Logon: Do Not Display Last User Name.
|
1. Customizing the Logon Screen
You probably don't spend
much time looking at the logon screen; after all, whenever you're using
your computer you're already logged on. Nonetheless, you might prefer a
different image for the desktop background. Or, if you have difficulty
reading the text on the logon screen, you can use a higher dots per inch
(DPI) setting.
1.1. Setting a Custom Desktop Background
To use a desktop background other than the default image shown in Figure 16-7 (or one provided by the manufacturer of your computer), follow these steps:
In the Start menu search box, type regedit and press Enter to open Registry Editor. In Registry Editor, navigate to the HKLM\Software\Microsoft\Windows\ CurrentVersion\Authentication\LogonUI\Background key. If a DWORD value named OEMBackground does not exist, create one. Set this value's data to 1. In Windows Explorer, navigate to %Windir%\System32\Oobe\Info\Backgrounds. (If the subfolders of Oobe do not exist, create them.) Copy the image you want to this folder, using these guidelines: The image must be in .jpg format, and the file size cannot exceed 256 KB. Scale the image to the pixel dimensions of your primary monitor's native (or default) resolution, and name the file Backgroundwwwxhhh.jpg, where www and hhh represent the width and height, in pixels (for example, Background1600x1200.jpg). Because
this feature doesn't support all screen resolutions, create a copy of
the image file and name it BackgroundDefault.jpg. If Windows is unable
to use the resolution-specific image, it uses this one and stretches it
to fit.
If that procedure sounds too daunting, download the Tweaks.com
Logon
Changer, a utility that compresses your image file (to stay under the
file-size limit) as well as safely diving into the registry and deeply
nested folders for you.
2. Making the Logon Text Bigger
If you use a high-DPI
setting to enlarge text while you're logged on, you might be
disappointed to see that your setting doesn't apply to the logon screen.
To remedy that situation, follow these steps:
In the Start menu search box, type regedit and press Enter to open Registry Editor. In Registry Editor, navigate to the HKU\.Default\Control Panel\Desktop key. If a DWORD value named LogPixels does not exist, create one. Double-click
the LogPixels value. Be sure that Base is set to Decimal, and then set
the value to the desired resolution in dots per inch. The default
setting is 96 DPI; larger values increase the text size. For example, setting the value to 120 increases the size by 25 percent. (96 times 1.25 is 120.)
Log off to see the
changes. The first time each user logs on after making this change,
Windows applies the new DPI setting to the user's desktop as well as the
logon screen. Users who want to change to a different text size can do
so by visiting Display in Control Panel.
|
Context menus are unreadable after setting the logon screen text size
You might discover
that, after setting the logon screen text to a comfortably legible
size, the text for context menus (right-click menus) and other items has
become microscopic. The fix is easy: open Personalization and select a
different theme.
|
2. Bypassing the Logon Screen
If your computer has only
one user account (aside from built-in accounts, such as Administrator
and Guest), and if that user account doesn't have a password, Windows automatically logs on that user during startup. You won't see the Welcome screen or any other logon screens; Windows launches straight to your desktop.
You might want to set up your computer to log on automatically
even if it has more than one user account and even if your preferred
user account is password-protected. This kind of logon can be convenient
in several situations: if you're the primary user of the computer but
other people occasionally need to use it; if you occasionally need to
log on as a different user to install software or perform other tasks;
or if you have set up a password for your account (so that you can use
scheduled tasks or connect remotely, operations that are available only
to accounts with passwords), but you still want it to log you on
automatically at startup.
Warning:
Automatically logging on
means that the system effectively enters your user name and password
when you turn on the power. Anyone who has physical access to your
computer can then log on as you and have access to all computer
resources (including websites for which you've saved passwords) that you
normally have.
If your computer is not joined to a domain, you can set it up to log on automatically by following these steps:
At a command prompt, type netplwiz to open Advanced User Accounts.
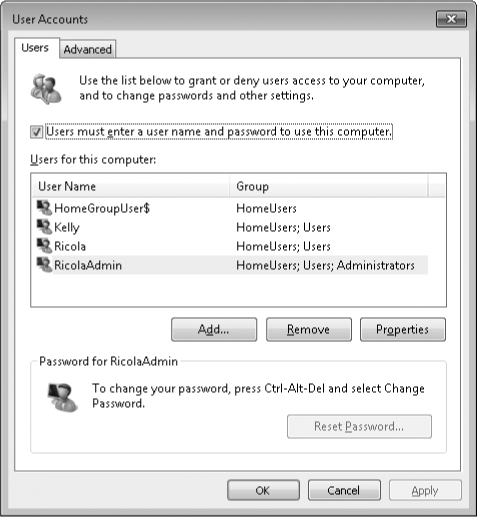
On
the Users tab, clear the Users Must Enter A User Name And Password To
Use This Computer check box and then click OK. Note that the Users Must
Enter A User Name And Password To Use This Computer check box doesn't
appear if your computer is a member of a domain. Only computers that
aren't part of a network or are part of a workgroup can bypass the logon
screen. Domain users must enter a user name and password, even to log
on locally. The Automatically Log On dialog box appears.
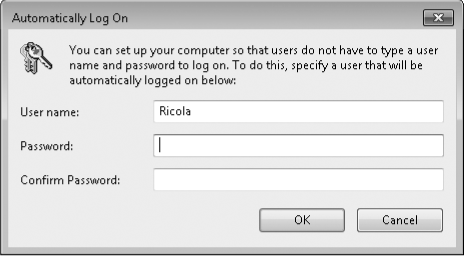
Type the user name and password for the account that you want to be logged on each time you start your computer. After you make this change, you can use other accounts on the computer by logging off and then logging on to another account or by using Fast User Switching. Users of any computer—those joined to a domain as well as workgroup and standalone computers—can configure automatic
logon by downloading and using a free utility named Autologon, which
was created by Mark Russinovich at Sysinternals (now part of Microsoft).
|
Bypass automatic logon or prevent others from bypassing
it If you've configured your system to log on automatically, you can
suppress the automatic logon by holding down the Shift key as the system
boots. If you want to prevent users from bypassing the automatic logon
(thereby ensuring that your system always starts with a particular
account), you can use a registry setting to make the system ignore the
Shift key. Use Registry Editor to navigate to HKLM\Software\Microsoft\
WindowsNT\CurrentVersion\Winlogon. If the string value
IgnoreShiftOverride doesn't exist, create it. Set this value to 1 to
ensure that your system always starts with its auto-logon account.
|
3. Logging Off, Switching Users, or Locking Your Computer
When you're finished using
your computer, you want to be sure that you don't leave it in a
condition in which others can use your credentials to access your files.
To do that, you need to log off, switch users, or lock your computer:
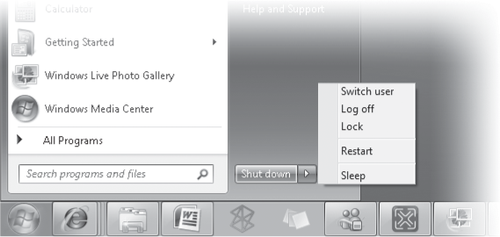
Log Off
With this option, all your programs close and dial-up connections are
ended. To log off, click the arrow in the lower right corner of the
Start menu and click Log Off. (See Figure 2.) Switch User
With this option (sometimes called Fast User Switching), your programs
continue to run. Your account is still logged on, but (if it's protected
by a password) only you can return to your session. To switch users,
click the arrow in the lower right corner of the Start menu and click
Switch User. This takes you to the Welcome screen, where you can click
the name of the account you want to switch to. Fast
User Switching, a feature that made its first appearance in Windows XP,
allows multiple users to be logged on to a computer at the same time.
As the feature name suggests, you can quickly switch among users. This
might be convenient, for example, if one user logs on, opens several
documents, and begins downloading a huge file from the internet.
Meanwhile, another user comes along and wants to quickly check e-mail.
No problem: the second user can log on, log off, and return control to
the first user. While the second user is logged on, the first user's applications (such as the download process) continue to run. Lock
With this option, your programs continue to run, but the logon screen
appears so that no one can see your desktop or use the computer. Only
you can unlock the computer to return to your session; however, other
users can log on in their own sessions without disturbing yours. To lock
a computer, click the arrow in the lower right corner of the Start menu
and click Lock.
In any case, if you want
to prevent others from using your account, you must protect your account
with a password. When you choose any of these options, Windows hides
whatever you were working on. Your computer continues to run (subject to
power management settings), and any resources shared by your computer
remain available to other users on the network.
|
To lock your computer, you can press Windows logo key+L (You might also find it more convenient to use this shortcut for switching
users; the only difference is that it takes you to the logon
screen—which has a Switch User button—instead of to the Welcome screen.)
For any of these actions—log off, switch users, or lock—you can start by pressing Ctrl+Alt+Delete, which displays a menu that includes all three options.
|
|
