When you install Windows 7 on a new computer, you
create one user account, which is an administrator account. If you
upgrade to Windows 7 from Windows Vista and you had local accounts set
up in your previous operating system, Windows migrates those accounts to
your Windows 7 installation. Accounts that you migrate from Windows
Vista maintain their group memberships and passwords.
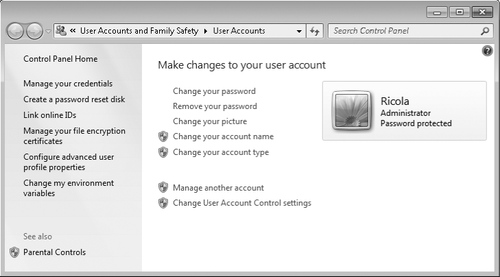
Through User Accounts in
Control Panel, Windows provides a simple post-setup method for creating
new accounts, making routine changes to existing accounts, and deleting
accounts. When you launch User Accounts in Control Panel, you'll see a
window similar to the one shown in Figure 1.
|
You can jump straight into User
Accounts without going through Control Panel. Simply open the Start
menu and click the account picture in the upper right corner of the Start menu.
|
If your computer is a
member of a domain, User Accounts has far fewer options; you can change
your picture and change your password. In a domain environment, all
management of user accounts beyond these basic tasks and those shown in
the left pane of User Accounts is normally handled at the domain level.
You can manage local accounts on a domain-joined computer using the
Advanced User Accounts Control Panel. For more information, see Section 16.2.6 on Section 16.2.6.
1. Creating a New User Account
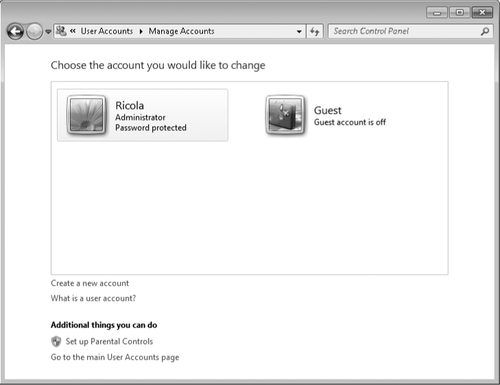
To create a new user account, in the User Accounts window shown in Figure 1,
click Manage Another Account. The Manage Accounts window appears, as
shown in Figure 2. (To get there directly, in the main Control Panel
window click Add Or Remove User Accounts, under User Accounts And
Family Safety.)
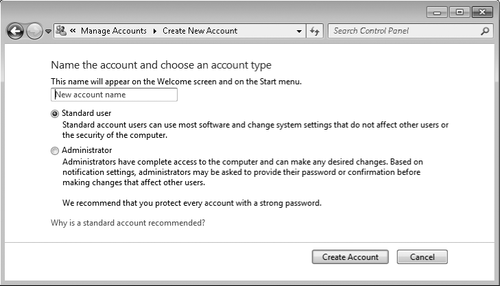
Click Create A New Account, which takes you to the window shown in Figure 3,
where you can create a new account with a minimum of fuss. You need to
supply only a name for the account and decide whether you want to set up
the account type as standard user or administrator.
Note:
The name you provide when you create a new account with Windows is used for both the user name and the full name. The user name
is the primary name used internally by Windows. You use it when you log
on without the benefit of the Welcome screen (such as in certain
networking situations) and when you specify the account name in various
commands and dialog boxes for setting permissions. The full name
is the name that appears on the Welcome screen, at the top of the Start
menu, and in User Accounts. You can change either name at any time
after the account is created.
If you want to specify
any other information about the account—including setting a password—you
must make changes after you create the account, as described in the
following section. Alternatively, you can use the Local Users And Groups
snap-in or the Net User /Add command, both of which allow you to create
an account and make several other settings simultaneously.
2. Changing Account Settings
Making routine changes to an account is easy with User Accounts. To change your own account, start at the main User Accounts page, shown in Figure 1.
To change another user's account (you must have administrative
privileges to do so), click Manage Another Account to display the page
shown in Figure 2,
and then click the name of the account you want to change. You'll see
links to options similar to those you can make to your own account.
In this window, you can
make the following account changes to your own account or (if you're an
administrator) other accounts on your computer:
Account name Although User Accounts doesn't explain the distinction, when you change the name here you're changing
the full name (the one that appears on the Welcome screen, on the Start
menu, and in User Accounts), not the user name. (You must have
administrator privileges to change the account name.)
Password
You can create a password and store a hint that will provide a reminder
for a forgotten password. If the account is already password protected,
User Accounts allows you to change the password or remove the password.
Picture
If you don't want a user to be identified as a flower (or whatever icon
Windows selects for the account), you can change the picture associated
with the account name on the Welcome screen, at the top of the Start
menu, and in User Accounts. Clicking the change-picture link shows all
the pictures
stored in %AllUsersProfile%\Microsoft\User Account Pictures\Default
Pictures, but you're not limited to those choices. Click Browse For More
Pictures, and you can select any picture in bitmap, GIF, JPEG, or PNG
format, such as a picture of yourself or a favorite scene. Windows
reduces and crops the picture to fit the picture box.
Parental Controls
Clicking this link takes you to Parental Controls, where you can place
restrictions on the user by limiting the hours of use, filtering web
content, and specifying which games and other programs can be run. You
must have administrator privileges to view or change Parental
Controls settings, and you can't configure Parental Controls settings
for administrator accounts.
Account type With User
Accounts, you can change the account type to Administrator (which adds
the account to the Administrators group) or Standard User (which adds
the account to the Users group). If you want to add the account to other
groups, you must use Advanced User Accounts, Local Users And Groups, or
the Net Localgroup command. For more information about those
alternatives, see Section 16.2.6 on Section 16.2.6. (You must have administrator privileges to change the account type.)
For your own account
(that is, the one with which you're currently logged on), you can make
the following additional changes by clicking links in the left pane:
Manage Your Credentials
This link opens Credential Manager (known as Stored User Names And
Passwords in earlier Windows versions), which lets you manage stored
credentials that you use to access network resources and websites.
Create A Password Reset Disk This link launches the Forgotten Password wizard, from which you can create a password reset disk.
Link Online IDs With Link
Online IDs, you can associate an online ID (a Windows Live ID, for
example) with your user account in Windows. Depending on the online ID
provider, linking an
account in this way might enable you to share resources in a homegroup
in new ways or to access your data from any computer signed in to the
online ID.
Manage Your File Encryption Certificates This link opens a wizard that you can use to create and manage certificates that enable the use of
Encrypting File System (EFS). EFS, which is available only in Windows 7
Professional and above, is a method of encrypting folders and files so
that they can be used only by someone who has the appropriate
credentials.
Configure Advanced User Profile Properties This link is used to switch your profile between a local profile (one that is stored on the local computer) or a roaming
profile (one that is stored on a network server in a domain
environment). With a local profile, you end up with a different profile
on each computer you use, whereas a roaming profile is the same
regardless of which computer you use to log on to the network. Roaming
profiles require a domain network based on Windows Server. To work with
user profiles
other than your own, in Control Panel open System, click Advanced System
Settings; on the Advanced tab, click Settings under User Profiles.
Change My Environment Variables
Of interest primarily to programmers, this link opens a dialog box in
which you can create and edit environment variables that are available
only to your user account; in addition, you can view system environment
variables, which are available to all accounts.
Manage Your Fingerprint Data
This link, which appears only on computers with an installed
fingerprint reader or similar biometric device, provides a path to the
program (usually provided by the manufacturer of the biometric device)
in which you register and manage fingerprints to be used for logging on.
3. Using the Guest Account for Visitors
The Guest account is
designed to allow an infrequent or temporary user such as a visitor to
log on to the system without providing a password and use the system in a
restricted manner. By default, the Guest account is disabled; no one
can use an account that's disabled.
To enable the Guest account, open User Accounts, click Manage Another
Account, and click the Guest account icon. In the window that appears,
click Turn On. The Guest account thereafter shows up on the Welcome
screen, and anyone can use it. Users of the Guest account have access to
items in the Public folder as well as those in the Guest profile.
