4. Deleting an Account
You can delete any
account except one that is currently logged on. To delete an account,
open User Accounts, click Manage Another Account, and click the name of
the account you want to delete. Then click Delete The Account. User
Accounts gives you a choice, shown in Figure 4, about what to do with the account's files:
Delete Files
After you select Delete Files and confirm your intention in the next
window, Windows deletes the account, its user profile, and all files
associated with the account, including those in its Contacts, Desktop,
Documents, Downloads, Favorites, Links, Music, Pictures, Saved Games,
Searches, and Videos folders. Keep Files
Windows copies certain parts of the user's profile—specifically, files
and folders stored on the desktop and in the Documents, Favorites,
Music, Pictures, and Videos folders—to a folder on your desktop, where
they become part of your profile and remain under your control. The rest
of the user profile, such as e-mail messages and other data stored in
the AppData folder; files stored in the Contacts, Downloads, Saved
Games, and Searches folders; and settings stored in the registry will be
deleted after you confirm your intention in the next window that
appears.

Note:
User Accounts won't
let you delete the last local account on the computer, even if you're
logged on using the account named Administrator. This limitation helps
to enforce the sound security practice of using an account other than
Administrator for your everyday computing.
After you delete an account, of course, that user can no longer log on. Deleting an account also has other effects you should be aware of. You cannot restore access to resources
that currently list the user in their access control lists simply by
re-creating the account. This includes files to which the user has
permission and the user's encrypted files, personal certificates, and
stored passwords for websites and network resources. That's because
those permissions are linked to the user's original SID—not the user
name. Even if you create a new account with the same name, password, and
so on, it will have a new SID, which will not gain access to anything
that was restricted to the original user account.
You might
encounter another predicament if you delete an account. If you use a
tool other than User Accounts to delete the account, the user's original
profile remains in the Users folder. If you later create a new account
with the same name, Windows creates a new profile folder, but because a
folder already exists with that user's name (for example, C:\Users\
Jan), it appends the computer name to the user name to create a
convoluted folder name (for example, C:\Users\Jan.Sequoia). The extra
folder not only consumes disk space, but leads to confusion about which
is the correct profile folder. (In general, the one with the longest
name is the most recent. But you can be certain only by examining files
in the profile folder.) To avoid this problem, use User Accounts to delete accounts because it properly deletes the old profile along with the account.
|
If you delete an account
with a tool other than User Accounts, the account's profile continues to
occupy space in the Users folder and in the registry. You don't want to
delete the files or registry entries directly because a simple mistake
could affect other accounts. Instead, in Control Panel open System and
click Advanced System Settings. Click the Advanced tab and then click
Settings under User Profiles. Select the account named Account Unknown
(the deleted account), and click Delete.
|
5. Effectively Implementing User Accounts on a Shared Computer
Whether you're setting up a computer for
your family to use at home or to be used in a business, it's prudent to
set it up securely. Doing so helps to protect each user's data from
inadvertent deletions and changes as well as malicious damage and theft.
When you set up your computer, consider these suggestions:
Control who can log on.
Create accounts only for users who need to use your computer's
resources, either by logging on locally or over a network. Delete or
disable other accounts (except the built-in accounts created by
Windows). Change all user accounts except one to standard accounts.
You'll need one administrative account for installing programs,
creating and managing accounts, and so on. All other accounts—including
your own everyday account—can run with standard privileges. If you are
the de facto administrator for a computer, we recommend that you create
two accounts for yourself: a standard account that you normally use for
logging on, and an administrator account that you can use for elevation
when needed. It's
easy to set up accounts this way. If you're working with a freshly
installed version of Windows 7 on which you haven't yet installed
applications or made personalizations to the single account created
during setup, use that account as your administrator account. (If you've
already given it your name during setup, you might want to modify the
name to indicate that it's your administrative account. See Section 16.2.2 on Section 16.2.2
for details.) Create a new standard account to use as your everyday account. (See Section 16.2.1 on Section 16.2.1.)
Log off, and then log on with your standard account. Whenever Windows
requires elevation, it displays the name of your administrator account;
enter its password to gain administrator privileges. |
Note that you'll
rarely, if ever, need to log on using your administrator account.
Instead, when Windows requires elevation while you're logged on with
your standard account, you simply enter the password for your
administrator account.
Certain programs
won't run (or are not fully functional) if you launch them while logged
on with a standard account. To get around obstacles like this, don't
log off and then log on with your administrator account. In most cases, a
better solution is to use the "run as administrator" feature. To do
that, right-click the program's shortcut (on the Start menu or in
Windows Explorer) and choose Run As Administrator. Alternatively, select
the shortcut and press Ctrl+Shift+Enter. Windows then prompts for your
administrator password.
A handful of
programs won't work, even with this trick. (Device Manager is an
example. If you start it from a shortcut in Control Panel while logged
on as a standard user, it displays settings but doesn't let you change
any settings. And its right-click menu doesn't include a Run As
Administrator command.) You can usually run such recalcitrant programs
by launching them from an elevated Command Prompt window. That is, run
Command Prompt as an administrator (in the Start menu search box, type
cmd, press Ctrl+Shift+Enter, and then enter your administrator password)
and then enter the program's executable name at the command prompt.
(For example, to run Device Manager as an administrator, in an elevated
Command Prompt window type devmgmt.msc. Device Manager then runs with
full functionality, exactly as if you had logged off and then logged on
with your administrator account.)
|
If
you've been using Windows for awhile and have already customized the
administrator account created during setup as your own, you're better
off keeping it as your everyday account. But you can still easily
implement this suggested practice. While logged on with your
administrator account, create a new administrator account, which will be
the account you use when Windows requires elevation. Then change your
current account to a standard account. (You must create the new
administrator account before you demote your account, because Windows
requires the existence of at least one administrator account.) Note that
you don't lose your administrator privileges until you log off; the
next time you log on with your (now standard) account, all your programs and personalizations remain exactly as before, but you now run with standard privileges. Be sure that all accounts are password protected.
This is especially important for administrator accounts and for other
accounts whose profiles contain important or sensitive documents. You
might not want to set a password on your toddler's account, but all
other accounts should be protected from the possibility that the tyke
(or your cat) will accidentally click the wrong name on the Welcome
screen. Restrict logon times.
You might want to limit the computing hours for some users. The easiest
way for home users to do this is with Parental Controls.
Restrict access to certain files.
You'll want to be sure that some files are available to all users,
whereas other files are available only to the person who created them.
The Public folder and a user's personal folders provide a general
framework for this protection. You can further refine your file
protection scheme by selectively applying permissions to varying
combinations of files, folders, and users. Turn on the Guest account only when necessary.
You might occasionally have a visitor who needs to use your computer.
Rather than logging on with your own account and exposing all your own
files and settings to the visitor, turn on the Guest account in such
situations.
6. Using Other Account Management Tools
Windows 7 includes no fewer than four different interfaces for managing users and groups:
User Accounts
Located in Control Panel, User Accounts provides the simplest method to
perform common tasks. Advanced User Accounts
If your computer is joined to a domain, clicking the Manage User
Accounts link in User Accounts opens Advanced User Accounts. (The title
bar of the dialog box doesn't include the word Advanced, however.) If
your computer is not joined to a domain, you can open this version by
typing netplwiz at a command prompt. The capabilities
of Advanced User Accounts are few (you can remove local user accounts,
set passwords, and place a user account in a single security group), but
it has a handful of unique features that you might find compelling.
With Advanced User Accounts, you can Change an account's user name.
Configure automatic logon. Eliminate the Ctrl+Alt+Delete requirement on domain-joined computers.
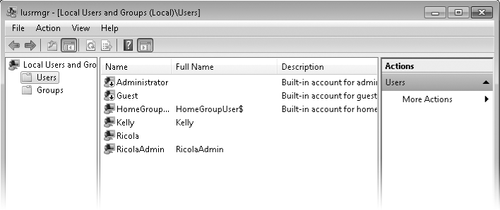
Local Users And Groups
This Microsoft Management Console (MMC) snap-in—which is available only
in Windows 7 Professional, Ultimate, and Enterprise editions—provides
access to more account management features than User Accounts and is
friendlier than command-line utilities. You can start Local Users And
Groups, shown in Figure 5, in any of the following ways: In Computer Management, open System Tools, Local Users And Groups. At a command prompt, type lusrmgr.msc. In Advanced User Accounts, click the Advanced tab, and then click the Advanced button.
Command-line utilities The Net User and Net
Localgroup commands, although not particularly intuitive (starting with
the name—we're talking about local accounts and groups, not
network-based accounts!), provide the most complete and direct access to
various account tasks. For
full details about the commands and parameters used with Net.exe for
managing user accounts and security groups, in a Command Prompt window,
type net help user | more or net help localgroup | more. For a succinct display of command syntax only, type net user /? or net localgroup /?.
You'll need to use an elevated Command Prompt window to change any
local user account or group information with Net User or Net Localgroup.
With varying degrees of
ease, all of these options allow an administrator to create, modify, and
delete local user accounts and security groups. The availability and
appearance of each of these options depends on which edition of Windows
you have (the Local Users And Groups console is not available in Starter
and Home Premium editions)
and whether your computer is a member of a domain. Which interface you
choose depends in part on whether you prefer a graphical interface or a
command prompt.
|
