5. Setting Up a Synchronization Schedule
Windows synchronizes
offline files, by default, about once every six hours. To set up
additional regular synchronization points, open Sync Center, click View
Sync Partnerships, click Offline Files, and then click Schedule on the
toolbar. You'll see a list of items that you can schedule, shown next.
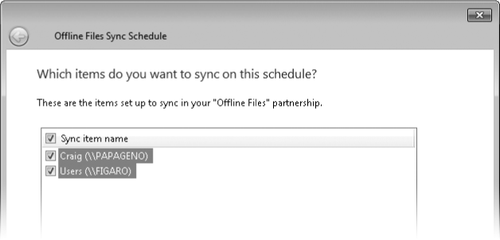
Make your selections and
click Next. On the following screens, you can choose to sync at a
scheduled time or on particular events.
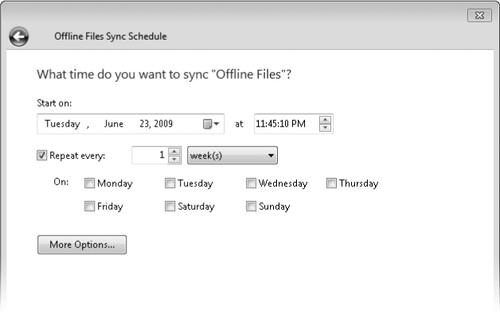
Click At A Scheduled Time
to set up a recurring schedule. In the Repeat Every setting, choose
minutes, hours, days, weeks, or months; for folders where frequent
updates are essential, you can specify that sync operations should occur
every n minutes or hours.
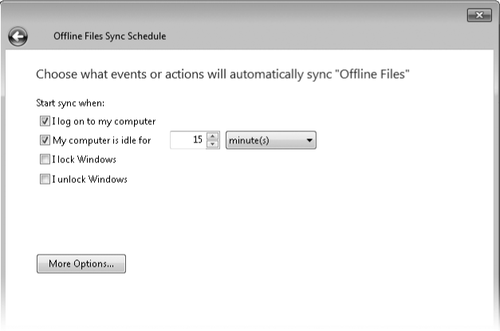
Click When An Event
Occurs to display the options shown next, where you can strike your own
personal balance between keeping files up to date and avoiding
interruptions to your work:
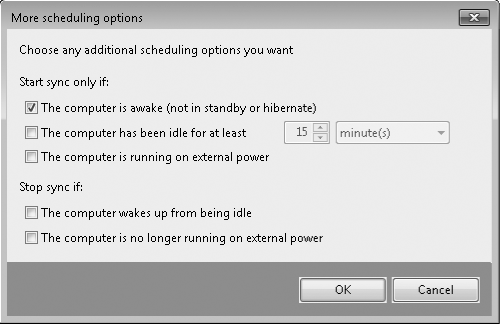
Regardless of which scheduling route you take, the More Options button leads to the dialog box shown in Figure 3, which allows you to favor power
management by allowing sync cycles only when you're running on external
power and pausing the schedule if the PC is asleep or hibernating.
6. Encrypting Offline Files
If the files you take
offline include private information, you might want to encrypt them. The
cached copies will then be hidden from all accounts but your own. To
encrypt your offline files, follow these steps:
Type offline files in Control Panel's search box.
Click Encrypt Your Offline Files.
On the Encryption tab of the Offline Files dialog box, click Encrypt.
Note that encrypting
offline files affects the cached copies only, and that once you have
exercised the encryption option, all subsequent additions to the cache
will also be encrypted.
7. Setting Caching Options on the Server
Our discussion of the
behavior of offline files and folders so far in this article has assumed
that the caching property of each network share accessed for offline
work is set at its default value. This value, called Offline Settings,
is one of three possible settings. To adjust the caching property, do
the following on the server computer:
Type fsmgmt.msc at a command prompt. This runs the Shared Folders management console.
In the console tree (the left pane), select Shares.
In
the details pane (the right pane), double-click the share whose
property you want to set (or right-click and then choose Properties).
On the General tab of the properties dialog box, click Offline Settings. The Offline Settings dialog box opens, as shown in Figure 4.
Note:
If you prefer, you
can access the Offline Settings dialog box directly from a shared
folder. Right-click the folder icon and choose Properties. On the
Sharing tab, click Advanced Sharing, and then click Caching in the
Advanced Sharing dialog box.
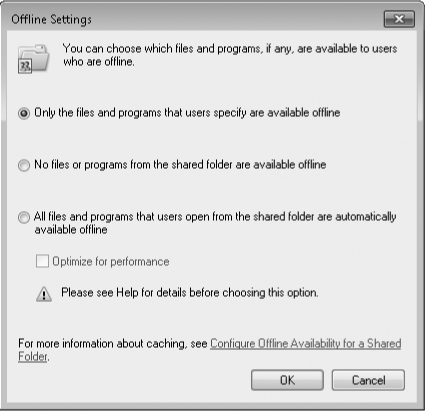
Choose the behavior you prefer for files in the shared folder:
The
default setting, Only The Files And Programs That Users Specify Are
Available Offline, stipulates that a computer connecting to the shared
folder from across the network will cache only those files and folders
that the user has explicitly marked as Always Available Offline.
The
second option, No Files Or Programs From The Shared Folder Are
Available Offline, completely disables caching of files from that share.
If you choose the third option, All
Files And Programs That Users Open From The Share Are Automatically
Available Offline, any file opened from a remote computer will be
automatically cached for offline use. When you open a cached document
from a client computer, the cached copy is used, but the original
document on the server
is also opened to prevent other people from changing the file while you
have it open. This setting is more convenient and easier to use than
the default manual caching. On the other hand, with automatic caching, Windows doesn't guarantee that your server
resources remain in the cache. How long they stay there, in fact,
depends on usage. As the amount of disk space you've allocated to the
cache is consumed, Windows discards any documents that have not been
used recently to make room for newer ones.
