2. Browsing Shared
Folders and Files
You've probably noticed the Homegroup node in the navigation pane of
Windows Explorer. Figure 4 shows an example.
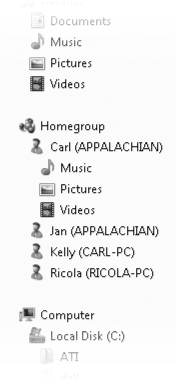
You can use folders and
files in the Homegroup
node just like you can use folders and files in your own libraries.
Tasks you can perform include
Preview and open files
Play music, pictures, or video
(notice the Play All button on the toolbar)
Search throughout a
folder, a library, a user, or the entire homegroup
Add a shared folder to one of your
local libraries
Add,
modify, and delete files (only in libraries or folders shared with
read/write access)
When you add a file to a
shared library on another computer (for example, by dragging a song file
to a shared Music library), the file goes into the library's public
folder (in our example, it would go to the %Public%\Music folder on the
remote computer).
|
You can add a link to the
Homegroup folder
to the right side of the Start menu, making it easy to browse homegroup
resources. To add the link, right-click the Start button and choose
Properties. On the Start Menu tab, click Customize. In the Customize
Start Menu dialog box, select Homegroup.
|
You can also
browse shared media libraries using Windows Media Player. Shared libraries
appear in the navigation pane under Other Libraries.
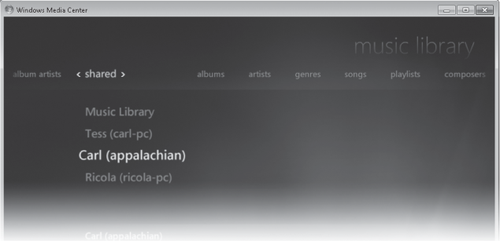
If you use Windows Media Center, you'll discover that
shared media files appear there too. In Media Center, choose the Shared
option above a gallery (music, pictures, videos, or recorded TV) to see a
list of shared libraries, as shown below.
|
With HomeGroup in
Windows 7, you cannot join multiple homegroups; you must leave one homegroup before you
can join another. Those who frequently visit another home, such as a
vacation home or the home of a trusted friend, might find this
limitation to be disappointing. However, there is a way to have an
"extended homegroup" that spans multiple physical locations. Suppose you
have two homes, each with a desktop computer, and a laptop computer
that travels between the homes. In the first home, have the desktop and
the laptop join a homegroup. Then take the laptop to the second home,
start it up and connect it to the network, and then join the second
desktop to the laptop's homegroup. Additional computers in each home can
also join the home-group. If the traveling laptop stores all your
music, for example, you'll be able to play it in whichever home the
laptop currently resides (or you can use the laptop to "play to" other
computers and devices). The laptop will also have seamless access to
shared resources in the home, including libraries and printers.
|
3. Streaming
Media in a Homegroup
Media streaming is the
process of delivering media (pictures, music, video, and recorded TV)
over a network in a continuous flow of data. With streaming, you can
play to network devices such as digital media receivers and digital
picture frames, as well as to computers. HomeGroup enables and
simplifies the streaming process. To enable streaming of media on your
computer to other devices, in HomeGroup (shown earlier in Figure 2), select Stream My Pictures, Music,
And Videos To All Devices On My Home Network.
4. Sharing a
Printer
In the bad old days of
home networking, many users found it easier to send a document that
needed to be printed via e-mail or USB flash drive to the computer with
an attached printer. HomeGroup greatly simplifies the process. If a
homegroup member computer has a printer connected to one of its USB
ports, and if the computer's user has chosen to share its printers (by
selecting the Printers check box in HomeGroup, shown in Figure 2), all homegroup users have access to that printer.
If the printer has
been certified by the Windows Logo Program, it shows up automatically in
the Devices And Printers folder of all homegroup users. HomeGroup
obtains the driver files from the host computer whenever possible or
downloads them from the internet if necessary (for example, if the host
computer runs 32-bit Windows and your computer has 64-bit Windows
installed), and then installs the driver without requiring any user intervention. (Note
that it might take a few minutes after joining or connecting to a
homegroup for HomeGroup to discover the shared printer and install the driver.)
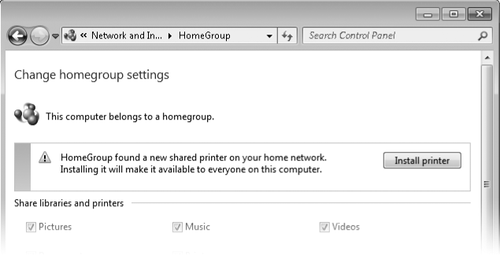
When you share a
printer that is not Windows Logo–certified, HomeGroup displays a popup
message to notify other homegroup members that a printer is available.
If you miss the pop-up, you can view the notification in HomeGroup, as
shown below. Click Install Printer to set it up on your computer. (The
reason for this extra step is security: HomeGroup won't install an
unsigned third-party driver without your consent.)
If the shared printer is
connected to a desktop computer (but not a laptop) that is in sleep
mode, sending a print request to the printer uses Wake On LAN to awaken
the computer so that it can perform the print job. After completing the
print job, the computer returns to sleep.
Windows sets the most
recently shared printer to be the default printer unless you have
manually selected a default printer. Note that it's the default printer
only for your home network, however. With a feature called Location Aware
Printing, if you have a mobile domain-joined computer that travels
between work and home, it retains its default printer on each network
and automatically changes the default to the home printer when you
connect to the home network.
5. Using
HomeGroup with a Domain-Based Computer
A computer that is
joined to an Active Directory domain (typically, a business network
based on Windows Server) can join a homegroup, making it easy and
productive to bring home a work computer and have access to home
resources such as media, documents, and printers. It's also secure, due
to differences in the way HomeGroup works on a domain-joined computer.
The principal difference is
that a domain-joined computer can see and use all shared resources in
the homegroup, but other homegroup members cannot see anything on the
domain-joined computer. (This is done to protect your business documents
and files from inadvertent access by others in your home.) When you
create or join a homegroup using a domain member computer, the dialog
box does not include any of the sharing options (Pictures, Music,
Videos, and so on) that appear for other homegroup users.
Some corporate
administrators might not relish the idea of you listening to music with Windows
Media Player or watching television with Windows Media Center while
you're working at home; those taskmasters can use Group Policy to
prevent the computer from joining a homegroup. (For details, see "Disabling HomeGroup," following.)
6. Leaving a
Homegroup
If you decide that HomeGroup
isn't for you (or, perhaps, you want to join a different home-group),
you can leave a homegroup. Open HomeGroup (shown earlier in Figure 2) and click Leave The Homegroup.
Because HomeGroup is a true peer-to-peer network, when any computer
leaves the homegroup, the homegroup remains intact and all other members
are unaffected (except they'll no longer be able to see your computer's
resources, of course).
Note, however, that the
Homegroup icon remains in Windows Explorer even after leaving the
homegroup. Selecting the icon displays a message that includes an option
to join a homegroup (if one is detected) or create one.
7. Disabling
HomeGroup
If you see no need for
HomeGroup and are annoyed by the presence of the empty Home-group node
in the navigation pane of Windows Explorer, it's easy to banish the
feature altogether. Simply change your network location to Work Network.
To do that, open Network And
Sharing Center and, under View Your Active Networks, click Home
Network. In the dialog box that appears, click Work Network. The next
time you start Windows Explorer, the Homegroup icon is gone.
An administrator can
also disable HomeGroup by using Group Policy. Open Local Group Policy
Editor (Gpedit.msc), and navigate to Computer
Configuration\Administrative Templates\Windows Components\HomeGroup.
Double-click the Prevent The Computer From Joining A Homegroup policy
and select Enabled. After rebooting, the computer can't join a
homegroup. Furthermore, the Homegroup node does not appear in Windows
Explorer, even if the network location is Home Network.
8. HomeGroup:
How It Works
The simplicity of
setting up and using HomeGroup belies its complexity. The basic sharing
mechanism uses standard sharing protocols that have been part of Windows
for many years. In short, HomeGroup grants share permissions and
applies an access control entry (ACE) to each shared object allowing
access to a group called HomeUsers. A password-protected account (which is
required for accessing shared objects over a network connection) named HomeGroupUser$ is a
member of HomeUsers, and acts as your proxy in accessing shared network
resources. (In fact, even if your user account is password protected,
HomeGroup still uses the HomeGroupUser$ account to connect to a remote computer
instead of using your account, unless you select the Use User Accounts
And Passwords To Connect To Other Computers option in Advanced Sharing
Settings.
Warning:
Do not change the password
for the HomeGroupUser$
account; doing so is a recipe for disaster. (Note that the account
password is not the same as the homegroup password.)
But there's much more
going on with HomeGroup. Creating or joining a workgroup creates the
HomeGroupUser$ account and the HomeUsers group, and adds all local accounts to the
group. HomeGroup setup also configures Windows Firewall. (Specifically, it enables
certain rules in the Core Networking, Network Discovery, and HomeGroup
groups. And for computers that are not joined to a domain, it enables
rules in the File And Printer Sharing, Windows Media Player, and Windows
Media Player Network Sharing Service groups.) In addition, it
configures the HomeGroup Provider and HomeGroup Listener services.
(Home-Group also relies on Function Discovery and several other
networking services.)
