The Network folder is your gateway to all available network resources, just as Computer is the gateway to resources stored on your own system. The Network folder (shown in Figure 1)
contains an icon for each computer on your network; double-click a
computer icon to see that computer's shared resources, if any.

To open a shared folder on
another computer, double-click its icon in the Network folder. If you
have the proper permissions, this action displays the folder's contents
in Windows Explorer. It's not always that easy, however. If the user
account with which you logged on doesn't have permission to view a
network computer or resource you select, a dialog box asks you to
provide the name of an account (and its password, of course) that has
permission.
Perhaps the
trickiest part of using shared folders is fully understanding what
permissions have been applied to a folder and which credentials are in
use by each network user. The first rule to recognize is that all network access is controlled by the computer with the shared resources;
regardless of what operating system runs on the computer attempting to
connect to a network share, it must meet the security requirements of
the computer where the resource is shared.
1. Working with Mapped Network Folders
Mapping a network
folder makes it appear to applications as though the folder is part of
your own computer. Windows assigns a drive letter to the mapped folder,
making the folder appear like an additional hard drive. You can still
access a mapped folder in the conventional manner, by navigating to it
through the Network folder. But mapping gives the folder an alias—the
assigned drive letter—that provides an alternative means of access.
To map a network folder to a drive letter, follow these steps:
Open
Computer in Windows Explorer, and on the toolbar, click Map Network
Drive. (Alternatively, after you open a computer in the Network folder,
right-click a network share and choose Map Network Drive.)

Select a drive letter in the Drive box. You can choose any letter that's not already in use.
In the Folder box, type the path to the folder you want or, more easily, click Browse and navigate to the folder.
Select Reconnect At Logon if you want Windows to connect to this shared folder automatically at the start of each session.
If
your regular logon account doesn't have permission to connect to the
resource, select Connect Using Different Credentials. (After you click
Finish, Windows will ask for the user name and password you want to use
for this connection.)
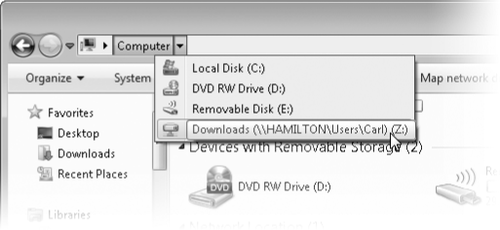
In the Computer folder, the "drive" appears in the Network
Location group. As a top-level item in Computer, it also appears in the
breadcrumb bar when you click the arrow to the right of Computer, as shown below:
If you change your mind
about mapping a network folder, simply right-click the folder's icon in
your Computer folder. Choose Disconnect on the resulting shortcut menu,
and the connection will be severed.
2. Connecting to a Network Printer
To use a printer that has
been shared, open the Network folder and double-click the name of the
server to which the printer is attached. If the shared printers on that
server are not visible, on the toolbar, click View Remote Printers.
Right-click the printer and choose Connect. Alternatively, from the
Devices And Printers folder, click Add A Printer and use the Add Printer
wizard to add a network printer.
