4. Configuring Default Security for Print Servers
In Windows Server 2008
and earlier versions, the following permissions are assigned by default
when a new printer is added to the Print Management console:
Administrator has Print, Manage Printers, and Manage Documents permissions. Creator Owner has Manage Documents permission. Everyone has Print permission.
If an administrator wants to
modify these permissions for all printers on a print server running on
one of these platforms, he needs to open the properties for each printer
individually and make the necessary changes on the Security tab of each
printer's properties sheet. This can be inconvenient if the
administrator needs to modify printer permissions to comply with
corporate security policy.
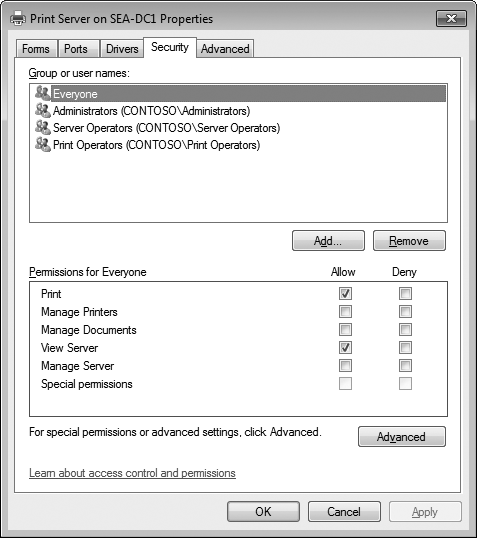
New in Windows Server 2008 R2 is
the capability of modifying the default security settings for all
printers installed on a print server. This can be configured by using
the new Security tab on the properties sheet for a print server (as
shown in Figure 2).
Any changes made to these default security settings will then be
inherited automatically by any new printers added to the print server.
Changes to these default security settings do not modify the permissions
for any existing printers on the print server.
You can modify a
print server's default security settings by using Print Management
running on Windows 7 or Windows Server 2008 R2. You can also take or
assign ownership of a print server by clicking Advanced and selecting
the Owner tab of the Advanced Security Settings dialog box.
Note:
A user must have View Server
permission to view printer settings on a print server. A user must have
Manage Server permission to add or delete printers, drivers, ports, and
forms on printers or to modify settings on a print server.
5. Adding Printers Using the Network Printer Installation Wizard
To add printers using the Network Printer Installation Wizard, follow these steps:
Add at least one print server to the list of managed print servers. Right-click a print server and select Add Printer to start the Network Printer Installation Wizard.
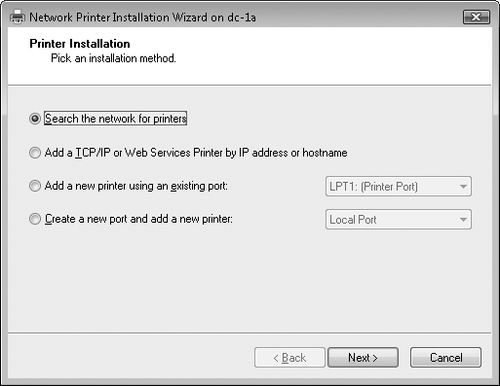
Do one of the following: To
scan the local subnet for TCP/IP or WSD network printers automatically,
select Search The Network For Printers and then click Next. As the scan
progresses, Windows will display a list of available network printers
and will install them automatically on the selected print server. (You
might be required to specify a driver for a printer manually if Windows
cannot find one automatically.) To
add a specific TCP/IP or WSD network printer to the list of printers
managed by the print server manually, select Add A TCP/IP Or Web
Services Printer By IP Address Or Hostname, specify the name or IP
address of the printer, and then click Next. To
add a new printer using an existing port, which can be either a local
port (LTP or COM) or a previously added TCP/IP port, select Add A New
Printer Using An Existing Port, click Next, and either install the
printer driver automatically selected by the wizard, select an existing
driver, or install a new driver either from the CD media included with
the driver or by using Windows Update. To
create a new local port and install a printer on it, select Create A
New Port And Add A New Printer, click Next, specify a name for the new
port, and then either install the printer driver automatically selected
by the wizard, select an existing driver, or install a new driver.
Note:
The option for
automatically detecting printers on the local subnet using Search The
Network For Printers cannot work across a firewall. If you want to use
this feature to detect printers for another location, such as a remote
subnet at a branch office location that is located behind a firewall,
use Remote Desktop to connect to a Windows Server 2003 R2 or later
computer at the remote location, start Print Management, and then select
Search The Network For Printers as described previously.
In addition to the new Network
Printer Installation Wizard, the end-user Add Printer Wizard is still
present in Windows 7 and has been enhanced to allow users to add local,
network, wireless, and Bluetooth printers and also to search Windows
Update for printer drivers when needed.
|
WSD Printers
WSD is a new type of network
connectivity supported by Windows Vista and later versions. With WSD,
users can have a Plug and Play experience similar to that with universal
serial bus (USB) devices over the network rather than only with locally
connected devices.
In Windows Vista and later
versions, WSD printer ports are serviced by the WSD Port Monitor
(WSDMon) instead of the Standard Port Monitor (TCPMon) used to service
TCP/IP ports. WSDMon is used by default if a printer supports it;
otherwise, it defaults to TCPMon.
For more information about the various Web Services specifications and their support on Windows platforms, see http://msdn.microsoft.com/en-us/library/ms951274.aspx on MSDN. You can find additional information on WSD printer support in Windows Vista and later versions on WHDC at http://www.microsoft.com/whdc/device/print/default.mspx.
|
6. Creating and Using Printer Filters
You can use Print Management to create custom printer filters to simplify the task of managing hundreds of print servers and thousands of printers. To create a custom printer filter, follow these steps:
Right-click the Custom Filters node in Print Management and select Add New Printer Filter. Type a name and description for the new filter. For example, type All HP Printers for a filter that displays printers whose driver names begin with HP, indicating Hewlett-Packard printers.
If desired, select the check box labeled Display The Total Number Of
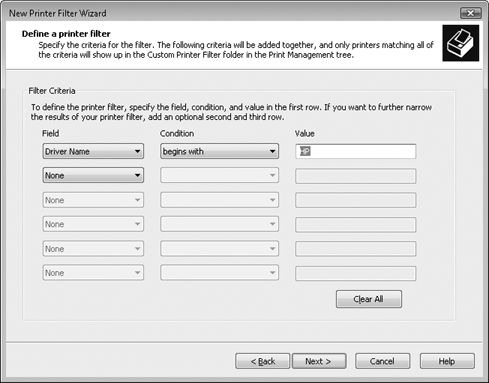
Printers Next To The Name Of The Printer Filter and then click Next. Specify
up to six filter criteria for your new filter. For example, to filter
for printers whose driver names begin with HP, select the Driver Name
field and the Begins With condition and type HP as the value.
Click
Next and configure an e-mail notification or script action that occurs
when a printer matches the filter criteria specified by the filter. Click
Finish to create the new filter. Select the new filter to activate it
and display printers that meet the criteria specified by the filter.
Table 1
lists the filter criteria fields, conditions, and possible values that
you can specify when you create a custom printer filter. Filter criteria
fields marked with an asterisk (*) are new to Print Management in
Windows 7 and Windows Server 2008 R2.
Table1. Fields, Conditions, and Possible Values for Printer Filter Criteria| FIELD | CONDITIONS | VALUE |
|---|
| Printer Name
Server Name
Comments
Driver Name
Location
Shared Name
Driver Version*
Provider* | Is exactly, is not exactly, begins with, not begin with, ends with, not end with, contains, not contains | (type a value to specify) | | Queue Status | Is exactly, is not exactly | Ready,
paused, error, deleting, paper jam, out of paper, manual feed required,
paper problem, offline, IO active, busy, printing, output bin full, not
available, waiting, processing, initializing, warming up, toner/ink
low, no toner/ink, page punt, user intervention required, out of memory,
door open | | Jobs in Queue | Is exactly, is not exactly, is less than, is less than or equal to, is greater than, is greater than or equal to | (type a value to specify) | | Is Shared | Is exactly, is not exactly | False, true |
Note:
To modify a printer filter after you create it, right-click the filter and then select Properties.
7. Creating and Using Driver Filters
A new feature of Print
Management in Windows 7 and Windows Server 2008 R2 is the ability to
create custom driver filters to simplify the task of managing all of
your printer drivers on your print servers. To create a custom driver
filter, follow these steps:
Right-click the Custom Filters node in Print Management and select Add New Driver Filter. Type a name and description for the new filter. For example, type Legacy Drivers for a filter that displays printer drivers that don't support driver isolation. Click
Next and specify up to six filter criteria for your new filter. For
example, to filter for printer drivers that don't support driver
isolation, select the Driver Isolation field and the Is Exactly
condition, and type None for the value. Click Next and continue configuring the filter as described in the previous section.
Table 2 lists the filter criteria fields, conditions, and possible values that you can specify when you create a custom driver filter.
Table 2. Fields, Conditions, and Possible Values for Driver Filter Criteria| FIELD | CONDITIONS | VALUE |
|---|
| Driver Name
Driver Version
Provider
Environment
Driver File Path
Config File Path
Data File Path
Default Datatype
Hardware ID
Help File Path
Language Monitor
Manufacturer
OEM URL
Inf Path
Print Processor
Driver Data
Type
Driver Isolation
Server Name | Is exactly, is not exactly, begins with, not begin with, ends with, not end with, contains, not contains | (type a value to specify) | | Packaged | Is exactly, is not exactly | False, true |
|
