So far we have only discussed the virtualization
capabilities inherent in Windows 7—virtually loading Windows 7 and using
the Windows XP Mode virtual system within Windows 7.
Sun xVM VirtualBox
The first environment we
want to discuss is Sun’s xVM VirtualBox software. This open source
virtualization software can be downloaded from www.virtualbox.org and installed on your system. At present, VirtualBox requires one of the following host operating systems to run properly:
If you plan to run
Windows 7 using VirtualBox, you should make sure that your system has
sufficient resources for all the various system configurations you plan
to use. In addition, allow for system resource utilization by the host
and allow 256MB of memory for the VirtualBox software itself. Your video
output should also be fully supported by the host system.
Installing Windows 7 Under Sun VirtualBox
Before installing Windows
7 as a virtual system, you need to make sure your host operating system
is installed on your computer and you have installed the Sun VirtualBox
software.
After you have done these two things, you can start installing Windows 7.
1. | Your
first task is to start the VirtualBox console and then use it to create
and configure a virtual hard disk instance for your Windows 7
installation. We have found that the settings shown in Tables 1 and 2 are the bare minimum that is acceptable for running Windows 7 from within VirtualBox.
Table 1. Minimum Settings for Running Windows 7 Under Sun VirtualBox| OS Type | Microsoft Windows | | Version | Windows Vista (see note below) | | Base Memory Size | 512MB | | Boot Hard Disk | Click New, and see below | | Hard Disk, Storage Type | Dynamically Expanding Storage | | Hard Disk, Location | Any appropriate location on your system | | Hard Disk, Size | 20.00GB |
Table 2. Expanded Recommended VirtualBox Settings for Windows 7 Virtual System| Section | Tab | Field | Notes/Entry |
|---|
| General | Basic | Operating System | Microsoft Windows. |
| Basic | Version | Windows Vista (we expect that an updated version with Windows 7 compatibility will be available by the end of 2009). |
| Basic | Base Memory | 800MB. |
| Basic | Video Memory | 128MB. |
| Basic | Enable 3D Acceleration | Yes. |
| Advanced | Boot Order | Whatever you think is appropriate. However, note that initially you will need to enable CD/DVD-ROM boot ahead of the hard disk. |
| Advanced | Enable ACPI | Yes. | | Hard Disk |
| Enable SATA Controller | Yes. |
| Slot | Hard Disk | The VDI file that you create for the virtual system instance. | | CD/DVD-ROM |
| Mount CD/DVD Drive | Yes. |
| Host CD/DVD Drive |
| Normally we would suggest this. However, see the next item for an alternative option. |
| Host CD/DVD Drive | Enable Passthrough | You must enable this option if you plan to let the virtual installation of Windows 7 use your computer’s CD/DVD drive. |
| ISO Image File |
| We
found some issues with DVD drive passthrough from our host system. As a
result, we wound up creating an ISO from the DVD drive on the host
system and then mounting the ISO as a DVD image with this option to
install Windows 7 to our virtual environment. | | Floppy | Mount Floppy |
| If
your system has a floppy drive, and you plan to allow the virtual
system to use it, you must select this option. We never used it because
none of our test systems had floppy drives. | | Audio | Enable Audio |
| If you want your virtual system to be able to use the host computer’s audio capabilities, you must enable this option. | | Audio |
| Host Audio Driver | If
you select Null audio driver, the Windows 7 virtual system will “see”
an audio card but will not be able to send any sound out through it. | | Audio |
| Audio Controller | SoundBlaster 16. | | Network | Adapter 1 | Enable Network | You must enable at least one network adapter for your virtual system to be able to communicate on the Internet. | | Network | Adapter 1 | Adapter Type | Intel Pro/1000 MT Desktop. | | Network | Adapter 1 | Attached to | NAT. | | Network | Adapter 1 | Cable Connected | Yes. | | Serial Ports | Port 1 | Enable Serial Port | Enable
this only if you plan to let the virtual system use your computer’s
serial ports. In our test cases, we left this turned off. | | USB |
| Enable USB Controller | Yes. | | USB |
| Enable USB 2.0 (EHCI) Controller | Yes. | | Shared Folder |
|
| By
default, no shared folders are created. We found it useful to create a
shared folder for the virtual system, which linked to the host system’s
desktop. Click the plus sign (+) icon in the upper-left corner to create
a shared folder. |
|
2. | After
you have created the virtual system instance, including its associated
virtual hard disk image (VDI file), you can install Windows 7.
|
3. | Mount the Windows 7 DVD in your system’s DVD drive.
|
4. | From within VirtualBox, select the Windows 7 virtual system instance and then click the Start arrow (see Figure 1).
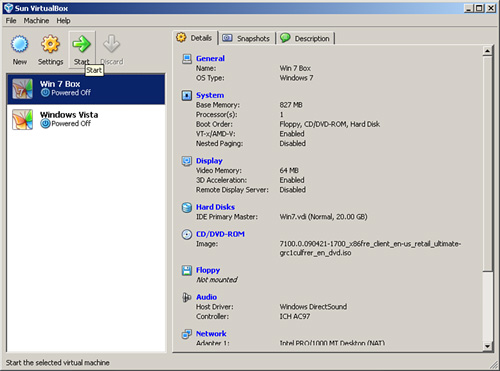
|
5. | Based
on the recommended settings, your virtual system should start to boot
and then load from your host system DVD drive. If you have any issues
with this process, stop the virtual system, copy an ISO image of the
Windows 7 DVD to your system, and then mount that ISO image as the DVD
drive under VirtualBox.
|
6. | Install and configure Windows 7 as you normally would.
|
7. | After
Windows 7 is installed in your virtual environment, test the network
connectivity from within the virtual system using Internet Explorer.
|
8. | Configure
the Windows 7 virtual instance as you would any other system
installation. Note that you can perform normal application migration
operations from within VirtualBox with no issues, so migrating
applications and settings should be as simple as they would be to a
regular Windows 7 installation.
|
VMWare
The next environment we
discuss is VMWare. In this case, we ran Windows 7 under VMWare
Workstation 6.5.2. However, any VMWare product will support the 32-bit
x86 platform that you need to run Windows
7, and virtually any VMWare product that you can get will also support
64-bit Windows 7 installations if your underlying hardware will support
it. In practice, this means that you can run Windows 7 virtually under
VMWare installed on Windows XP, Vista, Server 2003, Server 2008, any
recent version of Linux, and Macintosh OS. The precise operating system
requirements may vary depending on which version of VMWare you are
using. VMWare Server, for example, requires that you use a server
version of Windows as your host operating system; Windows XP and Windows
Vista would not work properly.
Note
To run the 64-bit
version of Windows 7 as a virtual system under VMWare, your host system
must have a 64-bit processor and a BIOS compatible with x86
virtualization. Intel systems require VT hardware virtualization, and
AMD64 processors must be revision D or later.
You should note the minimum system requirements for running Windows 7 under VMWare shown in Table 3.
Table 3. Minimum Requirements to Run Windows 7 Under VMWare
| Memory | 512MB
for VMWare, plus 768MB for Windows 7, totaling 1280MB. Of course, more
is better, and VMWare recommends 2GB–4GB of memory to run a guest OS
under VMWare. |
| Disk | VMWare
requires 1.7GB for installation purposes. You will also want 20GB of
disk space available for the actual Windows 7 installation. |
Installing and Configuring VMWare
The first task you need
to perform is to install the VMWare software. Install and configure the
VMWare environment using the procedures laid out in the VMWare
documentation. In our case, we needed to install both VMWare Workstation
(which creates the virtual machine) and VMWare Player (which runs it).
After you have done so,
create a new virtual machine. During the configuration, you will be
asked for the location of the installation media, as well as
configuration information, such as your license key and the default
user. By entering this information ahead of time, you can allow VMWare
to automatically configure the system. This situation also pointed up
the ease of having an ISO image of the Windows 7 installer. From within
VMWare Workstation, we selected File, New, Virtual Machine, which
launched the New Virtual Machine wizard. From there, we selected a
typical installation and then pointed the installer at the ISO file we
had created earlier. The wizard asked us for a product key, user name,
and password; then it asked for a virtual machine name and a location in
which to store the virtual machine. Finally, it asked for some
configuration information—how big the disk was to be and whether to
store the virtual system disk as a single file or split into smaller
files.
Once the virtual
system was created, we ran it from VMWare Player. The first time we
powered up the virtual machine, it automatically detected the ISO;
started it; and ran the installation process, configuring the Windows
installation using the information we had already entered.
Note
One item we noted
during our testing process was that configuring VMWare under a Linux
host was less simple than configuring other virtual environments. After
we got past the configuration issues, however, there were no problems of
any kind running Windows 7 under VMWare.
Other Virtual Environments
A number of other virtual
environments exist that you can use to virtually deploy Windows 7. As a
rule, you should stick to virtualization software that supports either
x86 (32-bit) or x64 (64-bit) technologies. Wikipedia maintains a useful
list of virtualization software that supports Windows-oriented
virtualization.
