Logo
programming4us
programming4us
programming4us
programming4us
Home
programming4us
XP
programming4us
Windows Vista
programming4us
Windows 7
programming4us
Windows Azure
programming4us
Windows Server
programming4us
Windows Phone
 
programming4us
Windows 7

Using Tablet PCs and Ultra-Mobile PCs : Using a Tablet PC (part 2) - Configuring Tablet PC Features - Using Pen and Touch

- Free product key for windows 10
- Free Product Key for Microsoft office 365
- Malwarebytes Premium 3.7.1 Serial Keys (LifeTime) 2019
6/15/2012 11:48:15 AM
1.2. Using Pen and Touch

The Pen and Touch window, shown in Figure 6, also offers a variety of tabs, each of which provides configuration options related to the stylus, or pen, you're using with the system, as well as to other options related to Tablet PC and other touch-based systems. This dialog represents the second major entry point in Windows 7 for configuring Tablet PC features.

Figure 6. Here is where you can configure options related to your stylus and Tablet PC hardware.

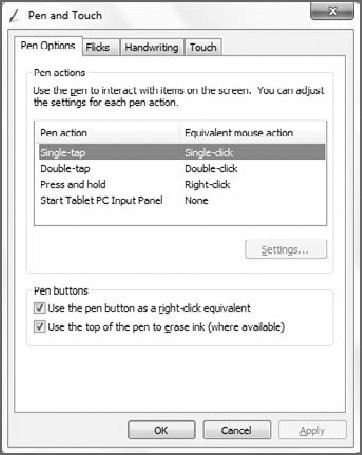
The Pen Options tab enables you to configure what different pen actions and Tablet PC buttons do. For example, by default, a single-tap is the equivalent of a single-click with a mouse button, whereas a double-tap, naturally, emulates a mouse double-click. You can also configure press and hold (right-click by default, although some Tablet PC styli actually include a dedicated pen button that acts as a right-click button in conjunction with a tap) and the Start Tablet PC Input Panel button, which is found on some Tablet PCs.

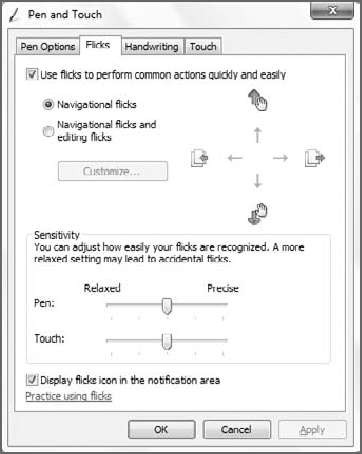
In the Flicks tab, shown in Figure 7, you can configure various options related to Flicks. Flicks were one of the major new features in the Windows Vista version of the Tablet PC software, and they've been enhanced in Windows 7 to support touch controls. So hang around—we'll get to that too.

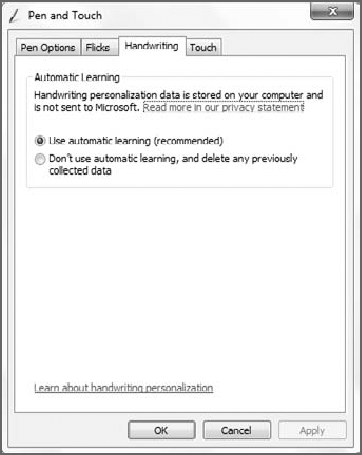
In the Handwriting tab, shown in Figure 8, you configure a tool called Automatic Learning that helps you personalize the system's handwriting recognition. Automatic learning is enabled by default—it was an opt-in service in Windows Vista—and it gathers information about the words you use regularly and how you write them, and then skews the system's handwriting recognition so that it can be more accurate and attuned to both your writing style and word usage.

Figure 7. In Windows 7, you can be sure a pen action occurred thanks to dynamic feedback.

Figure 8. The Handwriting tab enables automatic learning so the system will better understand how you write over time.

NOTE

While the personalized recognizer is available on all Windows 7–based PCs, automatic learning is available only on Tablet PCs (including Ultra-Mobile PCs), so if you visit this location on a non-Tablet PC, you'll see a message to that effect, and the Automatic Learning section of the Handwriting Recognition tab is grayed out.

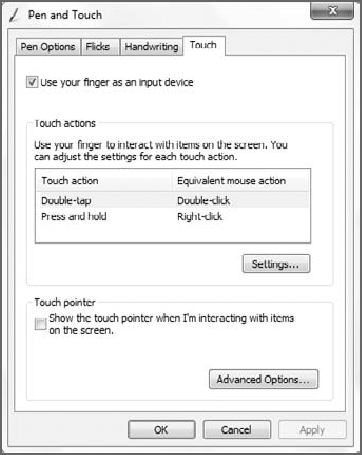
Touch-enabled PCs, like Ultra-Mobile PCs and Multi-Touch PCs, have an extra tab, called Touch, in the Pen and Touch window that's specifically related to touch features. Shown in Figure 9, this tab enables you to configure whether you can use your finger as an input device, and how to emulate click and right-click using touch.

Figure 9. The Touch tab presents various options related to UMPCs and other touch-enabled systems.

You can also optionally enable the touch pointer, which complements the onscreen keyboard in the TIP (described below) with an onscreen mouse. Shown in Figure 10 the touch pointer appears when you tap anywhere on the screen. To emulate a normal mouse click, just tap the left button of the virtual mouse. To emulate a right-click, tap the right button.

Figure 10. The touch pointer does for mouse clicks what the TIP does for keyboard input.

NOTE

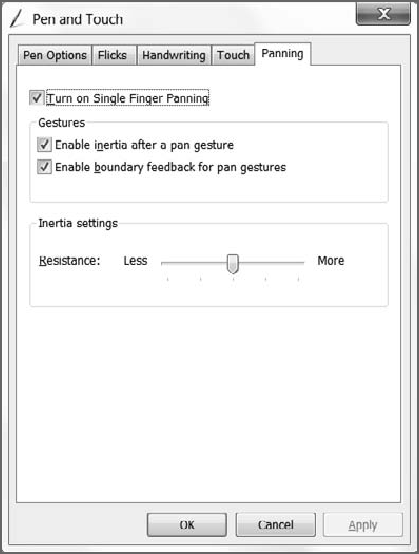
Multi-touch PCs will also have a fifth tab, Panning, shown in Figure 11. This tab turns on and configures single-figure panning, a special kind of touch gesture.

Figure 11. Special to multi-touch PCs is the Panning tab.
Other -----------------
- Using Tablet PCs and Ultra-Mobile PCs : A Short History of the Tablet PC
- Microsoft Project 2010 : Using the Resource Sheet View
- Microsoft Project 2010 : Understanding How Project Uses Resources and Costs
- Microsoft Access 2010 : Creating Queries - Finding Unmatched Records
- Microsoft Access 2010 : Creating Queries - Finding Duplicate Records
- Microsoft Outlook 2010 : Viewing Message Participant Information
- Microsoft Outlook 2010 : Configuring Reading Pane Behavior
- Deep Dive: Windows Home Server Features (part 2) - Remote Access
- Deep Dive: Windows Home Server Features (part 1) - PC Backup and Restore, Document and Media Sharing
- Microsoft Visio 2010 : Containers and Lists (part 2) - Lists
 
 
Top 10
- Microsoft Visio 2013 : Adding Structure to Your Diagrams - Finding containers and lists in Visio (part 2) - Wireframes,Legends
- Microsoft Visio 2013 : Adding Structure to Your Diagrams - Finding containers and lists in Visio (part 1) - Swimlanes
- Microsoft Visio 2013 : Adding Structure to Your Diagrams - Formatting and sizing lists
- Microsoft Visio 2013 : Adding Structure to Your Diagrams - Adding shapes to lists
- Microsoft Visio 2013 : Adding Structure to Your Diagrams - Sizing containers
- Microsoft Access 2010 : Control Properties and Why to Use Them (part 3) - The Other Properties of a Control
- Microsoft Access 2010 : Control Properties and Why to Use Them (part 2) - The Data Properties of a Control
- Microsoft Access 2010 : Control Properties and Why to Use Them (part 1) - The Format Properties of a Control
- Microsoft Access 2010 : Form Properties and Why Should You Use Them - Working with the Properties Window
- Microsoft Visio 2013 : Using the Organization Chart Wizard with new data
 
programming4us
Windows Vista
programming4us
Windows 7
programming4us
Windows Azure
programming4us
Windows Server