Here’s some XAML designed for a large-screen phone that moves a ball up and down:
<Grid x:Name="ContentPanel" Grid.Row="1">
    <Path Fill="Red">
        <Path.Data>
            <EllipseGeometry RadiusX="25" RadiusY="25" />
        </Path.Data>

        <Path.RenderTransform>
            <TranslateTransform x:Name="translate" X="240" />
        </Path.RenderTransform>
    </Path>

    <Path Fill="{StaticResource PhoneAccentBrush}"
          Data="M 100 625 L 380 625, 380 640, 100 640 Z" />

    <Grid.Triggers>
        <EventTrigger>
            <BeginStoryboard>
                <Storyboard RepeatBehavior="Forever">
                    <DoubleAnimation Storyboard.TargetName="translate"
                                     Storyboard.TargetProperty="Y"
                                     From="50" To="600" Duration="0:0:1"
                                     AutoReverse="True"
                                     RepeatBehavior="Forever" />
                </Storyboard>
            </BeginStoryboard>
        </EventTrigger>
    </Grid.Triggers>
</Grid>
There are two Path elements here. The first one is the red ball; the second is a “floor” on which the ball is supposed to bounce.
The ball has a TranslateTransform applied to it: the X property is fixed to keep the ball horizontally centered; the Y property is animated between 50 and 600 and back again. But it really doesn’t look like it’s bouncing
because it has the same velocity throughout its movement. It doesn’t
obey the laws of physics. In the real world, obeying the laws of physics
is pretty much mandatory, but in computer graphics, often more work is
involved.
Getting a better bouncing effect is possible with a DoubleAnimationUsingKeyFrames object with a SplineDoubleKeyFrame that speeds up the ball as it’s falling and slows it down as it’s rising. These use the spline control points that approximate free fall:
<Storyboard RepeatBehavior="Forever">
    <DoubleAnimationUsingKeyFrames Storyboard.TargetName="translate"
                                   Storyboard.TargetProperty="Y">
        <DiscreteDoubleKeyFrame KeyTime="0:0:0" Value="50" />
        <SplineDoubleKeyFrame   KeyTime="0:0:1" Value="600"
                                KeySpline="0.25 0, 0.6 0.2" />
        <SplineDoubleKeyFrame   KeyTime="0:0:2" Value="50"
                                KeySpline="0.75 1, 0.4 0.8" />
    </DoubleAnimationUsingKeyFrames>
</Storyboard>
This is much better. But it’s
still not quite right, and the problem involves what happens when the
ball hits the ground. The ball is at maximum velocity when it hits the
ground, and then immediately it’s at maximum velocity going in the
opposite direction.
In reality, this is not the
way it works. When the ball hits the ground, it decelerates and
compresses somewhat, and then the decompression of the ball causes it to
accelerate again. Can that be simulated? Why not?
Pausing the ball
momentarily as it hits the ground is an additional key frame. I decided
the ball will be compressed and uncompressed over the course of a tenth
second (which is probably a bit exaggerated), so I adjusted the times somewhat:
<Storyboard RepeatBehavior="Forever">
    <DoubleAnimationUsingKeyFrames Storyboard.TargetName="translate"
                                   Storyboard.TargetProperty="Y">
        <DiscreteDoubleKeyFrame KeyTime="0:0:0" Value="50" />
        <SplineDoubleKeyFrame   KeyTime="0:0:1" Value="600"
                                KeySpline="0.25 0, 0.6 0.2" />
        <DiscreteDoubleKeyFrame KeyTime="0:0:1.1" Value="600" />
        <SplineDoubleKeyFrame   KeyTime="0:0:2.1" Value="50"
                                KeySpline="0.75 1, 0.4 0.8" />
    </DoubleAnimationUsingKeyFrames>
</Storyboard>
The TranslateTransform starts at time zero with a value of 50. Over the next second it goes to 600 while speeding up. Over the next 10th
second, it remains at 600, and then goes back up to 50 during the next
second. The new animation now lasts 2.1 seconds rather than 2 seconds.
Of course, by itself, this looks even worse. But let’s add a ScaleTransform to the Path defining the ball:
<Path.RenderTransform>
    <TransformGroup>
        <ScaleTransform x:Name="scale" CenterY="25" />
        <TranslateTransform x:Name="translate" X="240" />
    </TransformGroup>
</Path.RenderTransform>
The untransformed center of
the ball is the point (0, 0), and the two radii are 25 pixels, so the
middle bottom of the ball is the point (0, 25). That’s the point that
touches the floor, and the point that should stay in the same spot
during the ScaleTransform, which is the reason for setting CenterY to 25. CenterX is 0 by default.
Here are the two additional animations for momentarily flattening out the ball:
<Storyboard RepeatBehavior="Forever">
    . . .
    <DoubleAnimationUsingKeyFrames
                    Storyboard.TargetName="scale"
                    Storyboard.TargetProperty="ScaleX">
        <DiscreteDoubleKeyFrame KeyTime="0:0:1"    Value="1" />
        <SplineDoubleKeyFrame   KeyTime="0:0:1.05" Value="1.5"
                                KeySpline="0.75 1, 0.4 0.8" />
        <SplineDoubleKeyFrame   KeyTime="0:0:1.1"  Value="1"
                                KeySpline="0.25 0, 0.6 0.2" />
    </DoubleAnimationUsingKeyFrames>

    <DoubleAnimationUsingKeyFrames
                    Storyboard.TargetName="scale"
                    Storyboard.TargetProperty="ScaleY">
        <DiscreteDoubleKeyFrame KeyTime="0:0:1"    Value="1" />
        <SplineDoubleKeyFrame   KeyTime="0:0:1.05" Value="0.66"
                                KeySpline="0.75 1, 0.4 0.8" />
        <SplineDoubleKeyFrame   KeyTime="0:0:1.1"  Value="1"
                                KeySpline="0.25 0, 0.6 0.2" />
    </DoubleAnimationUsingKeyFrames>
</Storyboard>
Between 1 second and 1.05
seconds, the ball’s width grows by 50% and its height decreases by a
third. That’s reversed over the next 0.05 seconds, at which point the
ball is normal and it begins its upward path.
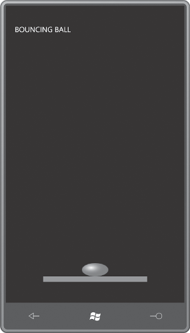
The final version of the BouncingBall program also applies a RadialGradientBrush to the ball:
Example 1. Silverlight Project: BouncingBall File: MainPage.xaml (excerpt)
<Grid x:Name="ContentPanel" Grid.Row="1">
    <Path>
        <Path.Data>
            <EllipseGeometry RadiusX="25" RadiusY="25" />
        </Path.Data>

        <Path.Fill>
            <RadialGradientBrush GradientOrigin="0.35 0.35"
                                 Center="0.35 0.35">
                <GradientStop Offset="0" Color="White" />
                <GradientStop Offset="1" Color="Red" />
            </RadialGradientBrush>
        </Path.Fill>

        <Path.RenderTransform>
            <TransformGroup>
                <ScaleTransform x:Name="scale" CenterY="25" />
                <TranslateTransform x:Name="translate" X="240" />
            </TransformGroup>
        </Path.RenderTransform>
    </Path>

    <Path Fill="{StaticResource PhoneAccentBrush}"
          Data="M 100 625 L 380 625, 380 640, 100 640 Z" />

    <Grid.Triggers>
        <EventTrigger>
            <BeginStoryboard>
                <Storyboard RepeatBehavior="Forever">
                    <DoubleAnimationUsingKeyFrames
                                    Storyboard.TargetName="translate"
                                    Storyboard.TargetProperty="Y">
                        <DiscreteDoubleKeyFrame KeyTime="0:0:0" Value="50" />
                        <SplineDoubleKeyFrame   KeyTime="0:0:1" Value="600"
                                                KeySpline="0.25 0, 0.6 0.2" />
                        <DiscreteDoubleKeyFrame KeyTime="0:0:1.1" Value="600" />
                        <SplineDoubleKeyFrame   KeyTime="0:0:2.1" Value="50"
                                                KeySpline="0.75 1, 0.4 0.8" />
                    </DoubleAnimationUsingKeyFrames>

                    <DoubleAnimationUsingKeyFrames
                                    Storyboard.TargetName="scale"
                                    Storyboard.TargetProperty="ScaleX">
                        <DiscreteDoubleKeyFrame KeyTime="0:0:1"    Value="1" />
                        <SplineDoubleKeyFrame   KeyTime="0:0:1.05" Value="1.5"
                                                KeySpline="0.75 1, 0.4 0.8" />
                        <SplineDoubleKeyFrame   KeyTime="0:0:1.1"  Value="1"
                                                KeySpline="0.25 0, 0.6 0.2" />
                    </DoubleAnimationUsingKeyFrames>

                    <DoubleAnimationUsingKeyFrames
                                    Storyboard.TargetName="scale"
                                    Storyboard.TargetProperty="ScaleY">
                        <DiscreteDoubleKeyFrame KeyTime="0:0:1"    Value="1" />
                        <SplineDoubleKeyFrame   KeyTime="0:0:1.05" Value="0.66"
                                                KeySpline="0.75 1, 0.4 0.8" />
                        <SplineDoubleKeyFrame   KeyTime="0:0:1.1"  Value="1"
                                                KeySpline="0.25 0, 0.6 0.2" />
                    </DoubleAnimationUsingKeyFrames>
                </Storyboard>
            </BeginStoryboard>
        </EventTrigger>
    </Grid.Triggers>
</Grid>
|
Here it is in action:
