Microsoft Cross-Platform Audio Creations Tool (XACT)
The Microsoft
Cross-Platform Audio Creations Tool (XACT) is a powerful graphical
audio-authoring tool that enables you to manage large numbers of source
wave files and to control their playback in the game. Using the XACT
graphical interface, you can load existing wave files, group the files,
and layer them with effects. The provided XNA Game Studio APIs can
trigger their playback.
Although the XACT tool
provides several features, we cover the basics of the graphical
interface and the XACT APIs to enable you to get started using the tool.
Note
XACT is available only for the Windows and Xbox 360 platforms. The Windows Phone is not supported.
Opening XACT
You can find the XACT
tool under the Microsoft XNA Game Studio 4.0 program files menu under
the Start menu. Select the Tools: folder, and then click the Microsoft
Cross-Platform Audio Creation Tool (XACT) menu item. This launches the
XACT tool, which looks like Figure 1.
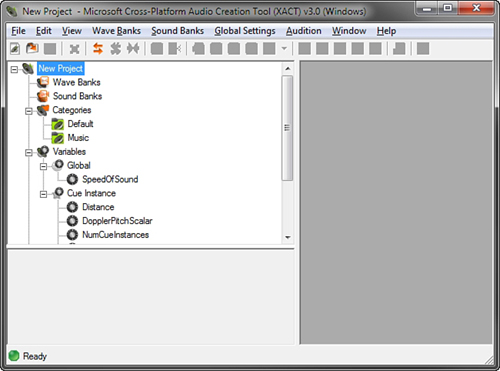
The XACT graphical
interface contains many menus, icons, and options. We cover the
different areas as they are needed in the following examples.
Creating a New XACT Project
In the XACT tool, select
File, then New Project. The New Project Path dialog box displays.
Because we use the XACT project in our game’s content pipeline, it is
often easy to use the content folder of the game to store the XACT
project file. Locate the content project folder for your game, and then
enter a name for your XACT project and make sure it ends with the .xap
extension. Click the Save button.
Adding a Wave File to the XACT Project
The
starting elements of an XACT project are wave files that must be loaded
from source recordings. In the following example, you load a single
wave file and then play back the sound using the XACT APIs provided in
XNA Game Studio.
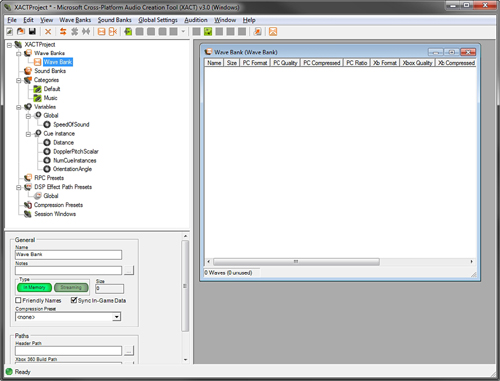
First, you need a wave bank
to load the source wave files into. A wave bank is a collection of wave
files that are grouped together. To add a new wave bank, click the Wave
Banks menu and select New Wave Bank. A new entry displays under Wave
Banks in the XACT project tree with the default name “Wave Bank”. You
can change the default name by clicking the wave bank in the tree or by
right-clicking the wave bank and selecting Rename. A wave bank menu also
displays in the right side of the XACT workspace. Your XACT workspace
should look like Figure 2.
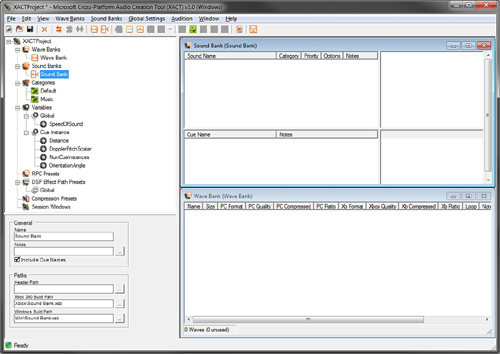
Next, you need to add the first
sound bank to the project. A sound bank is a collection of wave banks.
To add a new sound bank, click the Sound Banks menu and select New Sound
Bank. Just as with the wave bank, the new sound bank is added to the
XACT project tree, but this time, the new item displays logically under
the Sound Banks tree node. The new sound bank has a default name of
Sound Bank, but you can change the name by clicking on the sound bank or
by right-clicking the sound bank and selecting Rename. The sound bank
window is also added to the XACT workspace to the right.
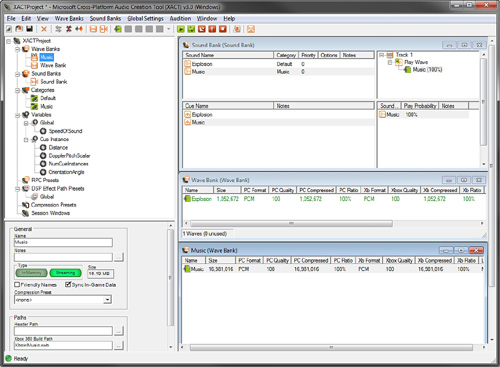
The workspace might be
getting cluttered now, so the wave bank and sound bank windows might be
overlapping. XACT provides a nice window-ordering option to organize
your windows automatically. Click the Window menu option to display the
windowing options. Select Tile Horizontally from the drop-down menu. The
sound bank and wave bank windows should now organized as shown in Figure 3.
You can now add the source
wave files to the project. Right-click the Wave Bank in the XACT project
tree and select Insert Wave File(s). In the open file dialog box,
choose a wave file and click the Open button.
To hear the newly added wave
file play, launch the XACT Auditioning Utility. This tool can be found
in the same Tools folder under Microsoft XNA Game Studio 4.0 as the XACT
tool is located. Launching the XACT Auditioning Utility should bring up
a console window like the one in Figure 4.

To listen to the wave file you just added to the wave bank, right-click the entry and select Play.
Note
If you receive and error
message that says, “Could not connect to a Windows auditioning server,”
verify that you have started the XACT Auditioning Utility tool.
Finally, you need to set up a cue.
The developer uses the cue to play back a sound or a group of sounds.
The cue is stored and accessed from the sound bank.
The quickest way to add a cue is
by dragging a wave from the wave bank onto the cue section of the sound
bank windows, which is in the lower left corner (see Figure 5).
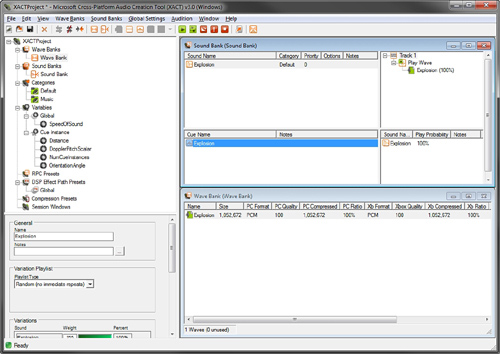
After you drag the wave file
and create the cue, notice there are a number of new items that display
in the sound bank window. Because a new sound has been created, by
default, it is created with the same name as the wave. The sound is
displayed in the top left of the sound bank window. After selecting the
sound entry, there is a track listing to the right of the window. Each
sound can contain a number of tracks. In this case, a single track is
created that plays the wave from the wave bank. Below the sound bank is
the cue window that you dragged the wave to. A new cue is created using
the same name as the wave that was used to create it. As we discussed,
the cue is used in the game code to control the playback of the sounds.
So, a cue is required if you want to cause the sound to be played in
your game. A cue is made up of multiple sounds from the sound bank
entries in the window above it. Because the cue is created by using the
dragging shortcut, the sound of the same name is added to the cue. By
right-clicking the cue, you can select the Play menu option to hear the
cue play.
Note
Without
using the cue-dragging shortcut, multiple steps are required to set up a
new cue for playback. First, you need to create a new sound, add a
track to the sound, and then add the wave to the track. Next, create a
new cue and add the sound to the cue.
Now you are ready to switch
over to the code to show you how to play the cue you just created. Save
your project and open XNA Game Studio.
Sound Playback Using Cue
It’s time to play the cue you
just created in the XACT tool. You need to add the XACT project you
created to the content project of your game. Just like adding other
types of content, it is easy to add the XACT project. Right-click the
content project and select Add, and then click Existing Item. Then,
select the .xap XACT project file in the dialog box and click the Add
button. Building the content project now should show that three files
are built from the single .xap file. XACTProject.xgs is the audio engine
file and is named after the project name that was used for your XACT
project. The Wave Bank.xwb file contains the data from the wave bank of
the same name. If you renamed the wave bank in your XACT project, this
file uses the name you used for your wave bank. The Sound Bank.xsb file
contains the data from the sound bank in your XACT project. Like the
wave bank, the name of the file is the same as you used for the sound
bank in the XACT project and is set to whatever you named your sound
bank.
In your game, add the following member variables for the AudioEngine, SoundBank, WaveBank, and Cue:
AudioEngine audioEngine;
SoundBank soundBank;
WaveBank waveBank;
Cue cue;
The AudioEngine is used to perform necessary updates to the underlying audio system. The AudioEngine.Update
method is required to be called once per frame to ensure the audio
playback stays up to date and is not stalled. The other three variables
for the SoundBank, WaveBank, and Cue are the code counterparts to the ones created in the XACT project.
To load the files that
were built by processing the XACT project through the content pipeline,
add the following lines of code to your games LoadContent method:
// Load file built from XACT project
audioEngine = new AudioEngine("Content\\XACTProject.xgs");
waveBank = new WaveBank(audioEngine, "Content\\Wave Bank.xwb");
soundBank = new SoundBank(audioEngine, "Content\\Sound Bank.xsb");
// Get an instance of the cue from the XACT project
cue = soundBank.GetCue("Explosion");
Finally in the games Update method, check to see whether the spacebar is pressed. If the spacebar is pressed, the cue plays:
// Play the cue if the space bar is pressed
if (currentKeyboardState.IsKeyDown(Keys.Space) &&
    lastKeyboardState.IsKeyUp(Keys.Space))
{
    cue.Play();
}

// Update the audio engine
audioEngine.Update();
After playing the sound, call the AudioEngine.Update method to ensure it is called each frame.
A Cue has similar playback methods as SoundEffectInstance, such as Play, Pause, Resume, and Stop. There is also an Apply3D method, which takes an AudioListener and AudioEmitter.
After Play is called on the Cue, it can’t be called again. You can call Pause and then Resume, but calling Play again will cause an InvalidOperationException. To play the sound more than once, create a new Cue instance by calling the SoundBank.GetCue method. Each Cue returned from GetCue is its own instance. This also means you should not call GetCue unless you need a new instance since it will allocate memory.
You can use the SoundBank.PlayCue
method to just play a cue and have no other controls on the cue similar
to how fire and forget sound effects work. You can use the following
code to play a cue without creating an instance of a Cue:
// Play cue without cue instance
if (currentKeyboardState.IsKeyDown(Keys.P) &&
    lastKeyboardState.IsKeyUp(Keys.P))
{
    soundBank.PlayCue("Explosion");
}
Streaming
Some wave files are large,
especially the wave files that are used to play back music in your game.
By default, the wave files used in the XACT project are loaded into
memory at runtime. This can cause problems if your file is quite large
because the file might not fit into memory or it might take up more
space than what you would like. Streaming is set at the wave bank level
for all of the wave files contained within the wave bank.
Let’s add some streaming music
to the previous XACT sample. Open the XACT project you created
previously. Add a new wave bank and call it Music. Select the new wave
bank in the XACT project tree. The properties of the wave bank display
in the lower left window. In the Type section, select the Streaming
button. It should be highlighted a green color (see Figure 6).
To add the music source
files to the wave bank, right-click the wave bank and select Insert Wave
File(s). Select your music file in the dialog window and click the Open
button. Now that the source wave file is added to your streaming wave
bank, you need a cue to use for playback. Like you did before, drag your
music wave into the sound bank’s cue window to create the cue for your
music wave.
Finally, you change the sound
that was created for the music cue to mark it as background music.
Setting a sound category to Music allows users on the Xbox 360 to play
their own music library over your game’s music. This allows the user to
hear the sound effects in your game but to override the music to what
they are playing using the media playback provided on the Xbox 360.
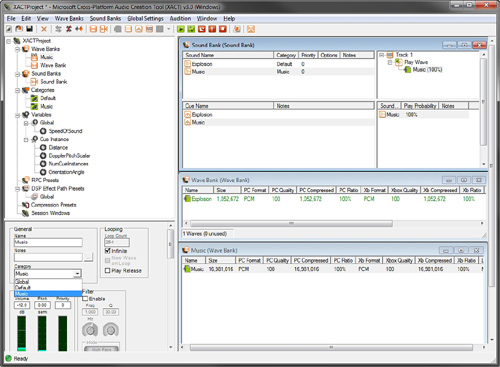
To change the sound
category, select the music sound entry that you just created in the
sound bank. In the lower left, select the Category drop-down and select
Music (see Figure 7).
Next, select the Infinite checkbox under the Looping section to have
the sound continually play until it is stopped. Save the XACT project,
so you can add the music to your previous code sample.
You need two additional member variables to add streaming music to the previous example. Add the following two member variables:
WaveBank streamingWaveBank;
Cue musicCue;
Like before, you need to load the wave bank. After the other audio loading in the games LoadContent method, add the following lines of code:
// Load streaming wave bank
streamingWaveBank = new WaveBank(audioEngine, "Content\\Music.xwb", 0, 4);
// The audio engine must be updated before the streaming cue is ready
audioEngine.Update();
// Get sue for streaming music
musicCue = soundBank.GetCue("Music");
// Start the background music
musicCue.Play();
The overload of the WaveBank constructor takes an additional two arguments. The first is the offset
into the wave to start. In most cases, you want to start at the
beginning, so a value of 0 should be set. The last parameter is the packetsize,
which determines the size of the streaming buffer used internally to
store the file as it is loaded. It is in units of DVD sectors, which are
2,048 bytes each. The minimum value must be 2. The higher the number,
the larger the memory buffer, which allows for smoother playback. You
can test different values to determine the minimum value that smoothly
streams the music in your game.
After creating a new streaming wave bank, you must call the AudioEngine.Update method to play a cue that contains the streamed data from the wave bank.
The last two steps are to get the Cue from the SoundBank and to call the Play method to start the background music. Now your game has streaming background music that can be overridden by the player.
