1. Animation with Sprite Sheets
Let’s set aside glyph rendering and visit
another topic common to 2D graphics: sprites. The iPhone is an ideal
platform for casual gaming, and many popular iPhone games rely heavily on
sprites for frame composition. To recap, a sprite is simply a bitmap that
gets applied to a rectangular region of the screen. Sprites often use
alpha to allow the background (and possibly other sprites) to show
through. I like to think of sprite rendering as using an overhead
projector, where each sprite is a plastic sheet with a cartoon
drawing.
For efficiency, it’s common to pack a slew of
sprites into a single texture; this is called a sprite
sheet. In general, a texture that contains multiple disparate
images is known as a texture atlas.
Note:
There are tools out there to help you build
sprite sheets. One such tool is a web-based application called
zwopple by Robert Payne. You can find it at http://zwoptex.zwopple.com.
Recall that there are two ways of animating a
sprite: the screen position can change (for example, a bouncing ball), or
the source image can change (for example, a spinning ball). In the former
case, the application code updates the vertex positions at every frame; in
the latter case, the application updates the texture coordinates at every
frame.
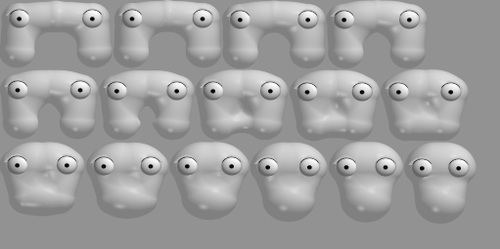
For an example of a sprite with multiple
animation frames, see Figure 1, a sprite sheet
from a game that I created in my college days. (The game’s protagonist is
named Noop, a blobby fellow who moves horizontally by repeatedly squishing
his legs together in wormlike fashion.)
2. Image Composition and a Taste of Multitexturing
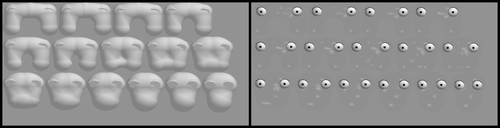
Sometimes it’s desirable to split a sprite
sheet into multiple layers, as shown in Figure 2. The left sheet has the animation frames
for Noop’s body; the right sheet has his eyes and shiny highlights. This
allows the application to vary the colors of the layers independently. For
example, my game can draw Noop using a yellowish hue most of the time but
sometimes renders him in orange to convey that he’s hurt. In both cases,
the eyes and highlights are white.
You can use a
luminance or luminance-alpha texture rather than a full-blown RGBA texture
and then modulate the texture’s color using per-vertex color (for example,
by calling glColor4f).
The obvious way of composing Noop’s eyes with
his body is to render the same quad in two passes with blending enabled.
The first pass uses texture coordinates for the body; the second pass uses
coordinates for the eyes and highlights. Example 1
shows an example of this procedure.
Example 1. Rendering Noop in two passes
// Enable Blending:
glEnable(GL_BLEND);
glBlendFunc(GL_SRC_ALPHA, GL_ONE_MINUS_SRC_ALPHA);

// Draw Noop's body in a yellowish hue:
glColor4f(1, 0.83f, 0.33f, 1);
glBindTexture(GL_TEXTURE_2D, bodyTexture);
glTexParameteriv(GL_TEXTURE_2D, GL_TEXTURE_CROP_RECT_OES, sourceRectangle);
glDrawTexfOES(x, y, 0, width, height);

// Draw Noop's eyes in white:
glColor4f(1, 1, 1, 1);
glBindTexture(GL_TEXTURE_2D, eyesTexture);
glTexParameteriv(GL_TEXTURE_2D, GL_TEXTURE_CROP_RECT_OES, sourceRectangle);
glDrawTexfOES(x, y, 0, width, height);
|
Note that Example 7-13 is
valid only for ES 1.1; under ES 2.0, we need to replace the
DrawTex-related lines with calls to glDrawArrays or
glDrawElements, and we need to replace
glColor4f with glVertexAttrib4f. See
Example 2.
Example 2. Two-pass Noop with ES 2.0
// Enable Blending:
glEnable(GL_BLEND);
glBlendFunc(GL_SRC_ALPHA, GL_ONE_MINUS_SRC_ALPHA);

// Draw Noop's body in a yellowish hue:
glVertexAttrib4f(MyColorAttribute, 1, 0.83f, 0.33f, 1);
glBindTexture(GL_TEXTURE_2D, bodyTexture);
glDrawArrays(GL_TRIANGLES, 0, 6); // draw a rectangle with two triangles

// Draw Noop's eyes in white:
glVertexAttrib4f(MyColorAttribute, 1, 1, 1, 1);
glBindTexture(GL_TEXTURE_2D, eyesTexture);
glDrawArrays(GL_TRIANGLES, 0, 6); // draw a rectangle with two triangles
|
Both OpenGL ES 1.1 and ES 2.0 provide a way to
combine simple two-pass operations like this into a single draw call. It’s
called multitexturing. Multitexturing allows you to
set up more than one texture stage. Example 3 shows the sample code for rendering Noop with
multitexturing; note there’s only one call to
glDrawTexfOES.
Example 3. One-pass Noop with multitexturing
glColor4f(1, 0.83f, 0.33f, 1);
glActiveTexture(GL_TEXTURE0);
glEnable(GL_TEXTURE_2D);
glBindTexture(GL_TEXTURE_2D, bodyTexture);
glTexParameteriv(GL_TEXTURE_2D, GL_TEXTURE_CROP_RECT_OES, sourceRectangle);

glActiveTexture(GL_TEXTURE1);
glEnable(GL_TEXTURE_2D);
glBindTexture(GL_TEXTURE_2D, eyesTexture);
glTexParameteriv(GL_TEXTURE_2D, GL_TEXTURE_CROP_RECT_OES, sourceRectangle);
glDrawTexfOES(x, y, 0, width, height);
|
The key lines in Example 3
are the calls to glActiveTexture, which sets the
current texture stage and affects all subsequent texture-related calls,
including glEnable(GL_TEXTURE_2D).
This allows individual stages to be independently turned on or
off.
I should warn you that Example 3 alone is not quite enough; you also need to tell
OpenGL how to combine the color values from the two texture stages. With
ES 1.1, this is quite a hassle; see Example 4.
This sets up the second texture stage so that it works in a way similar to
typical alpha blending. Thankfully, you can often perform this type of
configuration only once, when your application first starts up.
Example 4. Horrific texture stage configuration with ES
1.1
glActiveTexture(GL_TEXTURE1);
glTexEnvi(GL_TEXTURE_ENV, GL_TEXTURE_ENV_MODE, GL_COMBINE);
glTexEnvi(GL_TEXTURE_ENV, GL_COMBINE_RGB, GL_INTERPOLATE);
glTexEnvi(GL_TEXTURE_ENV, GL_SRC0_RGB, GL_TEXTURE);
glTexEnvi(GL_TEXTURE_ENV, GL_OPERAND0_RGB, GL_SRC_COLOR);
glTexEnvi(GL_TEXTURE_ENV, GL_SRC1_RGB, GL_PREVIOUS);
glTexEnvi(GL_TEXTURE_ENV, GL_OPERAND1_RGB, GL_SRC_COLOR);
glTexEnvi(GL_TEXTURE_ENV, GL_SRC2_RGB, GL_TEXTURE);
glTexEnvi(GL_TEXTURE_ENV, GL_OPERAND2_RGB, GL_SRC_ALPHA);
glTexEnvi(GL_TEXTURE_ENV, GL_COMBINE_ALPHA, GL_REPLACE);
glTexEnvi(GL_TEXTURE_ENV, GL_SRC0_ALPHA, GL_PREVIOUS);
glTexEnvi(GL_TEXTURE_ENV, GL_OPERAND0_ALPHA, GL_SRC_ALPHA);
|
OpenGL ES 2.0 simplifies this by allowing you
to combine colors from within your fragment shader.
