Implementing the Swipe Gesture Recognizer
The swipe gesture
recognizer will be implemented in almost the same manner as the tap
recognizer. Instead of being able to choose the number of taps, however,
you can determine in which direction the swipes can be made. There are a
total of four direction constants that you can specify:
UISwipeGestureRecognizerDirectionLeft: Swipe to the left
UISwipeGestureRecognizerDirectionRight: Swipe to the right
UISwipeGestureRecognizerDirectionUp: Swipe Up
UISwipeGestureRecognizerDirectionDown: Swipe down
By using a bitwise OR between the constants (that is, UISwipeGestureRecognizerDirectionLeft | UISwipeGestureRecognizerDirectionRight), you can create a recognizer that detects swipes in multiple directions. Let’s do that now.
Add the following code fragment to viewDidLoad method (immediately following the tap gesture recognizer is fine):
1:     UISwipeGestureRecognizer *swipeRecognizer;
2:     swipeRecognizer=[[UISwipeGestureRecognizer alloc]
3:                        initWithTarget:self
4:                        action:@selector(foundSwipe:)];
5:     swipeRecognizer.direction=UISwipeGestureRecognizerDirectionLeft |
6:                         UISwipeGestureRecognizerDirectionRight;
7:     swipeRecognizer.numberOfTouchesRequired=1;
8:     [swipeView addGestureRecognizer:swipeRecognizer];
9:     [swipeRecognizer release];
The exact same pattern is followed, this time using the UISwipeGestureRecognizer class. Lines 1–2 declare, initialize, and allocate the swipeRecognizer UISwipeGestureRecognizer instance and identify the method foundSwipe to be invoked when the gesture is recognized.
Lines 5–6 set the direction property to the allowed swipe directions—either left or right, in this example.
Line 7 sets the number of finger touches that need to be “seen” for the gesture to be detected.
Lines 8–9 add the gesture recognizer to the swipeView object and then release the recognizer.
Responding to the Recognizer
We’ll respond to the swipe recognizer in the same way we did with the tap recognizer. Implement the foundSwipe method as follows:
- (void)foundSwipe:(UISwipeGestureRecognizer *)recognizer {
    outputLabel.text=@"Swiped";
}
By the Way
If
you want to differentiate between different swipe directions, you must
implement multiple swipe gesture recognizers. By adding a recognizer
with multiple allowed directions, you’re saying that all the directions
are equivalent, that they aren’t differentiated as separate gestures.
So far, so good! Next up, the
pinch gesture. You should really start seeing the pattern now, so we
won’t spend too much time on the setup.
Implementing the Pinch Gesture Recognizer
Taps and swipes are
simple gestures; they either happen or they don’t. Pinches and rotations
are slightly more complex, returning additional values to give you
greater control over the user interface. A pinch, for example, includes a
velocity property (how quickly the pinch happened) and scale
(a fraction that is proportional to change in distance between your
fingers). If you move your fingers 50% closer together, the scale is .5,
for example. If you move them twice as far apart, it is 2.
To better show what this means visually, we’re going to be scaling imageView (UIImageView). We’ll want to reset this to the original size/location later, so before we do anything else, add these lines after the #import line in GesturesViewController:
#define originWidth 330.0
#define originHeight 310.0
#define originX 218.0
#define originY 679.0
These are the original width, height, and x and y locations of the UIImageView that was added to the interface in the initial project setup.
Now add the pinch gesture recognizer code fragment to viewDidLoad method (placing it after the swipe recognizer is fine):
UIPinchGestureRecognizer *pinchRecognizer;
    pinchRecognizer=[[UIPinchGestureRecognizer alloc]
                     initWithTarget:self
                     action:@selector(foundPinch:)];
    [pinchView addGestureRecognizer:pinchRecognizer];
    [pinchRecognizer release];
As you can see, there’s even
less going on than with tapping and swiping because we aren’t worried
about direction or the number of fingers touching the screen. The code
sets foundPinch as the method that will handle the gesture and then adds the recognizer to pinchView.
Responding to the Recognizer
You’ve made it to the most complex piece of code in this hour’s lesson! The foundPinch method will accomplish several things. It will reset the UIImageView’s
rotation (just in case it gets out of whack when we set up the rotation
gesture), create a feedback string with the scale and velocity values
returned by the recognizer, and actually scale the image view so that
there is immediate visual feedback for the user.
Enter the foundPinch method as shown in Listing 3.
Listing 3.
 1: - (void)foundPinch:(UIPinchGestureRecognizer *)recognizer {
 2:     NSString *feedback;
 3:     double scale;
 4:     scale=recognizer.scale;
 5:     imageView.transform = CGAffineTransformMakeRotation(0.0);
 6:     feedback=[[NSString alloc]
 7:               initWithFormat:@"Pinched, Scale:%1.2f, Velocity:%1.2f",
 8:               recognizer.scale,recognizer.velocity];
 9:     outputLabel.text=feedback;
10:     imageView.frame=CGRectMake(originX,
11:                                originY,
12:                                originWidth*scale,
13:                                originHeight*scale);
14:     [feedback release];
15: }
|
Let’s walk through this method to make sure we understand what’s going on. Lines 2–3 declare a string object, feedback, and a floating-point value scale.
These are used to store a feedback string to the user and the scaling
value returned by the pinch gesture recognizer, respectively.
Line 4 sets scale to the recognizer’s scale property.
Line 5 resets the imageView object to a rotation of 0.0 (no rotation at all) by setting its transform property to the transformation returned by the Core Graphics CGAffineTransformMakeRotation function. This function, when passed a value in radians, will return the necessary transformation to rotate a view.
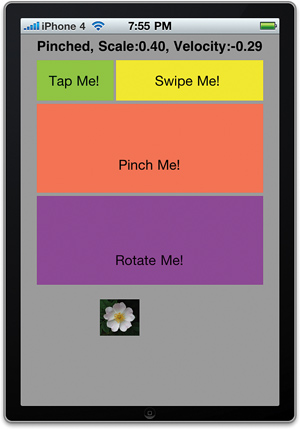
Lines 6–8 allocate and initialize the feedback string to show that a pinch has taken place, and output the values of the recognizer’s scale and velocity properties. Line 9 sets the outputLabel in the UI to the feedback string.
For the scaling of the image view itself, lines 10–13 do the work. All that needs to happen is for the imageView object’s frame to be redefined to the new size. To do this, we can use CGRectMake to return a new frame rectangle. The top-left coordinates (originx, originy) stay the same, but we multiply originWidth and originHeight by the scale factor to increase or decrease the size of the frame according to the user’s pinch.
Line 14 cleans up by releasing the feedback string.
Building and running the
application will now let you enlarge (even beyond the boundaries of the
screen) or shrink the image using the pinch gesture within the pinchView object, as shown in Figure 6.
