1. Problem
You need to send a message from BizTalk with the File adapter.
2. Solution
The BizTalk platform
offers numerous options to facilitate sending files. Within the BizTalk
File adapter, various send options are natively available for the user
to configure. The following steps demonstrate how to configure a send
port:
Open the BizTalk Explorer, and create a send port that uses the File adapter.
NOTE
In alignment with standard BizTalk functionality, only static ports are defined to use a named File adapter.
In the send port properties, under the General options, click the ellipses for the Address (URI) property. The FILE Transport Properties dialog box appears.
Click the Destination Folder input box. Enter the value of the folder where you would like BizTalk Server to write the file.
→ Click the Copy Mode drop-down list, and ensure that the default value, Create New, is selected, as shown in Figure 1.
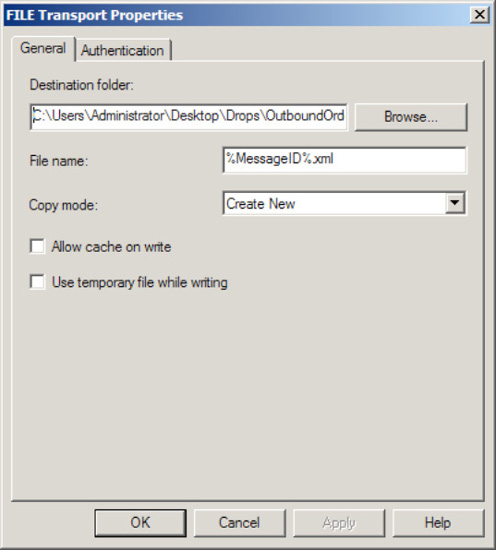
NOTE
The Copy Mode drop-down list offers the Create New, Append, and Overwrite options. In this recipe, we will use Create New.
Click
the Authentication tab, ensure that the Use These Credentials When Host
Does Not Have Access to Network Share check box is unchecked.
NOTE
BizTalk gives you the
ability to specify a different user account if the security permissions
are different from the running host user account.
3. How It Works
You can configure the File
adapter either within the BizTalk Explorer (under a send port) or
through code programmatically. The File adapter send configuration
options encompass naming a file, using copy mode, implementing caching,
and implementing security.
When naming files on the General
tab of the FILE Transport Properties dialog box, you can configure a
file send in conjunction with numerous macros to assist in making a file
name more meaningful. For example, as shown in Figure 1, the File Name value is %MessageID%.xml. The macro, %MessageID%,
will be substituted with the globally unique identifier (GUID) of the
message in BizTalk Server at runtime when the file is named. This GUID
comes directly from the message context property, BTS.MessageID. Please see Table 1 for a list of available macros. It is important to note you can use only these macros.
Table 1. BizTalk Macros
| Type | Description |
|---|
| %datetime% | Sets the name of the file to the current UTC date in the format YYYY-MM-DD (example: 2010-07-01T103500). |
| %datetime_bts2000% | Sets the name of the file to the current UTC date in the format YYYYMMDDhhmmsss (example: 201007011035234). |
| %datetime.tz% | Sets
the name of the file to the current local date plus the time zone
difference from GMT in the format YYYY-MM-DDThhmmss-TZD (example:
2010-07-01T103500+700). |
| %DestinationParty% | The name of the file would be set to whatever value is in the message context property for BTS.DestinationParty. This field is only set in certain situations, therefore this macro is rarely used. |
| %DestinationPartyQualifier% | The name of the file would be set to whatever value is in the message context property for BTS.DestinationPartyQualifier. This field is only set in certain situations, therefore this macro is rarely used. |
| %MessageID% | The
most commonly used macro. This sets the name of the file equal to the
unique identifier of the message. Using this macro guarantees that the
name of the file will always be unique. |
| %SourceFileName% | The file will be named after the value in the FILE.ReceivedFileName
context property. This property is only set if received by a File
adapter. If the value is not available, the macro will name the file the
actual string value of %SourceFileName%. |
| %SourceParty% | The name of the source party (if available) from the BTS.SourceParty context property. This macro is rarely used. |
| %SourcePartyQualifier% | The name of the source party (if available) from the BTS.SourcePartyQualifier context property. This macro is rarely used. |
| %time% | Sets the name of the file to the current UTC time in the format hhmmss (example: 103523). |
| %time.tz% | Sets
the name of the file to the current local time plus the time zone
difference from GMT in the format hhmmss-TZ (example: 103523+700). |
Currently, the product does
not support creating custom or user-defined macros, and it doesn't
support using any other BizTalk context properties other than what is
available via the macros. Using these file-naming macros has been
described as somewhat problematic within the BizTalk user group
community. It is worth noting that a macro will fail if the following is
true:
A corresponding system property is not set, for example, the exclusion of SourceParty or SourcePartyID.
The file send macro is misspelled (including case-sensitive considerations).
The value of the macro result causes an invalid file name, for example, the usage of the following characters:
/ \ ! . , * " |
A further consideration when
using the File send adapter is to ensure the security/access permissions
are set appropriately. This encompasses standard Active Directory
security considerations for related share and folder permissions, as
well as security considerations related to non-Windows environments. By
default, the File adapter write activity uses the user account of the
running BizTalk host. It is always a good idea to unit test a security
scenario first to ensure a file can be written to the desired
destination before introducing the File send adapter. This way, you can
isolate permission issues, saving possible issue detection and
resolution time.
