Administrators
can utilize any of the three administrative tools to perform a wide
variety of user-specific configurations on an individual mailbox. As has
been stated before, the ECP enables access to some of the settings, the EMC enables access to more of the settings, and the EMS enables access to all the settings. When it comes to administering nondisplay type data, the ECP gets left behind by the EMC and EMS.
Each mail-enabled
object in an Exchange Server environment has specific settings that can
be configured, enabling users in the same database to have different
settings, even if a default setting is already applied to the database.
Several mailbox
configurable properties are available on individual user mailboxes,
including mailbox settings, mail flow settings, and mailbox features.
Mailbox Settings
Mailbox
settings address storage quotas and records management functionality.
Some of the detailed functions covered in mailbox settings are as
follows:
Messaging Records Management—
Messaging Records Management (or MRM) policies assist organizations to
comply with legal or regulatory requirements for their organization.
Administrators can configure a Managed folder mailbox policy that varies
from the database default. This setting can be turned on for all
messages or particular start and end dates and times can be specified. Federated Sharing—
New in Exchange Server 2010, the Federated sharing setting enables
users to collaborate with organizations and users external to the
Exchange Server organization by sharing personal information management
(PIM) information such as free/busy data or contacts. Storage Quotas—
By default, mailboxes are configured to adhere to the storage quota
settings for the database on which they reside. By default, these quotas
are set to Issue warning at—
1,991,680 KB (1,945 MB or approximately 1.9 GB). This is not a “hard”
limit, but a warning threshold. When this limit has been exceeded, the
user gets a message warning them. Prohibit send at—
2,097,152 KB (2,048 MB or 2 GB). This is a “hard” limit. When a mailbox
exceeds this threshold, the user will be unable to send mail. This does
not impact the user’s ability to receive mail, ensuring users do not
miss any messages while scurrying to clean up their mailbox. Prohibit send and receive at—
2,411,520 KB (2,355 MB or approximately 2.3 GB). This is also a “hard”
limit. When the mailbox exceeds this limit, the user can no longer send
or receive messages. Incoming mail destined for this mailbox will be
returned to the sender.
Tip
Many organizations
choose to disable the Prohibit Send and Receive option, preferring to
allow a mailbox to exceed the desired maximum size rather than return
messages to the sender. This can enable some users, such as IMAP users,
to bypass storage quotas completely if the IMAP user is configured to
send mail through an alternate SMTP server. With this configuration,
users can allow their mailboxes to grow as large as they want, without
ever being impacted by the storage quotas.
Organizations should always configure a Prohibit Send and Receive quota, even if the quota is double (or triple) the desired maximum mailbox size.
To view
existing quotas on a particular database in the EMC, navigate to the
Organization Configuration \ Mailbox node and select the Database
Management tab. Select the desired database and select Properties from the action pane. Select the Limits tab to review the settings.
To view existing quotas on a particular database in the EMS, use the following command:
Get-MailboxDatabase "database name here" | fl *quota*
As previously stated,
individual mailboxes can be configured to override the default database
quotas. This is accomplished using the Storage Quotas option in the
Mailbox Settings tab of the mailbox properties. To do so, remove the
checkmark from the Use Mailbox Database Defaults box and configure the
customized limits.
Deleted item retention settings are also configured using the Storage Quotas tab.
Archive Quota—
Also new to Exchange Server 2010, a mailbox archive is a secondary
mailbox that is configured by the administrator that “archives” user
data onto potentially cheaper storage than that used by the primary
mailbox. Archive quotas can be set to a different level than the primary
mailbox. This option is only available for configuration if the mailbox
has an archive mailbox enabled.
Mail Flow Settings
Also configurable
from the Properties of a mailbox object, mail flow settings can be
modified to enable for changes in delivery options, message size
restrictions, and message delivery restrictions. Some specifics on the
mail flow settings are as follows:
Delivery Options—
Utilizing this tab, administrators can enable other users to Send on
Behalf of this user. Messages that are “sent on behalf” show the
recipient both who the message was sent on behalf of AND who actually
sent the message. Additional settings on the Delivery Options tab can
allow the mailbox to forward messages to another mailbox in the
organization, and the administrator can specify whether to Deliver
Message to Both Forwarding Address and Mailbox. Finally, an option
exists to specify the Maximum recipients the mailbox can send to at one
time. Message Size Restrictions—
Administrators can mandate the maximum message size that a user can
send or receive, overwriting the settings configured at the
organizational level. The Maximum send and receive sizes should
generally be the same, or users could have a situation in which they can
receive a message but cannot forward it (or reply with the original
message attached). Likewise, if the Receive limits are lower than the
Send limits, the user might send a message to a fellow employee but not
receive a reply that includes the original message. The default quotas set at the organizational level are Maximum receive size (KB)—10,240KB (10MB). Maximum send size (KB)—10,240KB (10MB). Maximum number of recipients—5,000.
There are several places in an Exchange Server environment in which message size limits can be applied: Individual Mailbox Level— Viewed in EMC from the message size restrictions or can be viewed in EMS with the following command: Get-Mailbox "username" | fl *size* Organizational Level—
Viewed in EMC by navigating to the Organization Configuration \ Hub
Transport node and select the Global Settings tab. Select Transport
Settings object and select Properties from the action pane. Select the
General tab to review the settings. Can be viewed in EMS with the
following command: Get-TransportConfig | fl *size* Send and Receive Connectors—
Can be viewed in the EMC by navigating to the Organization
Configuration \ Hub Transport node and selecting Send Connectors, or by
the Server Configuration \ Hub Transport node and selecting Receive
Connectors. Can be viewed in EMS with the following commands: Get-ReceiveConnector –id "receive connector name" | fl *size*
Get-SendConnector –id "receive connector name" | fl *size* Note
Setting a higher
message size limit on an Exchange Recipient bypasses the maximum
message size settings at the organizational level. However, this is for
internal messages only—messages sent outside of the organization are
still subject to the organizational limits.
Message Delivery Restrictions—
With this feature, you can dictate whether an individual mailbox can
receive messages from all senders or only specified senders, and whether
those senders are required to be authenticated. Additionally, you can
configure the mailbox to reject messages from particular senders.
Mailbox Features
Several property
options for mailbox features enable for changes in settings for Outlook
Web App (OWA), Exchange ActiveSync, unified messaging, and the Messaging
Application Programming Interface (MAPI) communications protocol.
Specific details on these mailbox feature properties are as follows:
Outlook Web App—
This tab is used to enable or disable access to the Exchange servers
via Outlook Web App for the user. Additionally, there is a new property
for the object that allows the administrator to specify that the account
must use a particular Outlook Web App mailbox policy, if one has been
created. By default, OWA access is enabled for all user mailboxes. Exchange ActiveSync— This
feature can be enabled or disabled for an individual mailbox. If
enabled, you have the option in the properties to apply an Exchange
ActiveSync mailbox policy for the mailbox. By default, Exchange
ActiveSync is enabled for all user mailboxes. Unified Messaging— You have the option to enable or disable unified messaging for the mailbox using this feature setting. MAPI—
With this setting, you can dictate whether the user can access his
mailbox from a MAPI-enabled client. You have the option to enable or
disable MAPI access. By default, MAPI access is enabled for all user
mailboxes. POP3—
With this setting, you can dictate whether the user can access his
mailbox with POP3, an application-layer Internet standard protocol used
to retrieve email from a remote server. This option is enabled by
default for all user mailboxes. IMAP4—
With this setting, you can dictate whether the user can access his
mailbox with Internet Message Access Protocol Version 4 Rev1 (IMAP4).
IMAP4 is an application-layer Internet protocol that enables a local
client to access email on a remote server. By default, IMAP4 access is
enabled for all user mailboxes. Archive—
By enabling the Archive option, administrators can require that items
be automatically moved from the primary mailbox to the archive using the
configured policy.
Calendar Settings
New to Exchange Server
2010, the Calendar Settings tab enables administrators to modify the way
that automatic processing of calendar items by the Calendar Attendant
is handled. The following options are available:
Enable the Calendar Attendant—Enabled by default—
This option enables or disables the Calendar Attendant, which decides
whether any of the remaining features on the tab are available. If the
Calendar Attendant is disabled, none of the following features can be
enabled. Remove meeting forward notifications to the Deleted Items folder—Disabled by default—
When selected, this option takes meeting forward notifications and
deletes them when they have been processed by the Calendar Attendant. Remove old meeting requests and responses—Enabled by default— When selected, this option allows the Calendar Attendant to remove old and redundant updates and responses. Mark new meeting requests as Tentative—Enabled by default—
If selected, new meeting requests are marked as tentative in the user’s
calendar. If not selected, pending requests are marked as free. Process meeting requests and responses originating outside the Exchange Organization—Disabled by default— If
selected, the Calendar Attendant will process meeting requests that
originate from outside of the Exchange Server organization.
Managing Email Addresses
When a new mail-enabled
user is created in an Exchange Server 2010 environment, the creation of
the primary SMTP address is controlled by a recipient policy. By
default, the recipient policy creates a primary SMTP address that is
formatted as Alias @ your default organization. For example, user John
Doe in companyabc.com, with an alias of JDoe, would have the default
SMTP address of [email protected].
However, the default
behavior of this recipient policy can easily be modified to create
primary SMTP addresses that conform to your organization’s standard. For
example, if your organization uses [email protected]
as its standard SMTP address, you can configure the recipient policy to
generate this address for you when the user mailbox is created. To do
so, perform the following procedure:
1. | Start the Exchange Management Console.
| 2. | In the Console Tree, select Organization Configuration; then select Hub Transport.
| 3. | In the results pane, select the E-Mail Address Policies tab, and then highlight the default policy.
| 4. | In the action pane, click Edit.
| 5. | On
the Introduction page, when modifying the Default Policy, all the
options are read-only and cannot be changed. If you create an additional
policy, these settings can be modified. Click Next to continue.
| 6. | On
the Conditions page, when editing the default policy, the options are
read-only. When creating a new policy, the policy can be specified to
apply to recipients based on a particular State or Province, a specific
department, or several other criteria. Click Next to continue.
| 7. | On the E-Mail Addresses page, under SMTP, select the policy and click Edit.
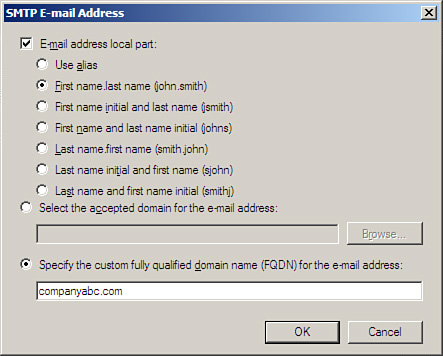
| 8. | By
default, the E-Mail Address Local Part is set to Use alias. To modify
the policy, click the E-Mail Address Local Part check box, and select
the desired SMTP naming standard for your organization. For available
options, see Figure 1.
In the example, we are changing the policy to create email addressed in
the format of First name.last name, so John Doe would get the default
email address of [email protected]. Select the desired entry, and
then, either select the Select the Accepted Domain for the E-mail
Address radio button and choose your domain by clicking the Browse
button, or (simpler) ensure the radio button for Specify the Custom
Fully Qualified Domain Name is selected and type the desired domain
there. When ready, click OK to continue.
| 9. | You
should now be back at the E-Mail Addresses page with the format for the
desired custom address populated. In our example, this would be
presented as %g.%[email protected] (%g is the variable for Given Name and
%s is the variable for Surname). Click Next to continue.
| 10. | On
the Schedule page, specify when the email address policy will be
applied. Note that if you select a time and date in the future, the
wizard remains open until the countdown has completed. Select the
appropriate option, and click Next to continue.
| 11. | On
the Edit E-Mail Address Policy page, the Configuration Summary is
shown. Review the policy to ensure all is correct, and then click Edit
to continue.
| 12. | On
the Completion page, a summary is shown informing you how many items
were modified, how many succeeded, and how many failed. Click Finish to
continue.
|
After this policy has
been applied, existing users will have a new SMTP e-mail address
generated that conforms to the policy, and it will be set as their
primary (reply-to) address. Previously assigned addresses remain in
place as secondary addresses. Users created from this point on, however,
have only the new address, and it is set as their primary SMTP address.
Note
If your existing
email address policy was created in a legacy version of Exchange Server,
it must be upgraded before you can edit it using the previous
procedure. To upgrade your policy, you must use the Set-EmailAddressPolicy command from the Exchange Management Shell. The following example shows how this command can be used.
From the Exchange
Management Shell—for a policy named “Default Policy” that should apply
to all users in the environment, the command would read:
Set-EmailAddressPolicy "Default Policy" –IncludedRecipients allrecipients
After hitting Enter, the administrator will see the following:
To save changes on object "Default Policy", the object must be upgraded to the
current Exchange version. After the upgrade, this object cannot be managed by
an earlier version of Exchange Management Tools. Do you want to continue to
upgrade and save the object?
Select “Y” for “Yes” and hit Enter.
The policy can now be edited from within the Exchange 2010 Management Console.
|
