Synching Content to SharePoint Workspace
If
SharePoint Workspace is installed on the computer and the administrator
has decided to allow syncing to SharePoint Workspace (by checking Yes
for Allow Items from This Document Library to Be Downloaded to Offline
Clients from the Advanced Settings page for the document library), this
icon will be clickable; otherwise, it will be grayed out.
Connect to Office Options
If the administrator or user
clicks the Connect to Office button on the Library tab of the Ribbon,
the following options are provided:
Add to SharePoint Sites—
This adds a shortcut to the list or library in Microsoft Office. If
selected, the user will be prompted with a message that states “...your
machine must register the user profile service application used by this
site....” If Yes is selected, a Library Added message will display,
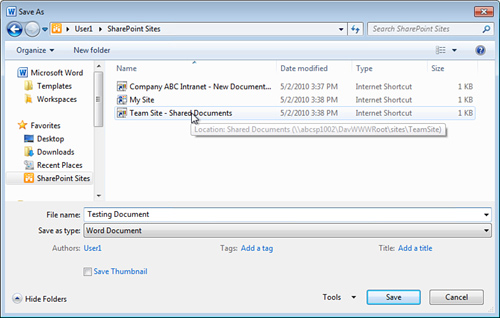
briefly indicating that the process succeeded. Now when the user clicks
Save from the Office 2010 application, such as Word 2010, these sites
will appear in the Favorites grouping under SharePoint Sites, as shown
in Figure 5.
Remove from SharePoint Sites—
Removes the link from SharePoint Sites. A Library Removed message will
appear briefly to show that the process completed successfully.
Manage SharePoint Sites— Opens the MyQuickLinks.aspx and allows the user to Add Link, Edit Links, Delete, or Create Tag from Link.
Tip
Using the Add to SharePoint
Sites option from the Connect to Office drop-down list in a library is a
great way to make it easier for end users to save their documents to a
SharePoint library. If they add to SharePoint Sites, the library will
then show up in the Save As window underneath Favorites in the
SharePoint Sites folder. These links can be easily managed by using the
Manage SharePoint Sites tool also available in the Connect to Office
drop-down menu.
Modify Form Web Parts Tools
The Modify Form Web Parts
button on the List tab of the Ribbon allows the administrator to open
the forms present for the list or library for editing. The editing
allowed includes inserting text, image, video and audio, web parts, or
the existing list view web part. The properties of the body of the form
can be edited, too, such as height, width, chrome state, layout,
advanced, and miscellaneous properties. This allows the administrator a
great deal of control over how the various forms, such as New, Edit, and
Display forms, appear, and over forms associated with content types in
use in that list or library. For a simple example, an administrator
could add a Video and Audio web part to the New form for a list, which
provides instructions on how to fill out the form.
Edit Library Tool
When clicked, this button will open SharePoint Designer 2010, and as shown in Figure 6,
provides an extensive dashboard of information about the library. This
information can be invaluable for a library administrator, as discussed
briefly in this section.
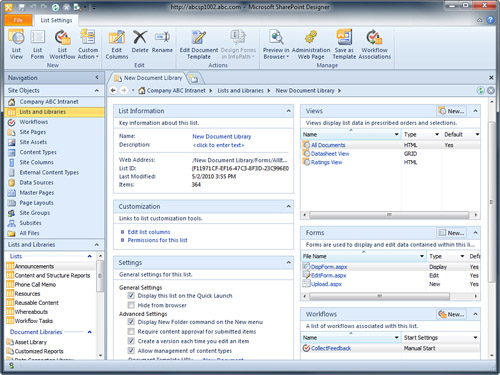
From a list
administrator’s perspective, the dashboard of information provided by
SharePoint Designer 2010 provides insight into a variety of areas:
List Information— Name and description of the library or list, web address, list ID, last modified, and number of items.
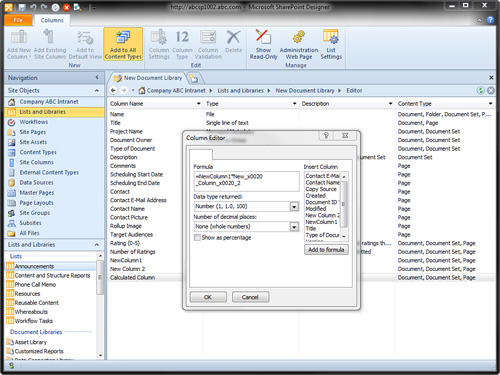
Customization— Provides links to the Edit list columns page and Permissions page for this list. Figure 7
shows the Columns that exist for the document library New Document
Library and show the Column Editor window for the column titled
Calculated Column.
Settings—
Allows the administrator to quickly change settings such as whether to
display the list on the Quick Launch, Hide from Browser, Display New
Folder Command on the New Menu, Require Content Approval for Submitted
Items, Create Versions, Allow Management of Content Types, and provides
the Document Template URL.
Content Types— Allows the administrator to add new content types, or view and manage settings for existing content types.
Views— Create new views or edit existing views.
Forms— Create new forms or edit existing forms.
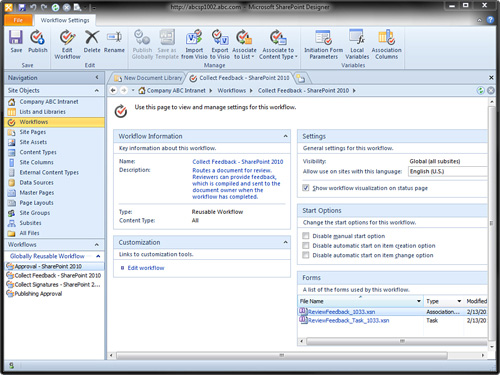
Workflows— Create new workflows or edit existing workflows. As shown in Figure 8, which shows the result of clicking the Collect Feedback workflow in Figure 20.7,
workflow information is provided, customization is allowed, settings
and start options can be modified, and forms used are shown.
Just from this quick
overview of tools, it appears that SharePoint Designer 2010 offers an
alternative to the administrator to the tools provided in the SharePoint
2010 user interface. It is
arguably a faster way for an experienced site administrator to quickly
navigate between sites and between lists and make changes.
For example, as visible in the List Settings Ribbon in Figure 6, a number of actions can be completed that include:
List View— Allows the administrator to create a list view.
List Form— Allows the administrator to create a list form.
List Workflow— Allows the administrator to create a list workflow.
Custom Action—
Allows the administrator to create a custom action of the types List
Item Menu, Display Form Ribbon, Edit Form Ribbon, New Form Ribbon, and
View Ribbon.
Edit Columns— Add, edit, or delete column settings.
Delete— Delete specific components.
Rename— Rename specific components.
Edit Document Template— Edit the document template associated with the library.
Design Forms in InfoPath— Open InfoPath to create new forms.
Preview in Browser— Preview the list or library at different resolutions.
Administration Web Page— Opens the Settings page for the list or library.
Save as Template— Save the list or library as a template, with the option to include content.
Workflow Associations—
Opens the Workflow Settings page for the list or library and allows the
administrator to decide which items are configured to run the workflow,
add or remove workflows, or view workflow reports.
The administrator should work
with the tools provided in SharePoint Designer 2010, as well as the
user interface provided by SharePoint 2010, and decide which is their
preferred method of managing SharePoint lists and libraries.
An Example of Creating a Custom Action
From SharePoint Designer
2010, with a library opened (for example, by clicking the Edit Library
link from the Library tab of the Ribbon), follow these steps to add an
entry to the drop-down menu in a document library. This is a powerful
way for an administrator to provide added functionality within a list or
library, but should be considered an advanced and potentially dangerous
process:
1. | Click the Custom Action drop-down menu and select List Item Menu.
|
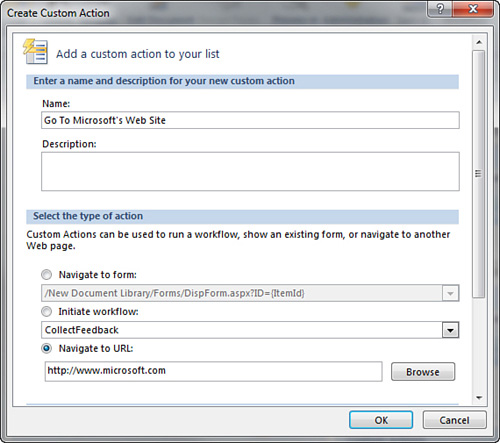
2. | Per Figure 9,
enter a name and description and then specify either Navigate to Form,
Initiate Workflow, or Navigate to URL. For this example, a link will be
added that simply navigates to a different website. Enter the Name as Go To Microsoft's Web Site, set the action as Navigate to URL, and enter http://www.microsoft.com.
|
3. | Scroll down, and in the Rights Mask section, enter EditListItems. This will result in this menu item only displaying to users with EditListItems permissions.
|
4. | Click OK. This will save the new menu item to the document library. No save is needed from Designer 2010.
|
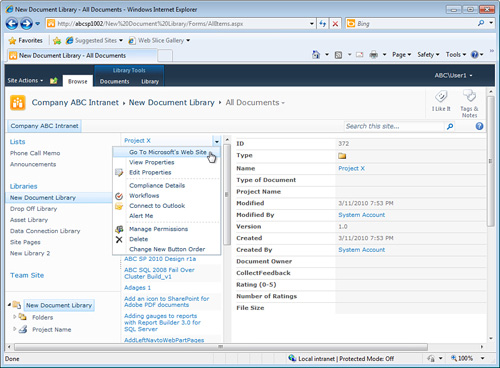
5. | Navigate
to the document library that was opened in SharePoint Designer 2010; in
this example, it was named New Document Library. Access the drop-down
menu for an item, and validate that the new entry appears, as shown in Figure 10.
|
6. | Next
access the Sign in as Different User from the drop-down menu next to
the username in the upper-right corner, and log in as a user who does
not have EditListItems permissions (in this example, User3 is a member
of the Visitor’s group, and does not have EditListItems permissions) and
verify that this new menu item does not appear.
|
New Quick Step Button
The New Quick Step button
opens SharePoint Designer 2010 and a window titled Add a Button, which
provides the options to Start a New Workflow or Start an Existing
Workflow and to define the Button Label and link to a Button Image.
