Understanding Distribution Groups
In Exchange Server
2010, distribution groups serve two primary purposes: They can be used
as email distribution groups created to expedite the mass sending of
email messages, calendar invitations, and other information within an
Exchange Server organization, or a security group to assign permissions
to a shared resource. Whether you create a distribution group or a
security group, the same utility (New Distribution Group) is utilized.
Whether
a distribution group or a security group is wanted, the group is
created as a mail-enabled Active Directory group object. When a sender
sends a message to a distribution group, the server takes the original
message, accesses the distribution group membership, and sends the
message to each recipient in the membership list; this is known as
“distribution group expansion.” In Exchange Server 2010, distribution
groups are configured to use any Hub Transport server as the
distribution group expansion server. Although this default behavior can
be modified, this default setting is a recommended best practice.
By default,
distribution groups created in Exchange Server 2010 require that all
senders be authenticated. This prevents external senders from sending
messages to distribution groups. To configure a new distribution group
to accept messages from all senders, you must modify the message
delivery restriction settings on the object.
To create or
modify distribution groups, the user must be assigned to either the
Organization Management or Recipient Management role.
Creating Distribution Groups in the EMC
To create a new distribution group in the Exchange Management Console, perform the following steps:
1. | Start the Exchange Management Console.
|
2. | In the Console Tree, navigate to the Recipient Configuration \ Distribution Group node.
|
3. | In the action pane, click New Distribution Group. The New Distribution Group Wizard appears.
|
4. | On the Introduction page, select New Group, and then click Next.
|
5. | On the Group Information page, complete the following fields:
- Group Type— To create
a distribution group, select Distribution. To create a security group,
click Security. The remaining steps are identical, regardless of which
type of group you create.
- Organizational Unit—
By default, the New Distribution Group is created in the Users
Organizational Unit (OU) in Active Directory. To change the default OU,
select the box labeled Specify the Organizational Unit Rather Than Using
a Default One; then click Browse and select the desired OU.
- Name— Enter the desired name for the group.
- Name (pre-Windows 2000)—
By default, the group name for pre-Windows 2000 operating systems is
automatically generated to be the same as the group name. You can modify
the name in this field (not recommended).
- Alias—
Enter the desired alias for the group. This is the name used to
generate the default email address for the distribution group, so it
must contain only characters that can be used in a valid SMTP address.
(For example, no spaces can be used.) If you select an invalid
character, the wizard notifies you. Enter the desired alias.
|
6. | Click Next.
|
7. | On
the New Distribution Group page, review the Configuration Summary. To
make any configuration changes, click Back. To create the new
distribution group, click New.
|
8. | On
the Completion page, the summary states whether the distribution group
was successfully created. The summary also displays the Exchange
Management Shell command that was used to create the distribution group.
|
9. | Click Finish.
|
Creating Distribution Groups in the EMS
To create a new distribution group in the Exchange Management Shell, you can use the following command syntax:
New-DistributionGroup –Name "GroupNameHere" –OrganizationalUnit "companyabc.com/users"
–Type "Distribution OR Security" –SamAccountName "GroupNameHere" –Alias "AliasHere"
Creating Distribution Groups in the ECP
New in Exchange Server
2010 is the ability to create and manage distribution lists from within
the Exchange Control Panel web interface.
Before we discuss the process, there are a few items to note:
Although
both Mail Universal Distribution Groups and Mail Universal Security
Groups are visible from within the ECP, there is no noticeable
differentiation between the two.
All
distribution groups created from within the ECP are created as Mail
Universal Distribution Groups; there is no option to create a security
group.
Dynamic Distribution Groups are not visible from within the ECP, nor can new ones be created there.
The ability to create
new groups using the ECP is governed by RBAC. Users must be granted the
permission to do so before the following process can be accomplished.
To create a new distribution group in the ECP, perform the following steps:
1. | Connect
to the ECP by logging into OWA as an administrator and selecting the
Options page, clicking Manage Your Organization, and selecting the
Groups icon. Alternatively, you can go directly to https://{your CAS
server name}/ecp and authenticate through OWA.
|
2. | Under Groups, click the New button.
|
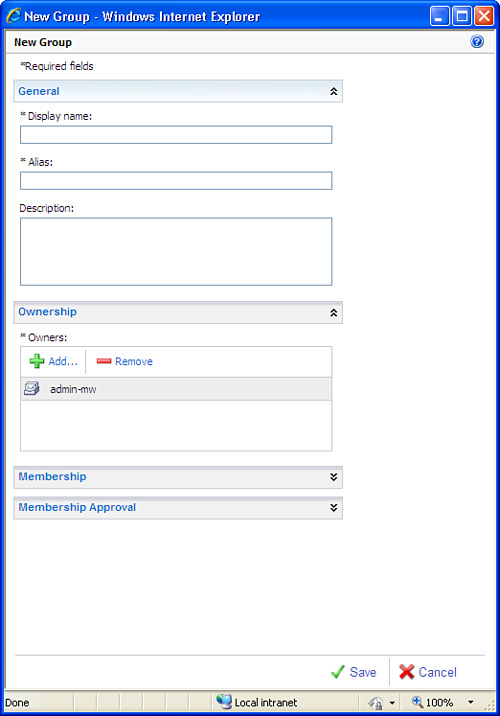
3. | In the New Group window, as shown in Figure 5, complete the following fields:
- Display Name—(Required)—
This name must be unique in the domain. This is the name that displays
in the address book and on the To: line when mail is sent to the group.
The display name should be user-friendly to help people recognize the
purpose or membership of the group.
- Alias—(Required)—
This is the name portion of the email address that appears to the left
of the @ symbol. The alias must be unique in the domain and, because it
is part of the email address, cannot contain any spaces.
- Description—(Not Required)—
This description populates the Notes field for the object. This
descriptive name can be viewed by employees who view the properties of
the distribution list. If populated, the field should describe the
purpose or membership of the group.
- Ownership—(Required)—
Owners can add members to the group, approve or reject requests to
join, and approve or reject messages sent to the group. By default, the
person creating the group is added as a group owner. If an administrator
creates the group at the request of an employee, the administrator can
add the employee as an owner and then remove herself.
- Membership—(Not Required)—
By default, all group owners are added as group members. If this
behavior is not desired, deselect the check box for this option. Add or
remove members to the group as desired.
- Membership Approval—(Required)—
New to distribution groups in Exchange Server 2010 is the ability for
users to self-manage their distribution lists, joining those that
interest them and leaving those that don’t. During the creation of the distribution group using the ECP, the following options are available:
- Owner Approval—Open— Anyone can join the group without being approved by the group owners.
- Owner Approval—Closed— Members can be added only by the group owners. All requests to join will be rejected automatically.
- Owner Approval—Owner Approval— All requests are approved or rejected by the group owners.
- Group Open to Leave—Open— Anyone can leave the group without being approved by the group owners.
- Group Open to Leave—Closed— Members can be removed only by the group owners. All requests to leave will be rejected automatically.
|
4. | After all fields have been populated and all options selected, click Save to create the distribution group.
|
Dynamic Distribution Groups
Unlike a regular distribution group, a dynamic distribution group,
as the name implies, is dynamic in nature. Whereas a regular
distribution group is composed of a defined set of members, the
membership list for a dynamic distribution group is calculated every
time a message is sent to it. This is accomplished by utilizing a
Lightweight Directory Access Protocol (LDAP) query that has been defined
and assigned to the group. For example, you can build a dynamic
distribution group that is intended to include all recipients in a
particular state. Each time the list is accessed, the membership would
be built based on information gathered from the AD.
Dynamic
distribution groups require less maintenance than standard groups
because the query is defined once, and the membership is built
automatically every time the group is called. However, a performance
cost is associated with their use, especially if the query produces a
large number of results. Every time an email is sent to a query-based
distribution group, server and domain resources are utilized to
determine its membership. Dynamic distribution groups are an extremely
functional tool but should be used with discretion.
Creating Dynamic Distribution Groups in the EMC
To create a new dynamic distribution group in the Exchange Management Console, perform the following steps:
1. | Start the Exchange Management Console.
|
2. | In the Console Tree, navigate to the Recipient Configuration \ Distribution Group node.
|
3. | In the action pane, click New Dynamic Distribution Group. The New Dynamic Distribution Group Wizard appears.
|
4. | On the Introduction page, complete the following fields:
- Organizational Unit—
By default, the New Distribution Group will be created in the Users
Organizational Unit (OU) in AD. To change the default OU, select the box
labeled Specify the Organizational Unit Rather Than Using a Default
One; then click Browse and select the desired OU.
- Name— Enter the desired name for the group.
- Alias— Enter the desired alias for the group. This is the name that will be used to generate
the default email address for the distribution group, so it must only
contain characters that can be used in a valid SMTP address. (For
example, no spaces can be used.) If you select an invalid character, the
wizard notifies you. Enter the desired alias.
|
5. | Click Next.
|
6. | On the Filter Settings page, complete the following fields:
- Recipient container—
By default, recipients from the entire organization are eligible as
members of the distribution list. However, you can specify to include
only members from a specific OU, if your OU structure matches the needs
of the distribution list. For example, if you have an OU container for
all employees in Europe, and you create a distribution group that
contains only employees in Europe, specifying that OU prevents the list
from searching the rest of AD every time a message is sent to the list.
If you select an OU here, that OU and all OUs under it are included. To
select an OU, click Browse and do so.
- Include these recipient types—
Either leave the default All Recipient Types, or, if desired, you can
limit the group membership to one of the following categories:
Users with Exchange Mailboxes Users with external email addresses Resource mailboxes Contacts with external email addresses Mail-enabled groups Or any combination of the above
|
7. | When you are ready, click Next to continue.
|
8. | On
the Conditions page, you can select the conditions that will build the
LDAP query that will identify the recipients to be included in the list.
Select one or more conditions by placing a check in the associated box
and then editing the conditions by selecting an underlying value. For
example, if you were to select Recipients in a State or Province, you
would then click the highlighted word and enter the value (example:
Florida).
|
9. | When
you are ready, click the Preview button to test the query you created
and ensure the membership of the list is populated as you expect. Click
OK and, if all is as expected, click Next.
|
10. | Review the configuration summary. If all is well, click New.
|
11. | On
the Completion page, the summary states whether the distribution group
was successfully created and shows the Exchange Management Shell command
that was used to create the distribution group. When ready, click
Finish.
|
Creating Dynamic Distribution Groups in the EMS
To create a new distribution group in the Exchange Management Shell, a sample command is shown here:
New-DynamicDistributionGroup –Name "Florida Employees" –RecipientContainer "companyabc.com/Users"
–IncludedRecipients "MailboxUsers" –ConditionalStateOrProvince "Florida" –OrganizationalUnit "companyabc.com/Users" –Alias "Florida_Employees"
