With three different tools to choose from,
determining which to use for a particular task is up to the person
performing the task. The decision is based primarily on two questions:
What tools can perform the activity? Some activities, such as creating a new user mailbox, can be performed from EMC, the EMS, or the ECP, whereas others, such as creating a new room mailbox, can be accomplished only in the EMC and the EMS.
Which
tool is most convenient for the task? If creating a new mailbox user,
it might be easier to simply log on through a browser and create the
account, whereas creating 100 new accounts would be easier using a
script in the EMS.
Some tasks can be performed in the ECP, more tasks can be performed in the EMC, and all
tasks can be performed in the EMS—but for something as simple as
changing the department for a single user, determining the PowerShell
cmdlet and parameters might be more challenging than simply using the
GUI or Web interfaces.
Creating User Mailboxes
The creation of a new
user mailbox, either for an existing user or in conjunction with the
creation of a new user, is an example of a task that can be accomplished
from any of the three administrative tools. For this example, we show
how to perform the task using all three tools.
Exchange Server 2010 allows for the creation of four different types of mailboxes:
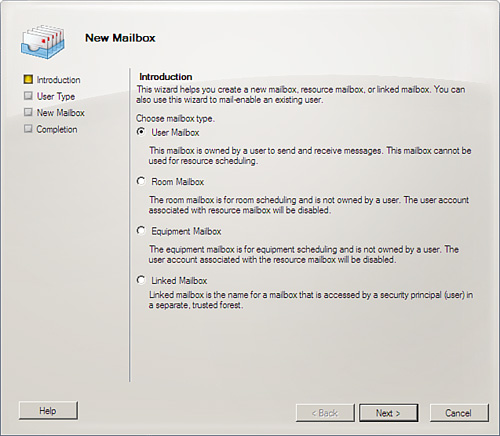
User Mailbox— Owned by a user and used to send and receive messages. This mailbox cannot be used for resource scheduling.
Room Mailbox— Intended for room scheduling and not owned by a user. A user account is created with the mailbox, but the account is disabled.
Equipment Mailbox—
Intended for equipment scheduling. Like the room mailbox, this is not
owned by an active user. The associated user account that is created
will automatically be disabled.
Linked Mailbox— Accessed by a user in a separate, trusted forest.
However, only a user mailbox can be created with the ECP. For our following examples, we create a User Mailbox for a user named Oscar B. Hayve.
Creating a New Mailbox in the Exchange Management Console
Creating a new mailbox
using the GUI interface of the EMC is easy and familiar to those who
have worked with previous versions of Exchange Server. To do so
1. | Start the Exchange Management Console.
|
2. | In the Console Tree, navigate to the Recipient Configuration node.
|
3. | In
the action pane, click New Mailbox. The New Mailbox Wizard appears.
Alternatively, administers can select New Mail User, which defaults to
creating an actual user mailbox (as opposed to a room, equipment, or
linked mailbox) and skips step 4.
|
4. | On the Introduction page, as shown in Figure 1, select User Mailbox, and then click Next.
|
5. | On the User Type page, click New User, and then click Next.
|
6. | On the User Information page, complete the following fields:
- Specify the organizational unit rather than using a default one—
Select this box if you want to specify a particular organizational
unit. If checked, click the Browse button and select the desired OU for
the user account. For our example, we leave this box unchecked.
- First name— Type the first name of the user. This field is optional.
- Initials— Type the initials of the user. This field is optional.
- Last name— Type the last name of the user. This field is optional.
- Name—
By default, this field is populated with the user’s first name,
initials, and last name, if entered. You can modify the name in this
field or type one manually if no previous fields were populated.
- User logon name (User Principal Name)—
This is the name that the user uses to log on to the mailbox. The user
logon name consists of a username and a suffix. Typically, the suffix is
the domain name in which the user account resides.
- User logon name (pre-Windows 2000)—
This is also known as the Security Account Manager Account Name
(SAMAccountName) and is used for Windows Internet Naming Service (WINS)
name resolution. This name must be unique within the domain and is, by
default, automatically populated based on the preceding User Principal
Name.
- Password— Type the password that the user must use to log on to his mailbox.
- Confirm Password— Retype the password that you entered in the Password field.
- User Must Change Password at Next Logon— Select this check box if you want to require users to reset the password after their first logon (recommended).
|
7. | When finished, click Next.
|
8. | On the Mailbox Settings page, complete the following fields:
- Alias— Enter the
desired alias for the user, based on your organization’s policies. For
our example, we use the user’s first initial, middle initial, and last
name—OBHayve.
- Specify the mailbox database rather than using a database automatically selected—
If desired, select this option and use the Browse button to select a
specific database. For our example, we leave this option blank.
- Managed folder mailbox policy—
If desired, select this box and click the Browse button to select the
MRM mailbox policy to be associated with this mailbox. For our example,
we leave this option blank.
- Exchange ActiveSync mailbox policy—
To specify an Exchange ActiveSync mailbox policy, select this check
box, and then click Browse to select the Exchange ActiveSync mailbox
policy to be associated with this mailbox. For our example, we leave
this option blank.
|
9. | When finished, click Next.
|
10. | New
to Exchange Server 2010 is the Archive Settings page. Selecting the box
beside Create an Archive Mailbox for This Account will, as indicated,
create a link to an online archive for the mailbox. Items will be moved
automatically from the primary user mailbox to the archive based on the
default retention policy settings or those defined by the administrator.
For our example, we leave this option blank.
|
11. | On
the New Mailbox page, review the Configuration Summary. To make any
configuration changes, click Back. To create the new mailbox, click New.
|
12. | On
the Completion page, the summary states whether the mailbox was
successfully created. The summary also displays the Exchange Management
Shell command that was used to create the mailbox. This command can be
copied and pasted into a text editor as the first step toward creating
future mailboxes from the command line interface of the EMS.
|
13. | Click Finish.
|
Creating a New Mailbox in the Exchange Management Shell
Creating a new
mailbox from the EMS can be complicated because there are so many
parameters to consider. However, by copying the EMS Shell command
created by the Management Console in the previous steps, we can now
paste that command into a text editor and modify the contents, allowing
us to create our next test user.
Note that we must
also remove the Password System.Security.SecureString and
ResetPasswordOnNextLogon $true portions of the command because these
were created in the EMC command to populate the password for the
account.
We can create our new user, Yasmine B. Guud, by using the following command:
New-Mailbox -Name 'Yasmine B. Guud' -Alias 'YBGuud' -UserPrincipalName '[email protected]'
-SamAccountName 'YBGuud' -FirstName 'Yasmine' -Initials 'B' -LastName 'Guud'
After running the
preceding command in the Exchange Management Shell, we are prompted for
the Password. Enter the desired password (carefully, there will not be
an option to confirm it) and press Enter.
As you can see,
every option configured during the creation of the account in the GUI
interface, with the exception of the user password, can be replicated
using the Exchange Management Shell command.
Creating Multiple Mailboxes in the Exchange Management Shell
Given the complexity of
creating a new mailbox in the EMS, why would anyone want to do so?
Generally, they wouldn’t. But what if your Human Resources department
handed you a list of 50 new employees and requested that you create new
mailboxes for all of them? Doing so through the GUI interface of the EMC
would not only take hours, but would also result in the increased
likelihood that misspellings or mistakes might occur.
That’s where the power of the EMS comes into play.
By putting the list of
names in a .csv file, we can quickly create multiple accounts from only
two lines of code. To do so, perform the following steps:
1. | Create a text file called newusers.csv in a directory called (for our example) c:\scripts.
|
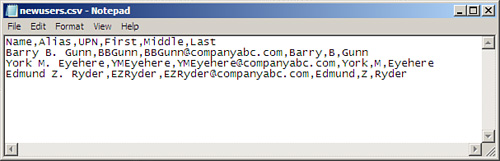
2. | For our example, we create several column names and populate the data, as shown in Figure 2.
The columns we will populate are Name, Alias, UPN, First, Middle, and
Last. Additional column names can be added, if desired, to populate more
data in the user accounts.
|
3. | When
the .csv file is complete, we are ready to begin. Each user account
will be created with a default password, with the user required to reset
the password when they
first log in. From the Exchange Management Shell, type the following
command. (Type it word-for-word, do not attempt to enter the password
yet.)
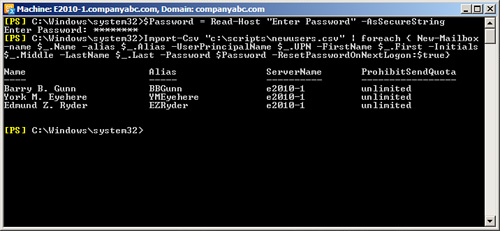
$Password = Read-Host "Enter Password" -AsSecureString
And press Enter. You will be presented with a prompt stating
Enter Password. Type the password you want to apply to all your newly
created users and press Enter. Your password will now be assigned to the
variable $Password for use in our script.
|
4. | Next,
we run two cmdlets, piping the results of the first into the second, to
create the new mailboxes from the .csv file. The syntax will be as
follows:
Import-Csv "c:\scripts\newusers.csv" | foreach { New-Mailbox –name $_.Name –alias $_.Alias –UserPrincipalName $_.UPN -FirstName $_.First -Initials $_.Middle -LastName $_.Last -Password $Password –ResetPasswordOnNextLogon:$true}
|
The result, as shown in Figure ,
is the creation of the new mailboxes. The existence can be confirmed by
viewing the mailboxes in the Exchange Management Console. (Remember to
refresh the screen if you already had it open.)
Again—while this is a
significant amount of work for three users, the same concept can be
used to create 50 users (or 500) and can prove to be a valuable time
saver.
Creating a New Mailbox in the Exchange Control Panel
Before administrators
can create a new mailbox in the Exchange Control Panel, they must be
granted the rights to do so using RBAC.
Once they have
the appropriate permissions, creating a new mailbox in the Exchange
Control Panel is so easy that it’s hardly worth the time to explain it.
However, because the ECP is brand new, this section runs through the
process to show how quick and easy it is.
To create a new mailbox user in the Exchange Control Panel, perform the following steps:
1. | Log in to the OWA server with administrative credentials.
|
2. | From the OWA page, select Options.
|
3. | Select Manage Your Organization.
|
4. | Ensure
My Organization is selected in the UI Scope Control, Users & Groups
is selected in the Primary Navigation Panel, and Mailboxes is selected
in the Secondary Navigation Panel.
|
5. | Click the New Mailboxes icon.
|
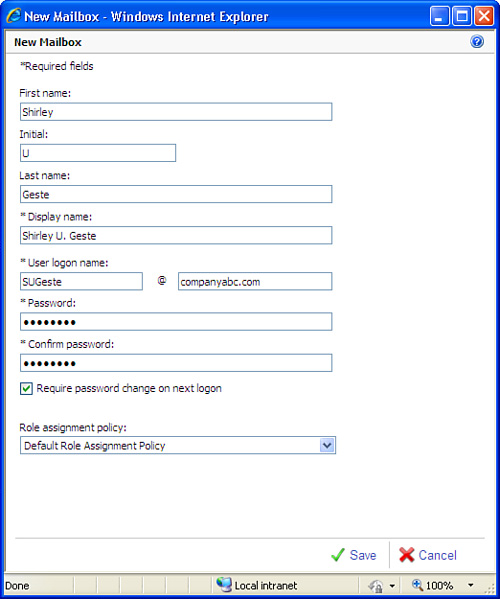
6. | On
the New Mailbox page, enter the information for the new account. Those
marked with asterisks (*) are required fields. An example of the New
Mailbox page is shown in Figure 4.
|
7. | When finished, click the Save button.
|
The ECP passes the
information on to the CAS server, which, in turn, uses Remote PowerShell
commands to perform the actual operation and create the account.
