A Windows Media Services server can be used as the
host to broadcast real-time videos. With a camera attached to the
broadcasting server, video can be captured and published to multiple
users. Real-time live broadcast videos are commonly used for
organizational press releases or announcements, distributed broadcasting
of conference sessions or training classes, or video-published company
meetings.
Configuring a Server for Real-Time Live Broadcasts
To configure a Windows
Media Services system for real-time live broadcasts, a publishing point
needs to be configured for live communications. The configuration
process is as follows:
1. | In
the Windows Media Services MMC, right-click on Publishing Points in the
navigation tree, and select Add Publishing Point (Wizard).
| 2. | Click Next to move past the Welcome screen.
| 3. | Enter a publishing point name that describes the function. In the case of this live broadcast, you might choose something like Live Company Mtg 09-05-09. Click Next to continue.
Note
The name of a publishing
point should not have special characters, such as <, >, \, ?, %,
&, ‘, #, “, {, }, [, ], or *. These characters can interfere with
the successful publishing of the broadcast over the Internet.
| 4. | Select Encoder (A Live Stream) and click Next.
| 5. | Select Broadcast Publishing Point and click Next.
| 6. | Select Unicast or Multicast as the delivery option for the broadcasting publishing point, and then click Next.
|
The Unicast delivery option
sets up a one-to-one video stream between the Windows Media server and
each client system, whereas the Multicast delivery option sends a single
video stream that can be accessed by multiple users simultaneously.
The unicast delivery method
is simpler to configure and more likely to work without much network
infrastructure (router, firewall, system configuration) changes.
However, unicast is a significantly more bandwidth-intensive
environment. Because each client-to-server session is a separate video
stream, a broadcast with 10 users would have 10 video streams from the
server to the clients, and a broadcast with 100 users would feature 100
video streams from the server to the clients. For a relatively small or
low-demand Windows Media server environment, unicast delivery is easier
to implement, but be careful when using unicast delivery in large or
broadly distributed environments.
The multicast delivery
method sends a single video stream out on the network, which can be
accessed by multiple client systems simultaneously. With a multicast
delivery stream, whether 10 users or 100 users need to access the
system, there is only a single broadcast either way. However, for a
multicast delivery to work, the routers must be configured to support
multicast routing. The client systems receiving the multicast broadcasts
need to be running Windows 2000 Professional, Windows XP Professional,
Windows Vista, Windows 7, Windows 2000 Server, Windows Server 2003,
Windows Server 2008, or Windows Server 2008 R2.
An additional consideration
for choosing between the unicast and multicast delivery methods is the
number of clients that expect to connect to the broadcast stream and the
variation of client configurations. If the compatibility to accept
broadcasts from various systems is important and the number of
connections to a broadcast stream is limited, the unicast method will
provide better compatibility. If the organization controls the desktop
configurations and knows the client systems can accept multicast
broadcasts and the organization is broadcasting a video to be received
by many users, the multicast delivery method will lessen the demand on
network bandwidth.
|
| 7. | Enter the uniform resource locator (URL) for the encoder. This is typically the name of the Windows Media server, such as http://server1 or http://media.companyabc.com, depending on whether the server has been added to DNS for naming. Click Next to continue.
| 8. | Select the Enable Logging option if you want to log media events, and then click Next.
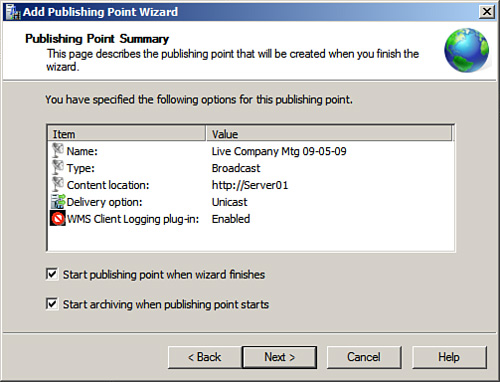
| 9. | The next screen shows a summary of the created publishing point, similar to the one shown in Figure 1.
You can choose to start the publishing point when the wizard is
finished, and if you want to capture and archive the live event, select
the Start Archiving When Publishing Point Starts option. Click Next.

| 10. | Before finishing with the Add Publishing Point Wizard, you are prompted to choose between three file creation options:
- Create an Announcement File (.asx) or Web Page (.htm)—
An announcement file is similar to an invitation file that can be used
to notify users of a pending live broadcast or the availability of an
on-demand video playback session.
- Create a Wrapper Playlist (.wsx)—
A wrapper playlist is content that can be added to either the start or
end of a broadcast. An example of wrapper content might be a welcome or
closing message, advertisements, or broadcast identification.
- Create a Wrapper Playlist (.wsx) and Announcement File (.asx) or Web Page (.htm)—
Choosing this option launches both the Announcement File and Wrapper
Playlist Wizards to create the invitation announcement, as well as the
capability to add content at the start or end of a broadcast.
Choose one of these three options or deselect the After the Wizard
Finishes check box if you don’t want to choose any of the options. Click
Finish when complete.
|
Starting a Real-Time Live Broadcast
A
live broadcast can be started immediately or at a later time. Many
organizations create the live broadcast publishing point and test the
session to ensure that the session process is working properly. Some key
aspects to test include making sure the camera and lighting are
acceptable for view, ensuring that the microphone is working, and
ensuring the audio quality and volume are acceptable.
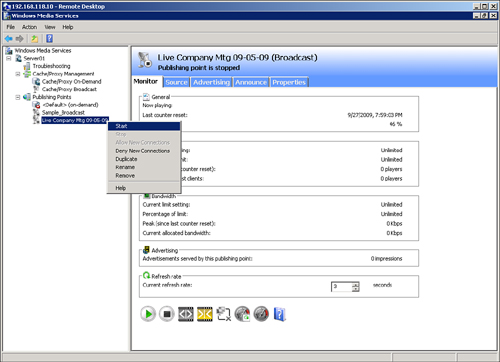
After the live broadcast is
tested, the session can be stopped and started at the time of the live
broadcast. To start a broadcast, right-click on the publishing point,
and select Start, as shown in Figure 2.

When the broadcast is complete, clicking the Stop button stops the broadcast session.
|