Adding a Column in a List and Updating a List Item
Although
libraries store documents, and can be extremely useful even if
additional metadata columns aren’t added, lists derive their value from
the columns that make up the list, so adding columns to lists is a
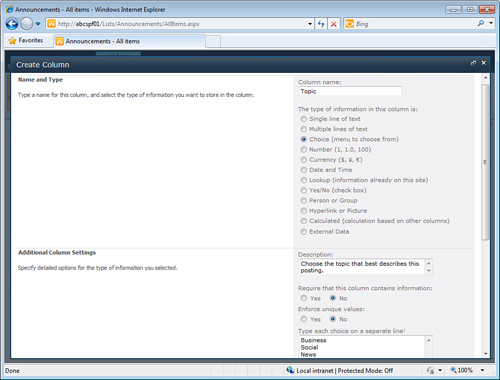
frequently performed task. Figure 5
shows the Create Column window that opens when a user with the manage
lists list permission clicks the Create Column button. Similar to in a
spreadsheet, a number of different column options are provided. In
SharePoint Foundation 2010, these are as follows:
Single line of text
Multiple lines of text
Choice (menu to choose from)
Number
Currency
Date and Time
Lookup (information already on this site)
Yes/No (check box)
Person or Group
Hyperlink or Picture
Calculated (calculation based on other columns)
External Data
SharePoint Server 2010 Standard or Enterprise also give the option of creating Managed Metadata columns in lists.
In this example, the
Choice column is chosen, and several items that will appear in the
drop-down menu are provided. Radio buttons or check boxes can also be
selected, and fill-in choices can be allowed, as well as a default value
provided. After OK is clicked, the column is added, and if the check
box is left checked to Add to Default View, the new column will be added
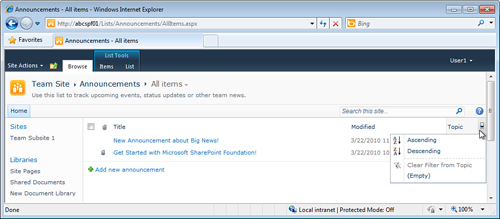
to the default view. In the example given immediately above, the new
column named Topic can be seen on the right side of the Announcements
list in Figure 6,
since the Add to Default View check box was selected when then new
column was added. The arrow next to the column header Topic is shown
selected in Figure 6,
and sorting options are provided; once there is content in this column,
the different distinct values will be available for selection for the
filter. To populate this new column with data, several different sets of
steps can be followed, as described in the following three sections.
Clicking the Item Title to Edit Content
This first section describes the process of editing content by clicking the title of an item in a list:
1. | The
easiest option, and most intuitive is to simply click the title of the
item (for example, New Announcement About Big News! shown in Figure 19.31) and the AJAX window for the item in View mode will open.
|
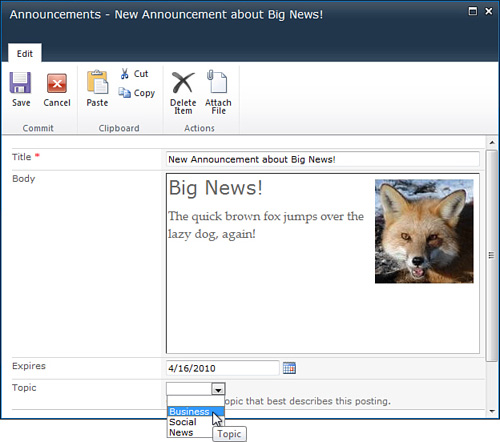
2. | Then click Edit Item from the View tab, and the item changes to Edit mode, as shown in Figure 7. Now make a change, such as clicking the drop-down arrow next to the Topic field, and select from the provided choices.
|
3. | Then click Save to save the modification and return to the previous view of the list.
|
Accessing the Drop-Down Menu to Edit an Item
This section describes the process of editing content by accessing the drop-down menu:
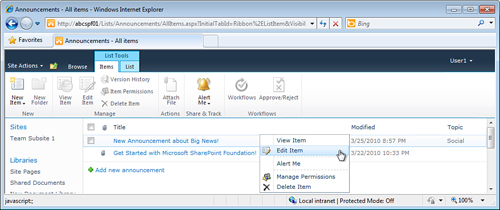
1. | As shown in Figure 8, hover over the Title for the list item in the list, and then access the drop-down menu to the right and click Edit Item.
|
2. | The list item then opens in Edit mode. Update one or more fields and click Save.
|
Selecting the Item and Choosing Edit Item
This section describes the process of editing an item by first selecting it and then choosing Edit Item from the Ribbon:
1. | Hover over the list item until the box appears to the left of the title, and then check the box.
|
2. | The
Items tab under List Tools is then active. Click Edit Item, and the
list item opens in Edit mode. Update one or more fields and click Save.
|
Note
The check box might not always be enabled in a list or library.
Interacting with Lists Using the Datasheet View
The Datasheet view is
extremely useful for quickly entering data into a list, or also for
rapidly entering metadata for items in a library. As shown in the
preceding three processes, editing a single item can involve several
hovers, clicks, more mouse-work, entering the information, and then
another click to save the data. Datasheet view appeals to the efficiency
conscious part of many users, and should be introduced to new users.
Follow these steps to use the Datasheet view in an Announcements list,
and most other lists:
1. | Click the List tab under List Tools.
|
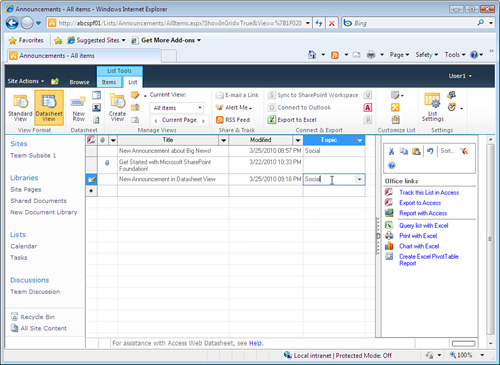
2. | Click the Datasheet View icon in the List tab Ribbon. Figure 9
shows an Announcements list in Datasheet view. The user clicked in an
empty cell under the bottom announcement, entered a new announcement
title, tabbed past the Modified cell (because this cell will be
populated by SharePoint automatically), and then selected Social from
the drop-down menu in the Topic column. If the user tried to enter any
data in the Modified column, he’ll get a message that says, “The
selected cells are read-only.”
|
3. | Click Enter, and the selected cell drops to the next row down, triggering a save of the data entered.
|
Note that the Body column is not visible in this view, so the user can’t actually enter in the body of the announcement.
In Figure 9,
the task pane has been extended on the right side of the Datasheet
view, and it provides easy access to tools such as Cut, Copy, Paste,
Undo, Custom Sort, Remove Filter, and a number of tools under the Office
links section.
With a little
experimentation, it can be seen that the Datasheet view allows a user to
quickly enter in data in lists (or libraries), cut, and paste into
other cells if needed, which dramatically cuts down on the time it takes
when compared to selecting items one at a time, accessing the drop-down
menu, or selecting the item and then accessing the Edit Item tool on
the Ribbon.
Note
At the time of this writing, per TechNet (http://technet.microsoft.com/en-us/library/ee681792(office.14).aspx)
the Edit in Datasheet view technology is not supported by the 64-bit
version of Office 2010. This can be a big surprise if an organization
plans on heavily using the Datasheet view, which is an extremely helpful
interface and considered essential in some orgs.
Note
Not every type of field can
be edited in Datasheet view. Some columns are read-only, which means
that SharePoint will populate them automatically, or SharePoint blocks
them from being edited in Datasheet view. For example, a Multiple Lines
of Text column that is configured to allow enhanced rich text (Rich text
with pictures, tables, and hyperlinks) cannot be edited in Datasheet
view. However, multiple lines of text configured to allow plain text or
rich text (bold, italics, text alignment, and hyperlinks) does allow
editing in Datasheet view. For this reason, if Datasheet view will be
used extensively, lists should be configured to allow editing of all the
different fields that a typical user would need to edit.
