There are many very
powerful features and tools provided by SharePoint libraries, and
SharePoint lists provide a similar set of tools and features. Because a
number of these tools and features overlap with libraries, this section
concentrates on the differences between lists and libraries and gives
examples that will help users and administrators grasp the differences
and how to best utilize lists. Examples will also be given of how list
administrators and site administrators can customize lists to make them
better suited to the needs of the users.
Differentiating Lists from Libraries
Although libraries are one of
the most frequently used building blocks for SharePoint-based
collaboration and information management systems, lists are the other.
Libraries store files, while lists are designed to store rows of
information, in much the same way as a spreadsheet stores rows of data
defined by columns that are configured to support certain types of data,
such as text, numbers, date and times, choices, and others.
When a user clicks the New
Item link in a list, she is prompted to enter different types of
information, such as text, currency value, time and date, selecting an
item from a list of items, or perhaps entering in a user’s name. This
information then gets saved as a row in the list and is given a unique
ID number. No document needs to be uploaded at this point, which is a
fundamental difference from a library, which can’t store data without a
document to attach it to.
Another revealing exercise for an administrator is to anticipate ways in
which end users, especially power users, might get themselves into
trouble. There
is no specific site name needed because the document library exists as
part of the root site and the user could see the contents of the
document library clearly shown as documents and even a folder.
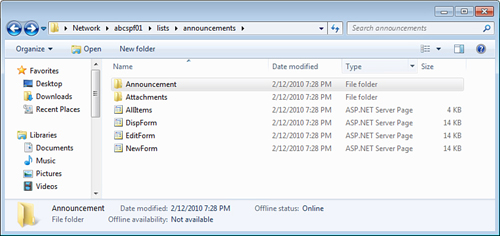
Navigating to a list in a similar fashion isn’t quite as friendly a
process, as shown in Figure 1,
where there is a folder titled Announcement, one titled Attachments,
and then several documents that can be seen to be ASP.NET Server Pages
are also apparent. Double-clicking the Announcement folder does not
actually show the data that was entered into the list because the data
is written to SQL databases and stored in tables. And data cannot be
added from the Explorer interface, so there is arguably no benefit to
end users of accessing a list in this fashion.

Note
The organization should
decide whether to allow Explorer view (WebDAV) access to SharePoint 2010
content, because the results end users see when visiting lists, in
terms of the folders and ASP.Net pages end users find, may confuse them.
Furthermore, an overzealous power user who deletes the folders or forms
can impact the functionality of the list.
A
fact that can be confusing to new users and administrators is that a
SharePoint list can also store attachments to a list item, so be
prepared for discussions along the lines of pros and cons of using lists
and libraries to store items. These attachments are stored in the
Attachments folder seen via the Explorer view in Figure 19.26.
Another difference between list and library functionality pertains to
versioning. Even if versioning is turned on for a list, one or more
attachments will not have their versions tracked if they are changed.
This can lead to potential confusion or even lost productivity if users
are expecting attachments in a list to be versioned. Along these lines, a
user could delete an attachment to a list item, and it will not be
recoverable by just recovering an older version of the item because the
attachments aren’t tracked with the versioning tool. Note that
attachments that are deleted will end up in the Recycle Bin for recovery
if needed. An additional point on versioning is that lists offer only
major versions and do not allow the saving of minor versions, making
them less well suited for more intricate document review and approval
processes. Possibly for these reasons, lists can be configured so that
attachments to list items are disabled.
Reviewing Several Common Lists Found in a Team Site Template
By reviewing several of
the basic lists that are provided with a SharePoint Team Site, the
flexibility of lists can easily be seen. A Team Site template includes
an Announcements list, Calendar list, Links list, and Tasks list. Each
of these is comprised of several columns, different views, and in some
cases some special functionality that has been added by Microsoft. An
overview of the columns included in each list and a brief description of
enhancements are as follows:
The
Announcements list stores announcements that consist of a Title, a Body
section, and an Expiration Date. This makes it well suited as a starting
point to input data that will make up an announcement on the site,
which will “expire” and no longer display after a certain date.
The
Calendar list stores rows of data that include a number of columns of
data, including: Title, Location, Start Time (and date), End Time (and
date), Description, Category, whether it’s an All Day Event, whether
there is Recurrence, and whether a Workspace is needed. Collected
together, each row of data serves to represent an event taking place and
can be displayed on a special calendar-like view, and provides
different display options and navigation tools.
The
Links list is quite simple, and just provides a URL field, with
description field, and a Notes field. This list is designed to track URL
information while displaying a friendly description instead of the
whole URL.
The
Tasks list is also quite complex, and stores data including Title,
Predecessors, Priority, Status, % Complete, Assigned To, Description,
Start Date, and Due Date. This list has specially configured views to
display only items that meet certain filters, such as My Tasks, Due
Today, Active Tasks, By Assigned To, and By My Groups.
Examining the Tools in an Announcements List
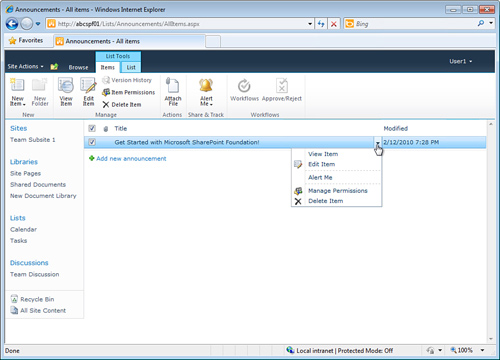
Figure 2
shows an Announcements list in SharePoint Foundation 2010 with an item
selected in it, and the Items tab on the List Tools Ribbon visible.
These tools should all look familiar, and were covered in the earlier
walk through for a library. Because this is housed in a SharePoint
Foundation 2010 site collection, the I Like It and Tags & Notes
tools are not included, but would be if the list were housed in
SharePoint Server 2010 Standard or Enterprise.

One new tool offered in the list
is the Attach File tool, which allows the user to browse for a single
file and then save it as an attachment. Attachments are saved in the
Attachments folder within the list, and although there is no published
limit to the number of attachments that can be added to a list item,
there are few benefits to storing documents in this manner, as discussed
earlier in this section.
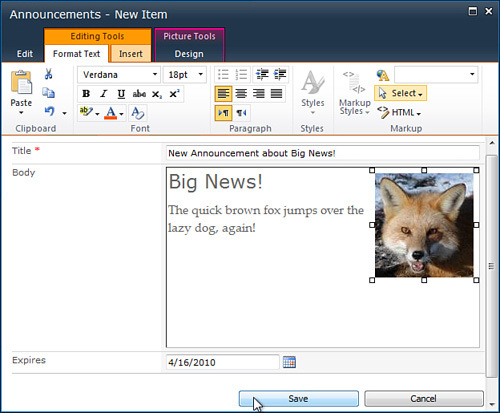
The process of creating a new
item in the list is simpler than in a library, and the user just needs
to click the New Item icon, and then add content to the fields, as shown
in Figure 3.
For this example, an image was also included, which was uploaded from
the user’s Pictures folder, and SharePoint allows the user to
simultaneously choose the picture to use and also to upload it to a
desired library on the site. Although this might not sound
groundbreaking, in SharePoint 2007, the process for including images in
rich text required that the image first be uploaded, the URL for the
image copied, and then the picture placeholder used in the content (a
much more laborious process). The text formatting tools can be seen,
which have also improved since SharePoint 2007, and the graphic image
can be resized from within the AJAX editing window. These tools make it
very simple and quick for users to create quite intricate postings.
After the Save button is clicked, the content is saved to the list.

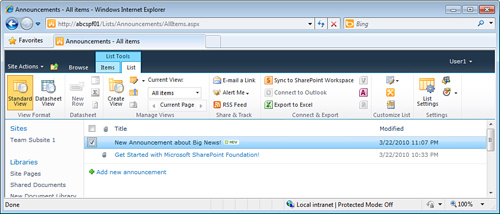
As with a library, an item in a list can be checked as active, and then the relevant tools become active. Figure 4
shows the List tab of the List Tools Ribbon, as a list administrator
will need to become familiar with these tools to fully realize the
potential of lists. A valuable set of tools is revealed in the next
section, which covers the Datasheet view from a high level, and to round
out this article, the Create View and Add a Column tools are
demonstrated and discussed.
