Creating a View in a List
Another important concept
to understand when using SharePoint 2010 lists is that of views. When
someone visits a list, the default view will display. Every list is
created with a default view, and then the list administrator can either
modify that view or create new views, one of
which could be set to be the default. The tools required are accessed
in the List tab of the Ribbon toolbar and include the Create View tool,
Modify view, and List Settings tools. The List Settings tool is the
“long way” of getting to the link to modify a view.
In the following example, a user
decides a new view is needed in the Announcements list that was
modified in the previous example by having a new column titled Topic
added. Follow these steps to create a new view in the list:
1. | Click the List tab, and then click the Create View tool.
| 2. | Several
view formats are offered: Standard View, Calendar View, Access View,
Datasheet View, Gantt View, and Custom View in SharePoint Designer. For
this example, click Standard View.
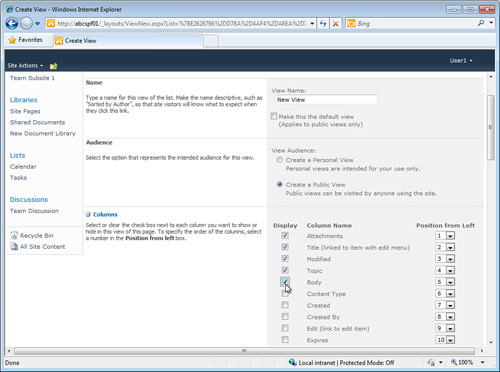
| 3. | The ViewNew.aspx page opens, as shown in Figure 10. Enter in a name for the view, such as New View, and check the box next to Make This the Default View, if desired.
| 4. | In
the next section, leave Create a Public View checked, or select Create a
Personal View, if you intend to use only this view and you don’t want
to share it with other users of the list. In this example, leave Public
View checked.
| 5. | In
the Columns section, check any column names that you want included in
the view. Change the number in the Position from Left column if needed;
this often takes some trial and error to get just right. In this
example, the column titled Body is checked because it was left out of
the default view.
| 6. | In
the Sort section, determine which column to sort by. In this example,
choose Title from the drop-down menu under First Sort by the Column, and
check the circle next to Show Items in Ascending Order.
| 7. | In
the Filter section, choose whether to filter items and only display
items that meet certain criteria. Leave the Show All Items in this View
option checked for this example.
Note
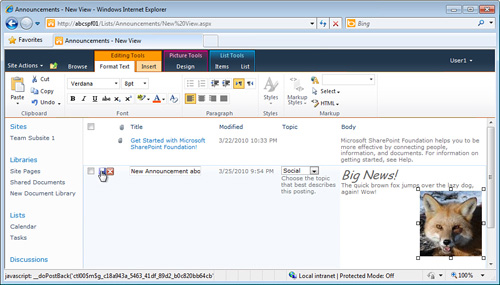
The Inline Editing option for a
view adds an editing icon to the view, which allows the user to edit
content for a column that contains multiple lines of text in rich text
or enhanced rich text formats. Figure 11
shows an example of this. The Save button must be clicked after editing
or the changes won’t be saved. However, even if Inline editing is
enabled, certain cells still can’t be edited in Datasheet view,
including multiple lines of text in enhanced rich text format. So, the
Inline Editing option should be provided to users when enhanced rich
text format is being used in lists on a trial basis to see whether it is
well received.
| 8. | Feel
free to experiment with the various other settings on the ViewNew.aspx
page, such as Inline Editing, Tabular View, Group By, Totals, Style,
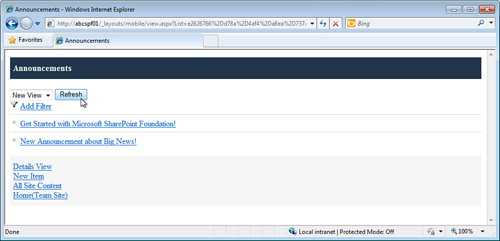
Folders, Items Limit, and Mobile. Figure 12
shows a sample of a mobile view for the Announcements list. The URL for
the mobile view is provided in the Mobile section of the ViewEdit.aspx
page.
| 9. | Click OK to save the changes.
|
Note
The Group By option can be
very useful for lists with numerous items as it allows the contents of
one or more columns to be used to group items. Groupings can be
displayed by default in collapsed mode, so a user can easily browse
through different groups by expanding a header, and then reviewing the
contents to see whether they are of interest.
Note
In the Folders section for
the ViewEdit.aspx page, the option is provided to either Show items
inside folders or to Show All Items Without Folders. Although this might
seem a fairly innocuous option, realize that the efforts to organize
content in folders can be completely ignored by simply checking the
circle next to Show All Items Without Folders. Any granular security
settings applied to contents of folders will still be honored; the view
will simply be flattened. With this simple option, SharePoint allows a
list administrator to be freed from the constraints of folders inside of
lists, even if users demand folders for peace of mind or comfort level.
|
