Managing Distribution Groups
As organizations
grow, they might find that the number of distribution groups maintained
can get extremely large. As the membership of these groups can change
often, the maintenance of them can take a significant amount of
administrative resources.
With Exchange Server
2010, users can now be granted the ability to self-manage their
distribution groups. This is intended to decrease the maintenance costs
associated with the upkeep of these groups.
Users who have the
appropriate RBAC permissions can create and manage their groups using
the ECP through their OWA interface. By default users can join or leave
groups using the ECP interface.
Message Delivery Restrictions
Often, distribution lists
are created with a specific user base in mind. For example, although you
might want any employee in the company to send to your Employee
Suggestions mailbox, you might want to restrict who can send to All
Employees, or All District Managers.
To restrict who can send to a particular distribution group, perform the following actions:
1. | Start the Exchange Management Console.
|
2. | In the Console Tree, navigate to the Recipient Configuration \ Distribution Group node.
|
3. | From the results pane, select the distribution group you want to manage.
|
4. | In the action pane, click Properties.
|
5. | Select the Mail Flow Settings tab, and then double-click the Message Delivery Restrictions option.
|
6. | By
default, All Senders is selected, allowing all senders in the
organization to send to the distribution list. To restrict this, select
the Only Senders in the Following List radio button and click the Add
button. Allowed senders can now be selected from the GAL. To select
multiple senders, hold the CTRL key as you select each additional user.
|
7. | Click OK three times to save the changes and exit.
|
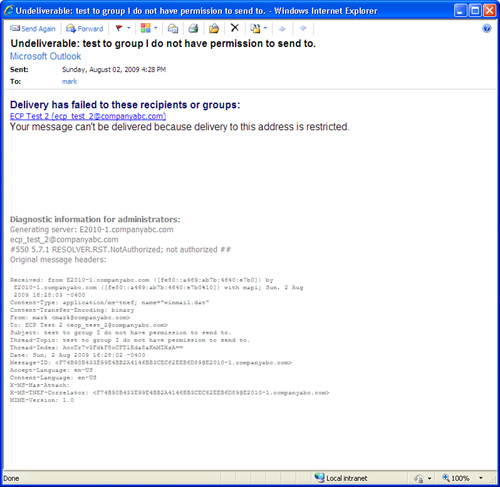
When an unauthorized
sender creates and sends an email to a restricted distribution group, a
message similar to the one shown in Figure 6 will be received by the sender.

Other delivery
restriction options include Require that all senders are authenticated
(enabled by default on groups created in Exchange Server 2010), which
prevents anonymous users from sending messages to the distribution group
and Reject messages from, which enables you to configure specific users
or groups that are restricted from sending messages to the group. In
addition, message size restrictions can be placed on the distribution
group, allowing only messages smaller than the mandated size to be
delivered.
Note
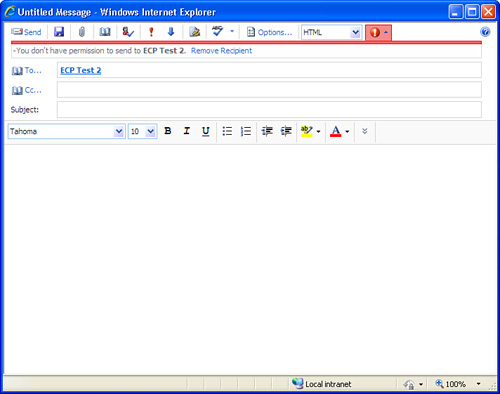
When
an OWA 2010 user attempts to send to a distribution list to which they
do not have permissions, a MailTip is displayed in the OWA window
notifying them that You Do Not Have Permission to Send To the
distribution list, as shown in Figure 7. The MailTips feature is enabled with OWA 2010 but does not work with Outlook 2007 or OWA 2007.

Message Moderation
New in Exchange
Server 2010 is the ability to configure Message Moderation settings on a
distribution list. These settings are configured when creating the list
using the ECP but are not populated when creating the distribution list
from the EMC interface.
To configure these settings from the EMC interface, perform the following steps:
1. | Start the Exchange Management Console.
|
2. | In the Console Tree, navigate to the Recipient Configuration \ Distribution Group node.
|
3. | From the results pane, select the distribution group you want to manage.
|
4. | In the action pane, click Properties.
|
5. | Select the Mail Flow Settings tab, and then double-click the Message Moderation option.
|
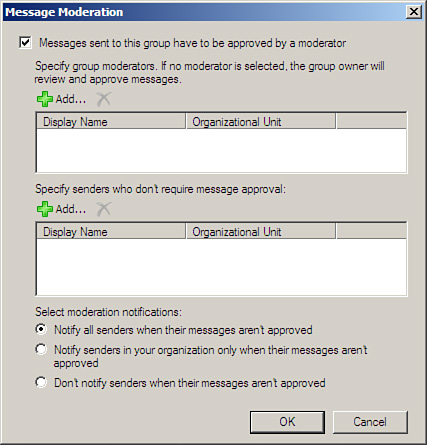
6. | Administrators
can configure the distribution group to require moderator approval for
all messages, group moderators can be defined, senders that do not
require approval can be specified, and moderation notification messages can be configured. These settings are shown in Figure 8.

|
7. | Click OK when finished.
|
Creating Mail Contacts
There are many times
when an organization has the desire or need to communicate with users
external to the Exchange Server organization but still have that user
show up in the GAL. When this situation occurs, it is an ideal
opportunity to utilize a mail contact.
Known as a custom
recipient in some older versions of Exchange Server, this functionality
has existed for some time, but the creation and management process has
changed slightly from revision to revision.
To create a mail contact in the Exchange Management Console, perform the following steps:
1. | Start the Exchange Management Console.
|
2. | In the Console Tree, navigate to the Recipient Configuration \ Mail Contact node.
|
3. | In the action pane, click New Mail Contact; this starts the New Mail Contact Wizard.
|
4. | On
the Introduction page, you can select whether you are creating a new
contact or choosing to mail-enable a contact that exists in your
organization but was previously not mail-enabled. For this instruction,
select New Contact, and then click Next to continue.
|
5. | On the Contact Information page, fill out the following fields:
- Organizational Unit—
Select the Specify the Organizational Unit check box if you want the
contact to reside in a specific OU. The default location is in the Users
container.
- First Name, Initials, Last Name— Enter the appropriate information in these fields.
- Name—
This field will automatically be populated based on the information
entered in the First name, Initials, and Last name fields. You can
change this setting to match your company standards if needed.
- Alias— Enter the desired alias for the contact.
- External E-Mail Address—
Click the Edit button to enter the SMTP address for your mail-enabled
contact (example, [email protected]). Click OK to continue.
|
6. | Click Next to continue.
|
7. | Review the Configuration Summary and click New to accept the current configuration and create the mail contact.
|
8. | On the Completion page, review the summary and ensure the item was created without error. Click Finish to continue.
|
Note
Mail contacts can also be created and edited in the Exchange Management Shell and in the new Exchange Control Panel interfaces.