Managing Disconnected Mailboxes
Exchange Server 2003
introduced an exciting concept in mailbox administration: the Mailbox
Recovery Center. Utilizing this feature, administrators could identify
disconnected mailboxes (those no longer associated with a user account)
and perform a variety of actions—including recovering the mailbox by
connecting it to a new or existing user.
In Exchange Server
2007 and Exchange Server 2010, this process has been greatly simplified
by the addition of a Disconnected Mailbox node located in the Recipient
Configuration node of the Exchange Management Console.
With this utility, you
can quickly and easily recover a mailbox that has been disassociated
from a corresponding user mailbox. To reconnect a disconnected mailbox,
perform the following procedure:
1. | Start the Exchange Management Console.
|
2. | In the Console Tree, navigate to the Recipient Configuration \ Disconnected Mailbox node.
|
3. | In
the action pane, click Connect to Server, and then click Browse. Select
the Exchange server in which the mailbox resides, click OK, and then
click Connect.
|
4. | In
the results pane, select the disconnected mailbox that you want to
reconnect; then in the action pane, click Connect. This starts the
Connect Mailbox Wizard.
|
5. | On
the Introduction page, select the type of mailbox you are reconnecting.
By default, User Mailbox is selected, regardless of the mailbox type of
the original mailbox. Click Next to continue.
|
6. | On the Mailbox Settings page, fill out the following fields:
- Matching User— If the
Exchange server located a matching user object in AD, this field will be
prepopulated. There are times that a matching user exists, but Exchange
Server does not locate it—in those instances, you can click Browse and,
if found, you can insert the user by selecting it and clicking OK.
- Existing User—
If you want to connect the mailbox to another existing user (but not a
“matching” user), select this option button. Click Browse and select the
user from those shown. After selecting the option, click OK to
continue.
- Alias— The Alias is automatically filled in based on the alias of the account you have selected previously.
- Managed Folder Mailbox Policy and Exchange ActiveSync Mailbox Policy—
Select the associated check boxes for these items if you want to
associate the mailbox with an existing policy. The policy can be
selected by clicking the Browse button.
|
7. | Click Next to continue.
|
8. | View
the Configuration Summary and ensure all is correct. If you need to
make any changes, use the Back button. After all the information is
correct, click Connect.
|
9. | From
the Completion page, review the Completion Summary and ensure the
reconnection was successful. Click Finish to close the wizard.
|
Moving Mailboxes
Administrators need to move
mailboxes between databases for a variety of reasons such as a user
being transferred to a different department or location or receiving a
promotion (or demotion).
Additionally,
mailboxes might need to be moved from one database to another to improve
the load balancing of users across multiple Exchange servers (moving
mailboxes from an overutilized server to an underutilized one).
Mailbox moves can also be
extremely useful when implementing new Exchange Server hardware. The new
server can be built in the existing environment, mailboxes can be moved
to the new location, and the old server hardware can be decommissioned,
all with minimal impact on the user community.
One other situation when
the ability to move multiple mailboxes is helpful is during an upgrade
to a newer version of Exchange Server; for example, when migrating your
organization from Exchange Server 2007 to Exchange Server 2010.
Administrators can install the new Exchange Server 2010 server, move all
user mailboxes from your old environment to your new one, and then
decommission your older Exchange servers when they are no longer needed.
Mailboxes are moved from a
source mailbox database to a target mailbox database. The target
mailbox database can be on the same server, on a different server, in a
different domain, in a different active directory site, or in another
forest.
New in Exchange Server 2010 is the concept of asynchronous
mailbox moves. Asynchronous moves enable the user’s mailbox to be kept
online during the move. Mailbox moves between Exchange Server 2010
servers are asynchronous, but mailbox moves from previous versions
(Exchange Server 2003 and Exchange Server 2007) to Exchange Server 2010
are NOT. In nonasynchronous moves, the user cannot access his mailbox
during the move.
When moving from one Exchange Server 2010 database to another, a new cmdlet (New-MoveRequest) is used. The cmdlet can perform an asynchronous move because it is not actually performing
the move. The action move is performed by the Mailbox Replication
Service (MRS), which is a new service running on Exchange Server 2010
client access servers.
The old cmdlet used for mailbox moves, Move-Mailbox,
operates differently, logging into both the source and target databases
and moving the contents from the source to the destination.
Administrators must keep the Shell open during the move or the process
will fail.
Which cmdlet should
an administrator use? This depends on the version of Exchange Server
housing the source and destination mailboxes. This is explained in Table 1.
Table 1. Supported Mailbox Move Scenarios for Single-Forest Moves
| Moving From | Moving To | New-MoveRequest Cmdlet | Move-Mailbox Cmdlet |
|---|
| E2010 | E2010 | Supported in the Exchange Management Shell and used by the Exchange Management Console | Not needed |
| E2007 | E2010 | Not supported | Supported |
| E2010 | E2007 | Not supported | Supported |
| E2003 | E2010 | Not supported | Supported |
| E2010 | E2003 | Not supported | Supported |
Preparing for Mailbox Moves
Before moving
mailboxes, some standard tasks should be completed in advance to
minimize the potential for data loss and to streamline the process.
These two primary tasks are as follows:
Backing Up Exchange Mailboxes—
Before performing any major work on a messaging system, it is a good
practice to back up the message store. In the event of serious problems,
you can always recover to your last known good backup.
Performing Mailbox Cleanup—
User mailboxes can grow rather large in size over time. Storing
important messages, especially when there are attachments included, can
take up a significant amount of disk space. Because moving larger
mailboxes takes longer than smaller ones, it is always a good idea to
have users clean up their mailboxes prior to moving them. One easy way
to accomplish this is with the Mailbox Cleanup utility in Outlook. With
this tool, users can view their current mailbox size, search for items
older than, or larger than, a specified date and size, or run the
autoarchive utility. Users can also empty their deleted items
permanently because there is no need to waste time and bandwidth to move
unwanted messages with the mailbox. Lastly, the utility enables users
to delete all alternative versions of items in their mailbox. By
cleaning up user mailboxes prior to moving them, you can significantly
decrease the amount of time and resources needed to accomplish the task.
Performing the Mailbox Move
The following section
discusses a mailbox move from one Exchange Server 2010 database to
another using the Exchange Management Console. This process will, as
previously described, utilize the New-MoveRequest cmdlet.
Mailbox moves are
performed in the EMC using the Mailbox Move wizard. This process is so
self-explanatory that we will bypass the step-by-step procedures and
discuss, instead, the theory of what is happening.
When a new mailbox
move request is generated by the Move Mailbox wizard, the source and
target databases are selected. If both are on Exchange Server 2010
servers, the new cmdlet New-MoveRequest is utilized. If either the source or destination is on a legacy Exchange server, the Move-Mailbox cmdlet is used.
After a move request
is started, the request and the current status can be viewed in the
Recipient Configuration \ Move Request node in the EMC. Anytime between
the time the move is requested and the time it is completed, the request
can be canceled by selecting the request in this node and clicking
Remove Move Request. This performs the EMS cmdlet Remove-MoveRequest.
When a Move Request
has been completed, it can still be viewed in the Move Requests node
until the administrator clears the move request. Mailboxes that have
been moved have a different icon in the EMC, differentiating them from
other mailboxes. This unique icon, shown on users kevin, linkin, and logan in Figure 9, remains in place until the move request has been cleared at which point it reverts to a normal icon.
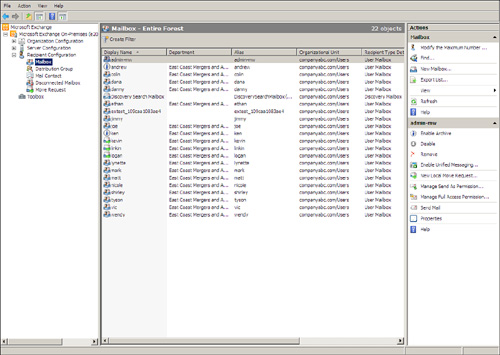
This custom icon
enables administrators to identify which mailboxes have recently been
moved to prevent accidentally moving them a second time.
