1. Problem
You need to send a specific type of request based on a certain element within a document.
2. Solution
You can send specific
request types based on certain document elements by using role links.
Role links offer the flexibility of defining functions or roles for the
inbound and outbound ports of your orchestration. Additionally, role
links also offer the flexibility of abstracting the interactions between
orchestration and external parties.
The following instructions
outline the steps required to create and configure role links within a
BizTalk orchestration. Before implementing role links, you must create
an orchestration and role links within the orchestration. Next, you must
deploy the orchestration and create the parties that participate in the
processes.
This solution uses two
sample XML files to demonstrate how role links route messages based on
message content. The first XML instance requires a manager party's
approval, and the second XML instance requires a human resources (HR)
department party's approval.
We've divided the solution for this recipe into several tasks, as described in the following sections.
2.1. Create the BizTalk Solution
First, you must create a BizTalk orchestration for this example.
Create
a new BizTalk solution that will process new hire requests that require
approvals. The message structure should match the sample outline in Listing 1.
Example 1. Sample New Hire XML Instance
<ns0:ApplicantApproval
    xmlns:ns0="http://Sample_Role_Link_Recipe.SampleNewHireRequest">
  <ApplicantID>1000</ApplicantID>
  <Approver>Manager</Approver>
  <Detail>

    <SSN>508-03-4433</SSN>
    <Name>Wally McFally</Name>
    <Position>Technician</Position>
  </Detail>
</ns0:ApplicantApproval>
|
Create an orchestration to process the new hire requests. The orchestration requires the artifacts listed in Table 1.
Table 1. Role Links Recipe Artifacts
| Name | Type | Description |
|---|
| ReceiveNewHireRequest | Receive port | The Receive port. |
| ReceiveRequest | Receive shape | The Receive shape to receive messages. |
| InitializeRoleLinks | Expression shape | The Expression shape to initialize role links for outbound message routing. |
| SendRequest | Send shape | Send shape for the outbound message. |
| msgNewHire | Message matching schema defined in step 1. | The
name of the message is crucial, because it must match the name
referenced in the expression code that is entered to initialize role
links. Make sure that the Approver element in the message is a distinguished property, because the value in this field is used for routing. |
2.2. Create the Orchestration Role Links
Next, you need to create and
initialize the role links send port for message approval. The Role Link
shape will contain a single Approval consumer role.
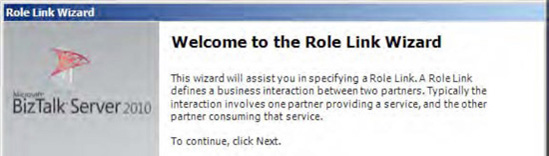
Select the Role Link shape form the BizTalk Orchestrations section of the toolbox, and drag the shape to the orchestration.
The Role Link Wizard will launch (see Figure 1). Follow the Role Link Wizard, and specify the following:
For the role link name, specify NewHireApproval.
For the role link type, specify NewHireApprovalRoleLinkType.
For the role link usage, specify that you are creating a Consumer role, as this orchestration will be providing messages.
Click the Finish button to complete the wizard.
Once
the wizard has completed, remove the Provider role from the newly
created role link, as the Provider role will not be used in this
example.
NOTE
When following the Role
Link Wizard, select either the Provider role or Consumer role for your
application. The Role Link Wizard will create both roles, but you are
free to remove the role that does not apply to your given situation.
2.3. Create the Role Link Send Port Type
After creating the role link,
the next task is to create a send port type implemented by the role
link. A send port type is required because it defines the type of
message a send port will send.
Right-click the Provider section of the Role Link shape, and choose Add Port Type.
In the Port Type Wizard, select Create a New Port Type, and enter SendPortType for the name. Click the Finish button to complete the wizard.
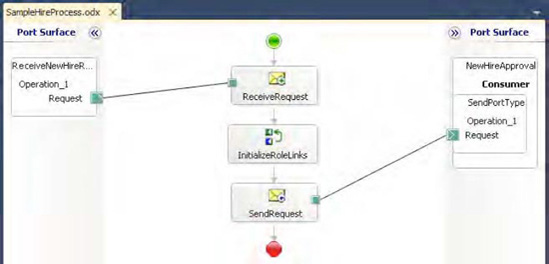
Connect
the orchestration send port to the newly created send port type in the
role link Consumer role. The orchestration should resemble Figure 2.
BizTalk
uses the destination party for routing of the message. Add the
following code to the Expression shape in your orchestration.
//set the approver name
       NewHireApproval(Microsoft.XLANGs.BaseTypes.DestinationParty) = new
Microsoft.XLANGs.BaseTypes.Party(msgNewHire.Approver, "OrganizationName");
Build
and deploy the solution after completing the orchestration. When you
deploy the solution, a new Consumer role is created in the Role Links folder located in the BizTalk Administration Console.
NOTE
The Expression shape code performs the party resolution. The line of code uses the Approver
distinguished field to determine to which party to route the message.
When you create a party, a party alias is also created to use for party
resolution. In the Expression shape, we use the default alias, OrganizationName,
which is created with each party. However, multiple aliases can be
created for a party and then referenced in an Expression shape. For
example, an alias of PhoneNumber could be created during the party creation and then referenced in the Expression shape.
2.4. Create Parties and Physical Send Ports
The final steps
involve creating the BizTalk parties and physical send ports for the
solution. Within the BizTalk Administration Console, create the physical
send ports and parties that will receive the approval messages.
Create a file send port named HRPartySendPort. This is the send port for messages that are routed to the HR department.
Create another file send port named ManagerPartySendPort. This is the send port for messages that are routed to the manager department.
Create a party named ManagerParty. Make sure that the ManagerParty refers to the ManagerPartySendPort.
Create a party named HRParty. Make sure that the HRParty refers to the HRPartySendPort.
NOTE
The Approver
name value in the message must match the name of the party you created.
If a message is sent referencing an invalid party, BizTalk will suspend
the message when trying to route the message to the party specified.
Enlist the two parties within the Consumer role that was created when the orchestration was deployed.
2.5. Test the Role Links
After completing the
preceding tasks, you will be able to enlist and start your solution to
test the implemented role links. When you submit a message with Manager as the value for the Approver element, the message will be routed to the send port associated with the Manager party. When you submit a message with HR as the value for the Approver element, the message will be routed to the send port associated with the HR party.
5.22.3. How It Works
Role links are extremely
useful for loosely coupling your physical solution from the trading
partner or disparate system. Processes that implement role links benefit
from the abstraction by being able to stand independent of the
implementation of the trading partner or subscribing system.
Imagine having a
business process that is the same for multiple trading partners or
systems. Some of the consumers of the process need the information in a
flat file format or must receive the information using a proprietary
communication protocol. You could implement this scenario through the
use of dynamic ports or a send port group, but the maintenance of
subscribers becomes a challenge. Updating a dynamic send port requires
updating the process that provides the configuration information.
Implementing role links allows the subscribers to be independent and
updated without impacting other subscribers.
Implementing role
links is straightforward and requires few steps in configuration. The
first set of configuration steps is performed in the solution
design-time environment. The final set of steps is performed after the
process has been deployed. You must identify whether you are consuming
or providing a service, identify the parties that will be interacting
with the service, and specify the role under which the parties will
operate. The Role Link Wizard in Visual Studio will create two default
roles automatically. You are not required to use the two roles, and you
can create additional roles after the wizard has executed.
The following are the required components when implementing role links:
Parties:
The specific entities interacting with your organization's
orchestration either providing or consuming information from that
orchestration. Typically, each party represents a single organization
that interacts with your organization.
Roles: Logical entities that define a specific business process. Roles either consume or provide services.
Role links:
Describe the relationship or connection (link) between two roles. The
Role Link shape within Visual Studio will launch the Role Link Wizard to
assist in creating roles within your orchestration.
Role link types:
Describe how your orchestration participates in the service. Role link
types are similar to port types in that you specify whether you are
consuming a message or publishing a message.
In the sample
solution accompanying this recipe, a New Hire process has been created
that contains a single Approver role. We required only a single role and
removed one role from the role link after the wizard was complete. For
the role created in our role link, we specified a send port type. Each
role must implement a port type for communication to outside entities.
The final step was to programmatically determine party resolution. For
illustration purposes, an Expression shape implemented party resolution
via code. BizTalk must always know which party will be receiving the
message, and the party resolution can either be performed in the
orchestration or within a pipeline.
