1. Problem
You need to create an
orchestration that inserts a record into a table in your SQL database.
Specifically, you need to create an orchestration that inserts a new
customer record in your ERP system based on an inbound customer creation
message from your CRM system.
2. Solution
The solution reviewed as part
of this recipe outlines how to use the SQL adapter within the context of
an orchestration. The following instructions outline the tasks required
to create and configure the physical SQL send port as well as the
orchestration that implements the SQL adapter.
The solution has sample XML
files to demonstrate how the SQL adapter inserts message content into a
SQL table. The solution also includes a sample SQL table structure.
3. Task 1: Create Supporting Artifacts
Your first task is to create
supporting artifacts. These include a database table and a BizTalk
solution. Here are the steps to follow:
Create a new SQL database and table for which to insert the record. Compile the table definition listed in Listing 1.
Example 1. Listing Customer Table Definition
CREATE TABLE [dbo].[Customer] (
    [CustomerID][int] IDENTITY (1,1) NOT NULL,
    [CustomerName][nvarchar](30) COLLATE SQL_Latin1_General_CP1_CI_AS NOT NULL,
    [Address][nvarchar](60) COLLATE SQL_Latin1_General_CP1_CI_AS NOT NULL,
    [City][nvarchar](30) COLLATE SQL_Latin1_General_CP1_CI_AS NOT NULL,
    [Region][nvarchar](30) COLLATE SQL_Latin1_General_CP1_CI_AS NOT NULL,
    [PostalCode][nvarchar](10) COLLATE SQL_Latin1_General_CP1_CI_AS NOT NULL,
) ON [PRIMARY]
|
Create
a new BizTalk solution that will contain the objects that will insert
customers into the Customer table in your SQL database. Next, create a
sample message that matches the structure detailed in Listing 2. The schema for this message will be created as part of the solution as defined in the "Task 2: Create BizTalk Solution Artifacts" section of this recipe.
Example 2. Sample Customer Message
<ns0:Customer_Request xmlns:ns0="http://SQLAdapterUpdategram">
  <ns0:sync>
    <ns0:after>
      <ns0:Customer CustomerName="Alice" Address="King" City="Seattle"
Region="WA" PostalCode="98005" />
    </ns0:after>
  </ns0:sync>
</ns0:Customer_Request>
|
4. Task 2: Create BizTalk Solution Artifacts
You will be using the Add
Generated Items Wizard to generate the BizTalk artifacts for this
recipe. The wizard will prompt you to specify your BizTalk environment
(such as specifying the BizTalk MessageBox database, setting the
connection string to the database you will be accessing, and identifying
the type of SQL port you are creating, such as send or receive). The
following steps describe this task in detail:
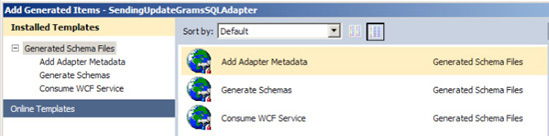
Choose Add Generated Items from the Solution Explorer tool menu. Verify that Add Adapter Metadata is selected. Figure 1 displays the Add Generated Items Wizard.
On
the Add Adapter Wizard screen that opens, select the SQL adapter, and
verify the settings to your BizTalk MessageBox database.
NOTE
You can leave the Port
field empty unless you are specifying an already created SQL send or
receive port. This sample will create a send port that you will specify
later through the BizTalk Explorer.
Click Next, and set the connection string for the database to which you are connecting.
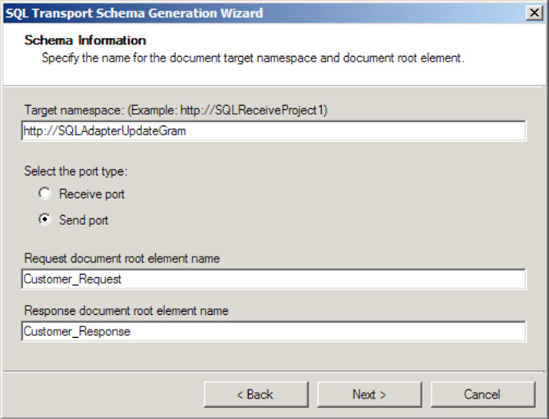
Next, in the SQL Transport Schema Generation Wizard, specify the target namespace as http://SQLAdapterUpdategram, the port type property as a Send port, the request document root element name as Customer_Request, and the response document root element name as Customer_Response. The wizard should look like Figure 2.
On the Statement type information page of the wizard, select Updategram as the type of statement.
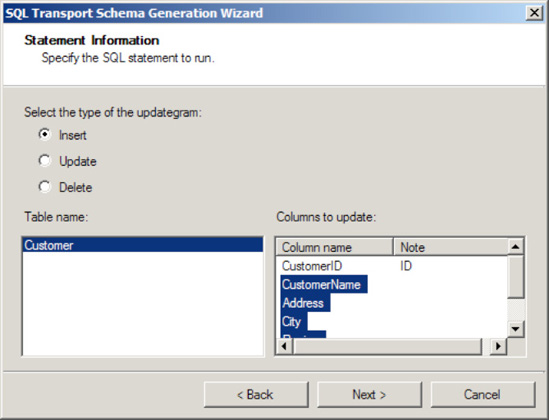
On
the Statement Information page of the wizard, select Insert as the type
of the updategram to create. Additionally, on the same page, select the
Customer table as the table name. In the Columns to Update list,
multiselect the following columns: CustomerName, Address, City, Region
and PostalCode. CustomerID is not required because SQL Server
automatically generates the ID because of the column being an Identity
column. The wizard should resemble Figure 3.
Click
Finish, completing the wizard. When you complete the wizard, notice
that BizTalk creates two artifacts for you: the BizTalk orchestration
and InsertCustomerService.xsd.
NOTE
The BizTalk
orchestration allows you to perform additional processing of an inbound
message before sending the message to the SQL database. The InsertCustomerService
schema represents a multipart message within your orchestration. The
first part of the message represents the request you will be sending to
the SQL database, and the second part represents the response the
database will return to you. In this recipe, we will use only the
request portion of the multipart message.
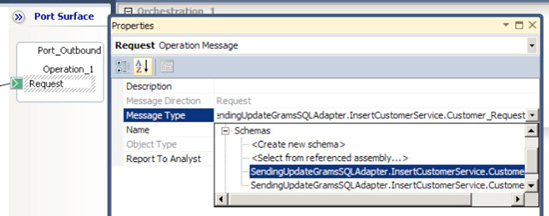
Configure
the BizTalk orchestration for an inbound receive and an outbound send.
Set the both the inbound and outbound ports to work with schemas of type
SQL_Adapter_Updategram.InsertCustomerService.Customer_Request. This property is set as shown in Figure 4. Make sure to set the Activate property on the receive shape of the orchestration to True.
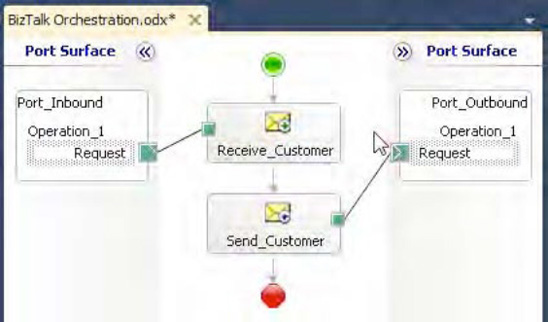
Build and deploy your BizTalk solution. Your orchestration should resemble Figure 5.
5. Task 3: Create Physical BizTalk Ports
To test this solution, you
will need to create a physical file receive port to consume the inbound
XML file and a SQL send port to send the message to the SQL database. A
simple file receive port will consume the inbound XML document and
activate the SQL updategram orchestration just created.
Open the BizTalk Administration Console.
From an appropriate BizTalk application, right-click the Send Ports
folder, and select New→Static One-way Send Port to open the Send Port
Properties dialog box. Enter Sample SQL Updategram Send Port for the new
send port's name. Within the Transport section of the General tab,
select SQL from the Type drop-down list.
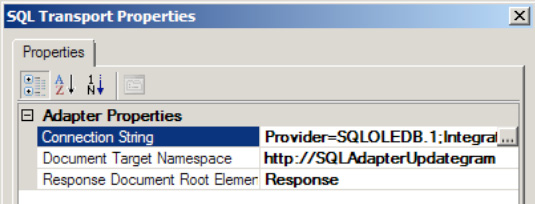
In
the SQL Transport Properties dialog box, configure the connection
string to the appropriate database by clicking the ellipses next to the
Connection String field. Additionally, configure the document target
namespace as http://SQLAdapterUpdategram. The Response Document Root Name can be set to any value; it is not used in this recipe. See Figure 6.
Set the Send Pipeline property to the Microsoft.BizTalk.DefaultPipelines.XMLTransmit pipeline.
Bind the deployed orchestration to the newly created send and receive ports.
6. Task 4: Test the Solution
Follow these steps to test the solution:
Place
the customer test file in the file folder being monitored by BizTalk
Server by the file receive port just created. BizTalk Server will
consume the file, launch the orchestration, and send the updategram to
SQL Server via the SQL send port configured.
Verify that the record inserted successfully into the Customer ustomer table.
7. How It Works
SQL updategrams are
extremely useful when you need a lightweight implementation to insert,
update, or delete data from a SQL table. This recipe demonstrates how to
use the Add Generated Items Wizard as well as how to insert records
into a SQL table. This recipe did not address the need to process
exceptions that may occur when inserting records into a SQL table.
The focus of this recipe was
to demonstrate how to insert a record into a single table; however,
updategrams can also affect data in multiple tables. The Add Generated
Items Wizard creates only a single schema for a single table. However,
if you want to modify multiple tables in the same call, you can run the
wizard multiple times and then copy the generated schemas into a single
schema, or you can manually adjust the autogenerated schema and add the
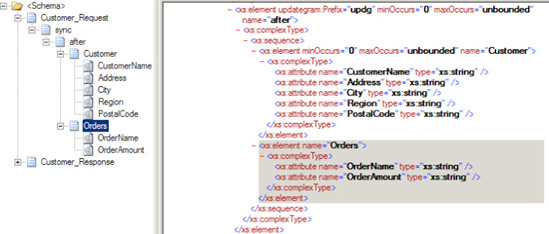
nodes. Assume you have a Customer table and an Order table. For each
customer, you insert into the Customer table, you would also like to
insert the corresponding orders to the Order table. If you knew the
structure of the Order table, you could add the structure to the
autogenerated schema, and BizTalk will know to insert the records into a
table with the name of the node you specified. Figure 7
displays the structure of the modified schema to also insert records
into the Order table. A better approach to modifying the autogenerate
schema would be to consider using a SQL stored procedure to manage the
insertion of data into multiple tables.
SQL updategrams allow you to
update records at a table level, which is convenient. However, not all
databases may allow access at a table level; they may require you to use
other means to manipulate data in the specific table. Additionally,
using an updategram locks you into using a deployed table structure,
which presents a challenge from a maintenance perspective. When
determining the best way to manipulate data in a SQL table, consider the
following questions:
Will the account with which you are accessing the SQL database have permissions at a table level?
What is the likelihood of the table structure changing, and how does that affect the solution you are building?
Is there logic at a database level that must be performed before the message from your orchestration can be processed?
Do
you need to affect data in many tables? Even though it is technically
possible to insert data into multiple tables via an update datagram,
inserting data into multiple tables can be better managed using a SQL
stored procedure.
