There are cases when it is better to migrate to a new
forest and domain, rather than bring along the baggage of a legacy
Active Directory. This includes needing to consolidate names, concerns
with the legacy Active Directory schema, or simply to consolidate Active
Directory services. The consolidation migration allows an administrator
to, in effect, start fresh with a clean installation of Active
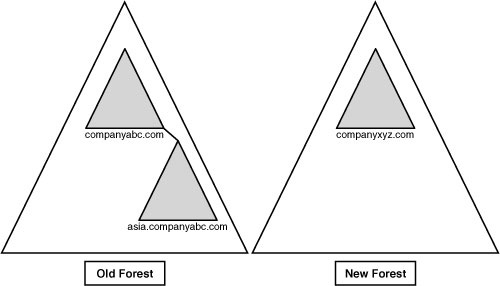
Directory. Figure 1 shows an example of the migration scenario used in this section, where the companyabc.com and asia.companyabc.com will be consolidated to a new forest with the domain companyxyz.com.
However,
this can be disruptive to the users and applications if not handled
carefully. Migrating to a new domain and forest results in changes to
the security identifiers, which can impact access. It can also result in
password changes, making it difficult for users. However, there are
tools and techniques, which are explored in this section, to mitigate
the impact to the users and applications.
The development of
Windows 2008 coincides with improvements in the Active Directory
Migration Tool, a fully functional domain migration utility. ADMT
version 3.1 allows Active Directory users, computers, and groups to be
consolidated, collapsed, or restructured to fit the design needs of an
organization. In regard to Windows 2000/2003 migrations, ADMT v3.1
provides for the flexibility to restructure existing domain environments
into new Windows 2008 Active Directory environments, keeping security
settings, user passwords, and other settings.
Understanding ADMT v3.1 Functionality
ADMT is an
effective way to migrate users, groups, and computers from one domain to
another. It is robust enough to migrate security permissions and
Exchange Server mailbox domain settings. ADMT is composed of the
following components and functionality:
ADMT migration wizards—
ADMT includes a series of wizards, each specifically designed to
migrate specific components. You can use different wizards to migrate
users, groups, computers, service accounts, and trusts.
Low client impact—
ADMT automatically installs a service on source clients negating the
need to manually install client software for the migration. In addition,
after the migration is complete, these services are automatically
uninstalled.
SID History and security migrated— Users
can continue to maintain network access to file shares, applications,
and other secured network services through migration of the SID History
attributes to the new domain. This preserves the extensive security
structure of the source domain.
Note
One unfortunate change
in ADMT v3.1 is the removal of the test migration and rollback
functionality that was present in ADMT v2. Microsoft had numerous
difficulties with it and chose to deprecate the features rather than
resolve the issues.
ADMT v3.1 installs very
easily but requires a thorough knowledge of the various wizards to be
used properly. In addition, best-practice processes should be used when
migrating from one domain to another.
The migration example in
the following sections describes the most common use of the Active
Directory Migration Tool: an interforest migration of domain users,
groups, and computers into another domain. This procedure is by no means
exclusive, and many other migration techniques can be used to achieve
proper results. Subsequently, matching the capabilities of ADMT with the
migration needs of an organization is important.
Using ADMT in a Lab Environment
You can develop the most
effective lab by creating new domain controllers in the source and
target domains and then physically segregating them into a lab network,
where they cannot contact the production domain environment. The
Operations Master (OM) roles for each domain can then be seized for each
domain using the NTDSUTIL utility, which effectively creates exact
replicas of all user, group, and computer accounts that can be tested
with the ADMT.
ADMT v3.1 Installation Procedure
The ADMT component
should be installed on a domain controller in the target domain, where
the accounts will be migrated to. To install, follow these steps:
1. | Download ADMT 3.1 from the Microsoft Download site.
|
2. | Choose Start, Run. Then browse to the download location, select admtsetup.exe, and click Open. Click OK to launch the setup.
|
3. | On the Welcome page, click Next to continue.
|
4. | Accept the end-user license agreement (EULA), and click Next to continue.
|
5. | Microsoft
SQL Server Desktop Edition will be automatically installed (or choose
an existing SQL Server if applicable). Accept the default database
selection, and click Next to continue
|
6. | Leave the default No, Do Not Import Data from an ADMT 2.0 Database. Click Next to continue.
|
7. | After installation, click Finish to close the wizard.
|
ADMT Domain Migration Prerequisites
As
previously mentioned, the most important prerequisite for migration
with ADMT is lab verification. Testing as many aspects of a migration as
possible can help to establish the procedures required and identify
potential problems before they occur in the production environment.
That said, several technical prerequisites must be met before the ADMT can function properly. These are as follows:
Create two-way trusts between source and target domains—
The source and target domains must each be able to communicate with
each other and share security credentials. Consequently, it is important
to establish trusts between the two domains before running the ADMT.
Assign proper permissions on source domain and source domain workstations—
The account that will run the ADMT in the target domain must be added
into the Builtin\Administrators group in the source domain. In addition,
each workstation must include this user as a member of the local
Administrators group for the computer migration services to be able to
function properly. Domain group changes can be easily accomplished, but a
large workstation group change must be scripted, or manually
accomplished, prior to migration.
Create the target OU structure—
The destination for user accounts from the source domain must be
designated at several points during the ADMT migration process.
Establishing an organizational unit (OU) for the source domain accounts
can help to simplify and logically organize the new objects. These
objects can be moved to other OUs after the migration and this OU
collapsed, if you want.
Exporting Password Key Information
The Password Export
Server (PES) service is used to migrate passwords during interforest
migrations. This service must be installed on the source domain and uses
a password key generated previously.
A 128-bit encrypted
password key must be installed from the target domain on a server in the
source domain. This key allows for the migration of password and SID
History information from one domain to the next.
To create this key,
follow these steps from the command prompt of a domain controller in the
target domain where ADMT is installed:
1. | Insert
a floppy disk into the drive to store the key. (The key can be directed
to the network but, for security reasons, directing to a floppy is
better.)
|
2. | Open a command prompt.
|
3. | Type admt key /option:create /sourcedomain:<SourceDomainName> /keyfile:a:\key.pes /keypassword:*,
where <SourceDomainName> is the NetBIOS name of the source domain
and a: is the destination drive for the key. Then press Enter.
|
4. | The utility prompts for the password and confirmation of the password. Then the utility creates the password onto the floppy.
|
5. | Upon successful creation of the key, remove the floppy and keep it in a safe place.
|
This needs to be repeated for each domain to be migrated.
Installing PES on the Source Domain
After exporting the
password key from the target domain, the encrypted password key needs to
be installed on a server in the source domain. The procedure uses the
key generated previously. The following procedure outlines this
installation:
1. | Insert the floppy disk with the exported key from the target domain into the server’s disk drive.
|
2. | |
3. | Start the Password Migration Utility by choosing Start, Run and browsing to find PwdMig.msi. Click OK to run it.
|
4. | On the Welcome page, click Next.
|
5. | Enter
the location of the key that was created on the target domain;
normally, this is the A: floppy drive. Click Next to continue.
|
6. | Enter the password twice that was set on the target domain, and click Next.
|
7. | On the Verification page, click Next to continue.
|
8. | Select the account for the service in the form domain\account and the password, and then click OK.
|
9. | Click Finish after the installation is complete.
|
10. | The
system must be restarted, so click Yes when prompted to automatically
restart. Upon restarting, the proper settings will be in place to make
this server a Password Export Server.
|
The account used for
the service will be granted the Logon As a Service right. This needs to
be installed on at least one source domain controller in each domain to
be migrated.
Setting Proper Registry Permissions
The installation
of the proper components creates special Registry keys, but leaves them
disabled by default for security reasons. One of these is the
AllowPasswordExport value. You need to enable this Registry key on the
source domain to allow passwords to be exported from the Password Export
Server. The following procedure outlines the use of the Registry Editor
to perform this function:
1. | On a domain controller in the source domain, open the Registry Editor (Start, Run, Regedit).
|
2. | Navigate to HKEY_LOCAL_MACHINE\SYSTEM\CurrentControlSet\Control\Lsa.
|
3. | Double-click the AllowPasswordExport DWORD value.
|
4. | Change the properties from 0 to 1 (Hexadecimal).
|
5. | Click OK and close the Registry Editor.
|
6. | Reboot the machine for the Registry changes to be enacted.
|
This allows passwords to be exported from the source domain to the target domain.
Configuring Domains for SID Migration
Migration of
the source security identifiers (SIDs) into the target domain SID
History allows the security assigned in access control lists (ACLs) to
work transparently after the migration. This gives the administrator
time to reset ACLs on a gradual basis or even after all objects are
migrated.
There are several
settings that need to be configured to allow for the SIDs to be
transferred. These settings include creating a local group in the source
domain for auditing, enabling TCP/IP client support on the source PDC
emulator, and, finally, enabling auditing on both the source and target
domains.
To create the local group on the source domain for auditing, execute the following steps:
1. | Log on to a domain controller on the source domain.
|
2. | Launch Active Directory Users and Computers.
|
3. | Create
a domain local group named SourceDomain$$$, where SourceDomain is the
NetBIOS name of the source domain. For example, the local group for the
companyabc.com domain would be companyabc$$$.
|
Do not add any members to the group, or the migration process will fail.
To enable TCP/IP client support, execute the following steps:
1. | Log on to the PDC emulator domain controller in the source domain.
|
2. | Launch the Registry Editor.
|
3. | Navigate to \HKEY\LocalMachine\System\CurrentControlSet\Control\LSA.
|
4. | Create the value TcpipClientSupport REG_DWORD and assign it a value of 1.
|
5. | Exit the Registry Editor.
|
To enable auditing in Windows Server 2008 domains, execute the following steps:
1. | Select Start, Administrative Tools, Default Domain Controller Security Settings.
|
2. | Expand the Local Policies.
|
3. | Select the Audit Policy node.
|
4. | Double-click on the Audit Account Management policy.
|
5. | Check the Define These Policy Settings and select both Success and Failure.
|
6. | Click OK to save the changes.
|
7. | Exit the Group Policy Object Editor.
|
Now the source and target domains will be prepared to transfer SIDs into the SID History.
