A common method of securing information sent across
unsecured networks is to create a virtual private network (VPN), which
is effectively a connection between two private nodes or networks that
is secured and encrypted to prevent unauthorized snooping of the traffic
between the two connections. From the client perspective, a VPN looks
and feels just like a normal network connection between different segments on a network—hence the term virtual private network.
Data that is sent across a
VPN is encapsulated, or wrapped, in a header that indicates its
destination. The information in the packet is then encrypted to secure
its contents. The encrypted packets are then sent across the network to
the destination server, using what is known as a VPN tunnel.
The Windows Server 2008 R2
RRAS role allows for the creation of VPNs, and integrates with the NPS
role to provide for validation of client health before creating a VPN
session.
Note
Virtual private network
support in Windows Server 2008 R2 provides for simple VPN tunnels to be
created. For more complex scenarios where specific rules need to be
created and application-layer filtering of the VPN traffic is needed,
look at Microsoft’s Forefront Edge line of products, which includes the
Forefront Threat Management Gateway (previously called Internet Security
and Acceleration or ISA Server) and the Forefront Unified Access
Gateway products.
Exploring VPN Tunnels
The connection made
by VPN clients across an unsecured network is known as a VPN tunnel. It
is named as such because of the way it “tunnels” underneath the regular
traffic of the unsecured network.
VPN tunnels are logically
established on a point-to-point basis but can be used to connect two
private networks into a common network infrastructure. In many cases,
for example, a
VPN tunnel serves as a virtual wide area network (WAN) link between two
physical locations in an organization, all while sending the private
information across the Internet. VPN tunnels are also widely used by
remote users who log on to the Internet from multiple locations and
establish VPN tunnels to a centralized VPN server in the organization’s
home office. These reasons make VPN solutions a valuable asset for
organizations, and one that can be easily established with the
technologies available in Windows Server 2008 R2.
Note
VPN tunnels can either be
voluntary or compulsory. In short, voluntary VPN tunnels are created
when a client, usually out somewhere on the Internet, asks for a VPN
tunnel to be established. Compulsory VPN tunnels are automatically
created for clients from specific locations on the unsecured network,
and are less common in real-life situations than are voluntary tunnels.
Tunneling Protocols
The tunneling protocol is
the specific technology that defines how data is encapsulated,
transmitted, and unencapsulated across a VPN connection. Varying
implementations of tunneling protocols exist, and correspond with
different layers of the Open System Interconnection (OSI)
standards-based reference model. The OSI model is composed of seven
layers, and VPN tunneling protocols use either Layer 2 or Layer 3 as
their unit of exchange. Layer 2, a more fundamental network layer, uses a
frame as the unit of exchange, and Layer 3 protocols use a packet as a
unit of exchange.
The most common Layer 2 VPN
protocols are the Point-to-Point Tunneling Protocol (PPTP) and the Layer
2 Tunneling Protocol (L2TP), both of which are fully supported
protocols in Windows Server 2008 R2.
PPTP and L2TP Protocols
Both PPTP and L2TP are based
on the well-defined Point-to-Point Protocol (PPP) and are consequently
accepted and widely used in VPN implementations. L2TP is the preferred
protocol for use with VPNs in Windows Server 2008 R2 because it
incorporates the best of PPTP, with a technology known as Layer 2
Forwarding. L2TP allows for the encapsulation of data over multiple
network protocols, including IP, and can be used to tunnel over the
Internet. The payload, or data to be transmitted, of each L2TP frame can
be compressed, as well as encrypted, to save network bandwidth.
Both PPTP and L2TP build on a
suite of useful functionality that was introduced in PPP, such as user
authentication, data compression and encryption, and token card support.
These features, which have all been ported over to the newer
implementations, provide for a rich set of VPN functionality.
L2TP/IPSec Secure Protocol
Windows Server 2008 R2
uses an additional layer of encryption and security by utilizing IP
Security (IPSec), a Layer 3 encryption protocol, in concert with L2TP in
what is known, not surprisingly, as L2TP/IPSec. IPSec allows for the
encryption of the L2TP header and trailer
information, which is normally sent in clear text. This also has the
added advantage of dual-encrypting the payload, adding an additional
level of security into the mix.
L2TP/IPSec has some distinct advantages over standard L2TP, namely the following:
L2TP/IPSec
allows for data authentication on a packet level, allowing for
verification that the payload was not modified in transit, as well as
the data confidentiality that is provided by L2TP.
Dual-authentication mechanisms stipulate that both computer-level and user-level authentication must take place with L2TP/IPSec.
L2TP
packets intercepted during the initial user-level authentication cannot
be copied for use in offline dictionary attacks to determine the L2TP
key because IPSec encrypts this procedure.
An L2TP/IPSec packet
contains multiple, encrypted header information and the payload itself
is deeply nested within the structure. This allows for a great deal of
transport-level security on the packet itself.
Enabling VPN Functionality on an RRAS Server
By installing the Routing and
Remote Access Service (RRAS) on the server, the ability to allow VPN
connections to and/or from the server is enabled. The following type of
VPN connections can be created:
VPN gateway for clients—
The most common scenario, this involves the RRAS server being the
gateway into a network for VPN clients. This scenario requires the
server to have two network cards installed.
Site-to-site VPN—
In this scenario, the RRAS server creates a VPN tunnel between another
RRAS server in a remote site, allowing for traffic to pass unimpeded
between the networks, but in an encrypted state.
Dial-up RAS server— In this layout, the server is installed with a modem or pool of modems and provides for dial-in capabilities.
NAT between networks—
On an RRAS server installed in Routing mode, this deployment option
provides for Network Address Translation (NAT) between network segments.
For example, on one network, the IP addresses might be public, such as
12.155.166.x, while on the internal network they might be 10.10.10.x.
The NAT capability translates the addresses from public to private and
vice versa.
Routing between networks—
On an RRAS server installed in Routing mode, this deployment option
allows for direct routing of the traffic between network segments.
Basic firewall—
The RRAS server can act as a simple Layer 3 router, blocking traffic by
port. For more secure scenarios, use of an advanced Layer 7 firewall
such as Microsoft’s Forefront Threat Management Gateway (previously
called Internet Security and Acceleration or ISA Server) is recommended.
Note
Setting
up a VPN connection requires the server to have at least two network
cards installed on the system. This is because the VPN connections must
be coming from one network and subsequently passed into a second
network, such as from the demilitarized zone (DMZ) network into the
internal network.
To set up the RRAS server for the most common scenario, VPN gateway, perform the following tasks:
1. | Open the Routing and Remote Access MMC tool (Start, All Programs, Administrative Tools, Routing and Remote Access).
|
2. | Select
the local server name or connect to a remote RRAS server by
right-clicking Routing and Remote Access and selecting Add Server.
|
3. | Click Action, Configure and Enable Routing and Remote Access.
|
4. | Click Next at the Welcome page.
|
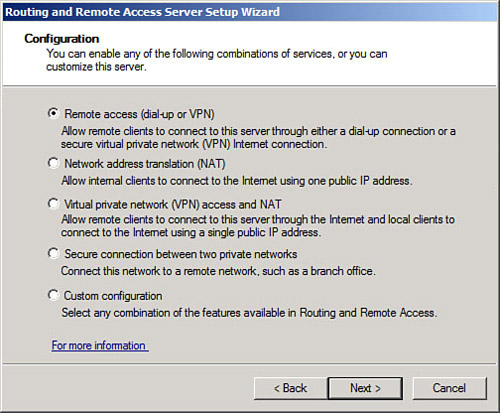
5. | Choose from the list of configuration settings, as shown in Figure 1.
Different scenarios would require different settings. For example, if
setting up a site-to-site VPN, you should select the Secure Connection
Between Two Private Networks option. In this case, we are setting up a
simple VPN, so we select Remote Access (Dial-up or VPN).
|
6. | On
the Remote Access page, check the box next to VPN. If enabling dial-up,
such as in scenarios when the VPN box has a modem attached to it, the
Dial-up box can be checked as well. Click Next to continue.
|
7. | On the VPN Connection page, shown in Figure 2, select which network card is connected to the network where VPN clients will be coming from. This might be the Internet, or it might be a secured perimeter network such as a DMZ. Click Next to continue.

|
8. | On
the IP Address Assignment page, select how VPN clients will get their
IP addresses (typically Automatically). In addition, a manual range can
be specified. Click Next to continue.
|
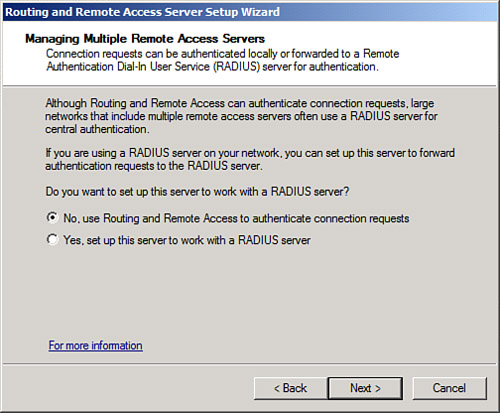
9. | On the Managing Multiple Remote Access Servers page, shown in Figure 3, select whether to use RRAS to authenticate locally or to use a remote RADIUS server. Click Next to continue.
|
10. | Review the wizard settings and click Finish when complete.
|
11. | Click
OK when prompted about the default connection request policy being
created and click OK again if prompted about the DHCP Relay Agent.
|
12. | Click Finish when the wizard is complete.
|
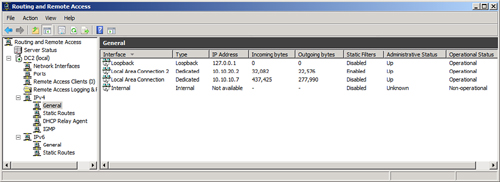
The wizard will enable RRAS
on the server and allow for administration of the VPN settings and
client from the Routing and Remote Access dialog box, shown in Figure 4. Review the settings within this tool to familiarize yourself with how the system is configured.
Modifying the RRAS Network Policy
After installing and
configuring RRAS, the NPS system will deny access by default to the RRAS
server for clients, unless the network policy generated is modified.
The network policy, which is labeled Connections to Microsoft Routing
and Remote Access server, can be found under the Network Policies node
of the Network Policy Server.
The policy must be set to Grant Access in the Access Permission section of the dialog box, as shown in Figure 5.
This dialog box can be invoked by right-clicking the policy and
choosing Properties. After enabling, the NPS system will allow client
connections.

Note
VPN clients can be
controlled and monitored using the NPS role just like the IPSec, 802.1X,
and DHCP clients can.
