The goal of a Network Policy Server is to enforce
policy settings defined by the administrator, for example, to configure
the NPS role to block clients from connecting if they don’t have an
antivirus application installed. There are multiple variations on this
theme, but the same principles apply to each of the variations.
This section of the article focuses on describing a scenario where NPS is configured to block DHCP
clients from receiving IP addresses if they do not have an antivirus
application installed and if their antivirus definitions are out of
date. The same overall process can be used for 802.1X validation, VPN
validation, or IPSec validation.
The process to set up this type of validation on an NPS system consists of the following five high-level steps:
1. | Create a System Health Validator.
| 2. | Create a health policy for compliant clients.
| 3. | Create a health policy for noncompliant clients.
| 4. | Create a network policy for compliant clients.
| 5. | Create a network policy for noncompliant clients.
|
Creating a System Health Validator
The
first step to enabling NPS validation is to create and configure a
System Health Validator (SHV). The validator is where the settings are
stored and what will be enforced on the client, such as if a firewall is
needed, if spyware software must be installed, and so on. To create the
SHV for the example we are outlining, do the following:
1. | From
the Network Policy MMC tool (Start, All Programs, Administrative Tools,
Network Policy Server), navigate to Network Access Protection, System
Health Validators, Windows Security Health Validator.
| 2. | Click on the Settings link in the details pane.
| 3. | Right-click the Default Configuration SHV in the details pane and choose Properties.
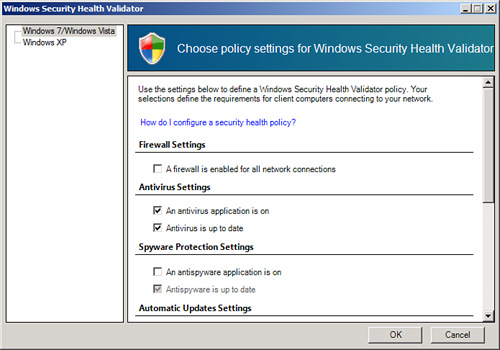
| 4. | From both the Windows 7/Windows Vista and Windows XP sections in the Windows Security Health Validator dialog box, shown in Figure 1,
select the type of policies that will be enforced. In our example, we
are just enforcing that an antivirus application is installed and up to
date. Click OK and then click OK again when you are finished.
|
Creating a Health Policy for Compliant Clients
After the System Health
Validator has been configured, a health policy for clients that are
compliant must be created. Any client that complies with the SHV will
have this policy applied. To create this policy, do the following:
1. | Open the Network Policy Server MMC tool (Start, All Programs, Administrative Tools, Network Policy Server).
| 2. | In the node pane, navigate to Policies, Health Policies.
| 3. | Right-click Health Policies, and choose New.
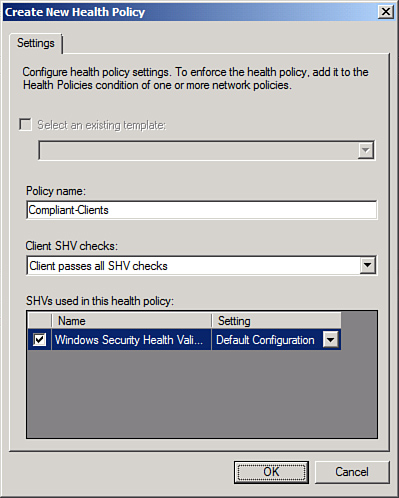
| 4. | Enter a name for the policy, such as Compliant-Clients, and then select which SHV checks the client must pass, as shown in Figure 2.
In this case, we create a health policy where clients must pass all
checks. Check the box next to the Windows Security Health Validator,
choose the setting (typically the default configuration, though R2
allows for multiple configurations), and click OK to save the policy.
|
Creating a Health Policy for Noncompliant Clients
In addition to creating a
health policy for compliant clients, there must be a policy for clients
who fail one or more of the checks in the SHV. To create this policy, do
the following:
1. | Open the Network Policy Server MMC tool (Start, All Programs, Administrative Tools, Network Policy Server).
| 2. | In the node pane, navigate to Policies, Health Policies.
| 3. | Right-click Health Policies and choose New.
| 4. | Enter a name for the policy, such as NonCompliant-Clients.
In this example, we select that the client fails one or more SHV checks
setting from the dialog box. Check the box next to the Windows System
Health Validator, and click OK to save the policy.
|
Creating a Network Policy for Compliant Clients
After the SHV and two health
policies have been created, network policies for both compliant and
noncompliant clients need to be created. These network policies will
define what type of access a compliant or a noncompliant client will
have. To create the compliant network policy for this example, do the
following:
1. | From the Network Policy MMC tool, navigate to Policies, Network Policies from the node pane.
| 2. | Right-click the Network Policies node, and choose New.
| 3. | On the Specify Network Policy Name and Connection Type page, enter a descriptive policy name, such as Compliant-Network-Full-Access, and click Next (leave the type of server as Unspecified).
| 4. | On the Specify Conditions page, click the Add button.
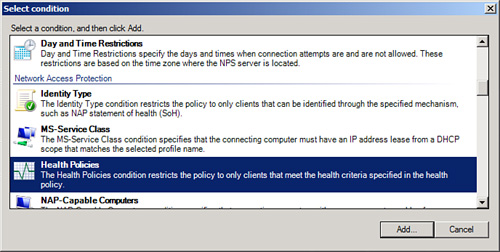
| 5. | Select Health Policies from the list, as shown in Figure 3, and click the Add button.
| 6. | From the list of health policies, choose the Compliant-Clients policy previously created, and click OK.
| 7. | Click Next to continue.
| 8. | On the Specify Access Permission page, select the Access Granted option button, and click Next to continue.
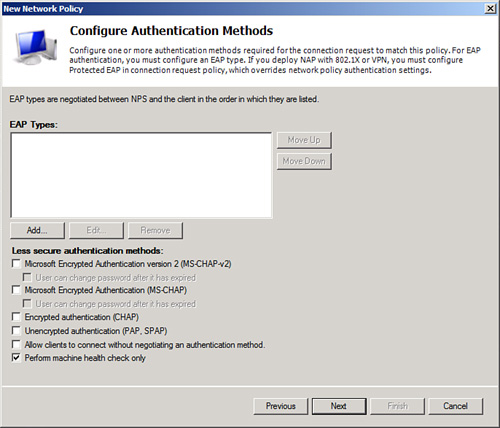
| 9. | On
the Configure Authentication Methods page, select only the Perform
Machine Health Check Only check box and deselect any other ones, as
shown in Figure 4. Click Next to continue.
| 10. | On the Configure Constraints page, leave the defaults in place, and click Next.
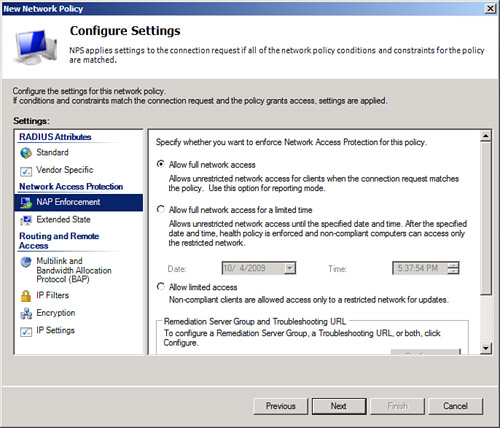
| 11. | On the Configure Settings page, ensure that Allow Full Network Access is selected under NAP Enforcement, as shown in Figure 5. Click Next to continue.
| 12. | Click Finish to complete the wizard. |
|