1. Problem
You need to receive a message in BizTalk using the File adapter.
2. Solution
Within the BizTalk File
adapter, numerous options are available to facilitate receiving files.
You can configure all these options natively within the adapter. The
following steps outline configuring the File receive adapter:
Open the BizTalk Administration Console
In
the desired BizTalk application, right-click the Receive Ports folder,
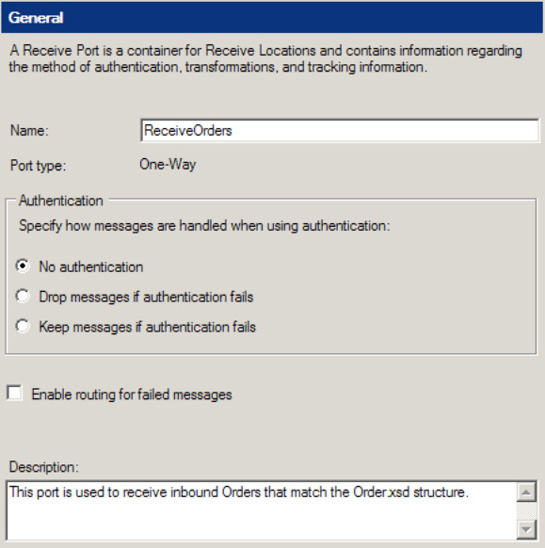
and select New→One-way Receive Port. Specify a name for the receive
port. Leave the default settings on the remainder of the General tab, as
shown in Figure 1.
NOTE
You can add maps to a
receive port; a map would be applied after a pipeline but before any
subscribers (send ports or orchestrations) have processed the message.
Some solutions can have maps but no orchestrations; the maps are added
to the receive and/or send ports.
Click
the Receive Locations tab, and click the New button. This will open a
new window for configuring the receive location. A receive port can have
one or more receive locations.
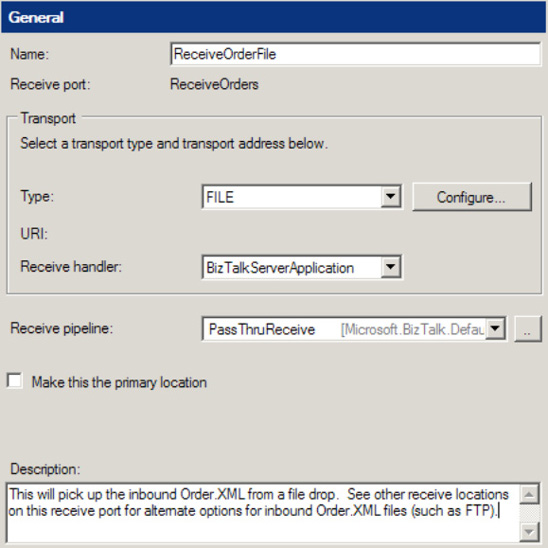
Give the receive location a name, and set the Type property to FILE.
The
Receive handler property should be set the correct host application;
this will depend on how you want to organize your environment. In many
scenarios, only a single option is available here.
Set the Receive pipeline property to the correct pipeline. In this case, the PassThruReceive
pipeline will be adequate; this means that any file will be picked up,
and the contents will not be validated by any code. If the file that was
being picked up was XML and you needed to ensure that it validated
against a deployed schema, the correct receive pipeline would be XMLReceive. Figure 2 shows the configuration of the receive location so far.
Click the Configure button.
Enter the value of the file folder you want BizTalk Server to pull for files.
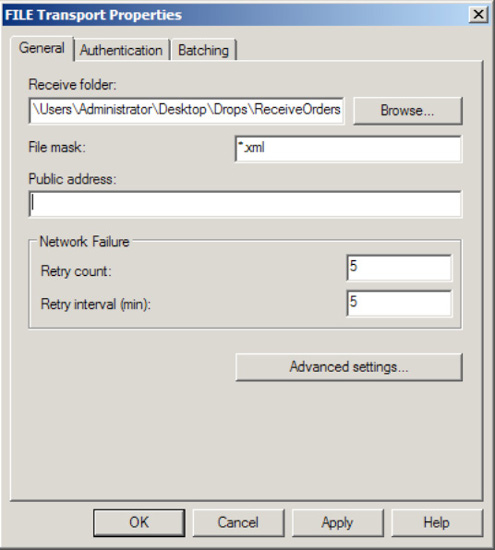
Click the File Mask input area. Enter the value *.*.
NOTE
The File Mask property allows the File adapter to consume files that match a specific file mask. In the instance of *.*,
all files will be consumed by the wildcard mask. However, it is worth
noting that you cannot set up two receive locations with the same mask,
monitoring the same location.
Under
the Network Failure options, set the retry values. The default options
are 5 and 5 for Retry Count and Retry Interval but can be set at any
value. If the retries are exceeded, the receive location will be
automatically disabled. This would most commonly occur when polling a
network drive that is inaccessible for a period of time.
NOTE
BizTalk gives you the
ability to specify a different user account, if the security permissions
are different from the running host user account. This can be done on
the Authentication tab.
Click OK to create the receive location.
3. How It Works
In this recipe, how to
use the File receive adapter was demonstrated. You can configure the
File adapter either using the BizTalk Explorer (within a receive
location) from Visual Studio, using code (most commonly via an
orchestration), or using the BizTalk Administration Console. The File
adapter receive configuration options encompass receive location
parameters, network failure options, batching, and authentication.
In addition to the basic
configuration options, you can configure other advanced options to
assist in the process of receiving files. The General tab contains some
advanced configuration options, as shown in Table 1.
Table 1. Advanced Settings for File Transport
| Option | Description |
|---|
| Rename Files While Reading | Ensures
that a file is renamed while BizTalk is reading the file during the
receive process. This might assist in ensuring that an incoming file is
not overwritten if the source address has the ability to write files
with identical names. |
| Receive Location Polling | Gives the ability to set the polling interval for BizTalk to check for new files on a given receive location. |
| Removing of Files | Specifies
timing values that control when BizTalk deletes the source files after a
file has been read and submitted to the BizTalk MessageBox. This might
be useful when trying to avoid overwrites in a scenario where multiple
files are written to the same file source. |
The File receive
adapter also allows for the configuration of file batching. Batching
allows destination files to be submitted in a collective batch, allowing
for the configuration of file consumption and file exception options on
the entire batch. Within BizTalk's batch processing model, files that
are processed successfully to the MessageBox are deleted from the
source, files that are processed to the MessageBox with exception are
suspended, and messages that fail to write to the MessageBox cause the
entire batch to be rolled back. For example, a security permission issue
might prevent the file from being open and consumed. This premise
ensures that all files are preserved on the source file location. That
is, the physical file deletion process does not occur until the entire
batch has been processed.
