Audience Targeting
Audience targeting can be
enabled for lists and libraries, but audiences are compiled based on
settings configured from Central Administration.
It is important for a list
and library administrator to understand the topic and decide whether it
should be enabled for some or all libraries/lists because this will be
another metadata
item that end users or list administrators will need to configure to
ensure that members of a specific audience are in fact seeing all the
documents that should be targeted to them.
Metadata Navigation
Metadata navigation is a
powerful tool available in SharePoint Server 2010 Standard or
Enterprise, and involves the configuration of hierarchy fields, key
filters, and the management of column indices. Essentially, the
Navigation Hierarchy fields allow a user to click in a tree structure to
view the content contained in folders, or that meet the field criteria
(such as using a specific content type). The Key Filter fields allow the
user to also filter the results based on specific criteria, such as
modified by a certain user.
This fills a
functionality “hole” that was present in SharePoint 2007 and earlier
versions, because document libraries could be difficult to navigate
within if folders were used and filters were somewhat difficult to use.
Navigating down into folders required only a click the folder, but
navigating up required using the back arrow in the browser, or using the
breadcrumb trail. Filtering in SharePoint 2007 required clicking the
column heading and then choosing the type of filter, but once set, the
user couldn’t tell what the filter was, so in complex searches, it was
easy to get confused. With these two new tools, it is intuitive to
navigate within document libraries using folders, content types, managed
metadata, and to apply multiple filters to the content.
Per-Location View Settings
Next on the Document
Library Settings page, is the link to Per-Location View settings. Views are a fundamental tool for the
list or library administrator to make the end user experience with the
list or library a productive one. SharePoint 2010 allows the list or
library administrator to determine which views are available from within
folders in the list or library.
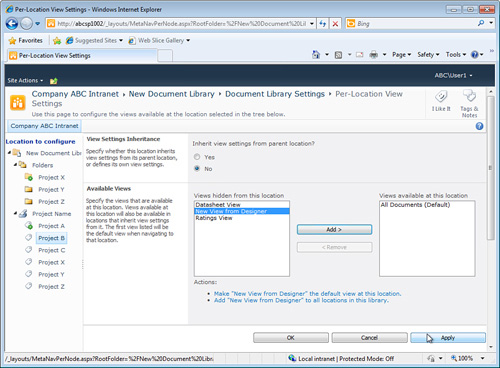
Figure 8
shows the Per-Location View page for a document library. The Location
to Configure tree on the left shows the items defined from the Document
Library Settings Metadata Navigation Settings. The topmost entry in each
of these has customized Per-Location Views, and correspondingly
slightly modified icons. In other words, these “locations” do not
inherit all the view settings from their parents, and they match the
settings visible but not yet saved in Figure 20.19.
This means that an end user who has navigated to the Project X folder
will see only the views that are defined as available at that location.
Likewise, a user who clicks one of the other Metadata Navigation
Settings options, such as Project A, will see only the views defined as
available for that location.
Although possibly confusing
initially, this is yet another toolset for the list administrator who
has created multiple views and uses folders and metadata to manage files
in the document library to control which views are available to end
users who navigate to the folders or use the Metadata Navigation tool.
Form Settings Tool
SharePoint
2010 will not allow the use of this tool for all lists and libraries,
and clicking the Form Settings link may simply display a message that
states “InfoPath does not support customizing the form used for this
list.” But if the forms are supported, the administrator can open the
form in InfoPath 2010, and then edit the form to her heart’s content.
An example is given in this
section of creating a rule in InfoPath that should impress readers with
the power suddenly placed in their hands by InfoPath via this tool. A
good example to use is the ubiquitous Announcements list. Follow these
steps to edit the form used in an Announcements list (InfoPath Designer
2010 must be installed on the computer in use):
1. | Navigate to an Announcements list, click the List tab on the Ribbon, and click List Settings.
|
2. | Click Form Settings from the General Settings column.
|
3. | Under
Content Type, the Announcement content type should be selected and the
circle next to Customize the current form using Microsoft InfoPath
checked. Click OK.
|
4. | InfoPath Designer 2010 will open and display the form.
|
5. | Click the Expires field, also shown in Figure 9, and then click Add Rule from the Home tab.
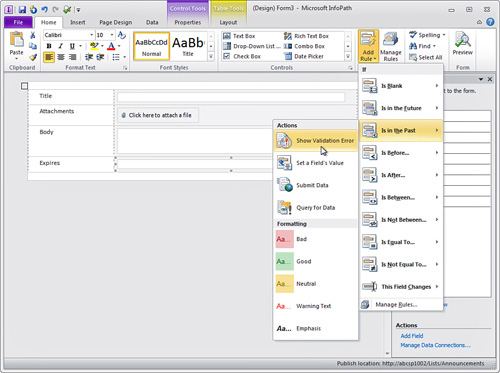
|
6. | Select Is in the Past, and then Show Validation Error from the Actions submenu, as shown in Figure 20.20.
|
7. | Review
the results in the Rules menu on the right side of the screen. Notice
that a screen tip is autopopulated: “Enter today’s date or a date in the
future.”
|
8. | Click
the File tab, and then click the Quick Publish button to publish the
updated form to the SharePoint 2010 Announcements list.
|
9. | Navigate
to the SharePoint 2010 Announcements list, and click Add New
Announcement, and enter a new announcement with a date that is in the
past, and once that date is entered, an error message should display, as
shown in Figure 10. SharePoint will not allow the form to be saved unless the date entered is in the past.
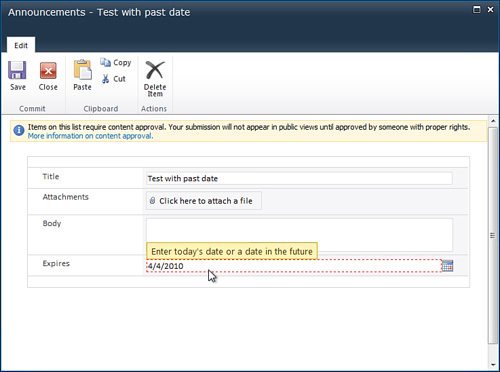
|
This simple example just
scratches the surface of the power of InfoPath in the hands of
experienced list and library administrators who can easily customize the
form used to add a new list item or edit a list item in a few minutes.
