Document sets are a powerful tool that can be enabled
for site collections that allow users to keep related documents
together as a “set” to facilitate collaboration on the documents. When a
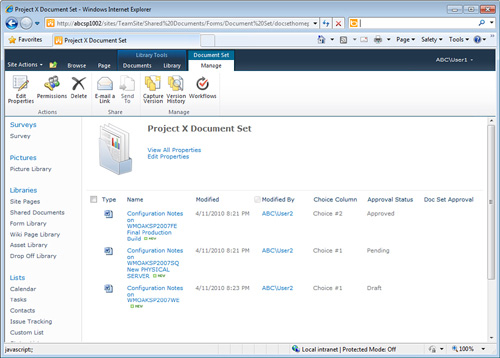
user clicks a document set, such as Project X Document Set used in the
examples in this section, all the files stored in the document set will
be visible, as shown in Figure 1.
In this way, document sets are similar to folders, but as explained in
this section, they have a variety of differences that are important to
understand from an administrative standpoint that are reviewed in this
section. From a high level, folders are simpler to enable, are more
limited in functionality, and so make a better choice for less-advanced
users or simpler collaboration requirements. But once the capabilities
of document sets are understood, many organizations will benefit from
their capabilities.

Document sets are
designed specifically to help users organize groups of files as a unit
and give some special tools to users to facilitate the management of the
group of documents as a whole such as the ability to assign metadata to
a document set, start a workflow on a document set, and capture a
version of the entire set of documents. Following are some key technical
details of document sets:
Document sets are not available in SharePoint Foundation 2010.
Document sets are available in SharePoint Server 2010 Standard and Enterprise editions.
A
document set is a content type, with Document Collection Folder as the
parent, and uses the Name column from the Folder content type and title
from the Item content type.
There is no hard limit on the number of documents that can exist in a document set.
Permissions changes to a document set do affect all items within the document set.
An alert set on a document set will apply to contents of the document set.
Deleting a document set sends the document set and all members of the document set to the Recycle Bin.
If the Send To feature is used with a document set, the sum for all documents in a document set cannot be larger than 50MB.
Metadata assigned to the document set is not automatically assigned to members of the document set.
Figure 1
shows a sample document set after the document set icon was clicked in a
document library. A fairly large icon representing the document set is
visible below the Ribbon, which gains a Document Set Manage tab, shown
active in Figure 1.
In this example, a workflow titled Doc Set Approval was started on the
document set and the column with the same title is visible on the right.
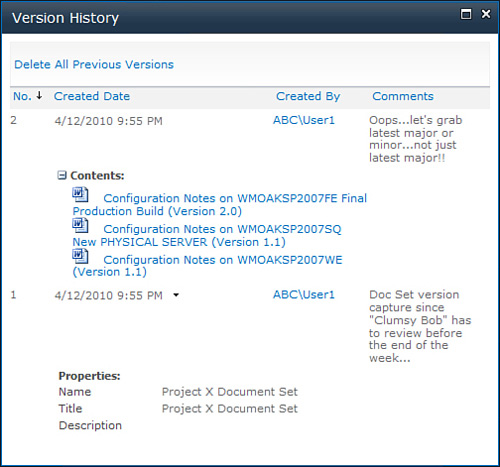
If the Capture Version button in clicked from the Document Set Manage
tab, the user is prompted to capture Latest Major Versions Only or
Latest Major or Minor Versions. Figure 2
shows the Version History window that appears after the capture version
is completed for the document set, which clearly displays each document
title with the version number appended. This function lets a user
capture the exact state of more than one document at a point in time,
which is in essence a way of taking a backup of a set of documents and
being able to manage these backups by deleting previous backups in the
future.

Note
Document sets can have the
Capture Version tool run to create a version of the document set, which
includes the latest major or major and minor versions of documents
contained within the document set. This adds another level of
granularity to versioning because not only can individual documents be
versioned, but also whole sets of documents can be versioned, to
“snapshot” the document set at a point in time.
Document
sets do require some additional configuration to be available to end
users, as they need to be enabled from the Site Collection Features. The document set content type
then needs to be added to the document library before it can be used.
Folders, on the other hand, can easily be configured to either be
available or not available for a document library from the list or
library settings page, by accessing the Advanced Settings link. Document
sets can have metadata associated with the document set itself, which
is different from folders, which cannot have metadata manually assigned
to them. Several other notable differences should be kept in mind when
determining whether the organization should use them:
Document sets are not available in SharePoint Foundation 2010 while folders are available.
Document sets can be created only in document libraries, whereas folders can be created in either libraries or lists.
Folders are not allowed within document sets.
Document sets can’t be nested, whereas folders can be nested.
Metadata can be assigned to document sets but not folders.
Workflows can be started on document sets but not folders.
Tip
If a view is configured
to Show All Items Without Folders, the items in a document set will be
visible, just as items within a folder will be visible. Unique
permissions will still be honored in both scenarios, so administrators
don’t need to worry about users seeing documents they shouldn’t see.
This should be considered a means of flattening out the contents of a
document library that users document sets or folders extensively if
users are complaining about having to navigate a complex set of folders,
or to encourage users to use SharePoint features such as filters and
metadata navigation hierarchies and key filters.
Enabling Document Sets from Site Collection Features
To enable Document Sets
feature for a document library, first ensure that the feature is active
for the site collection, and then add the content type to the document
library by following the steps in this section. First enable the site
collection feature by following these steps:
1. | Access
the Site Settings page for the site collection. Under the Site
Collection Administration section, click Site Collection Features.
|
2. | On
the Features page, for Document Sets, click Activate. The Document Set
content type will now appear in the Content Type Gallery for the site
collection.
|
To add the content type to the document library, follow these steps:
1. | Navigate
to the document library that will have the Document Set content type
added; in this example, the document library is named Shared Documents.
Click the Library tab on the Ribbon, and click Library Settings.
|
2. | Click Advanced Settings in the General Settings section.
|
3. | In the Content Types section, under Allow Management of Content Types?, click the circle next to Yes.
|
4. | Scroll to the bottom of the page and click OK to save the change and return to the Document Library Settings page.
|
5. | Scroll down to the Content Types section, which may have not been visible before. Click Add from existing content types.
|
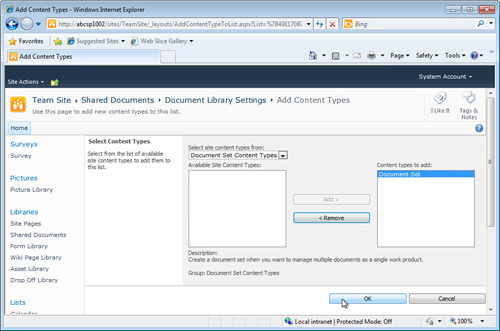
6. | From
the Add Content Types page, access the drop-down menu under Select Site
Content Types From, and choose Document Set Content Types. Click
Document Set in the Available Site Content Types box, and then click the
Add button, as shown in Figure 3, and then click OK.

|
7. | Click the document library name in the breadcrumb from Document Library Settings to return to the document library.
|
Now, to create a document set, follow these steps:
1. | Click
the Documents tab on the Ribbon, and access the drop-down menu for New
Document; there should now be an entry for Document Set. Click Document
Set.
|
2. | Enter a name for the document set, such as Project X Document Set, and click OK. The document set will now display. There are no documents within this document set yet.
|
3. | Click
the name of the document library in the Browse tab to return to the
document library default view, and the document set will be visible as
an “item” in the document library.
|