Migrating Groups
In
most cases, the first objects to be migrated into a new domain should
be groups. If users are migrated first, their group membership will not
transfer over. However, if the groups exist before the users are
migrated, they will automatically find their place in the group
structure. To migrate groups using ADMT v3.1, use the Group Account
Migration Wizard, as follows:
1. | Open the ADMT MMC snap-in (Start, All Programs, Administrative Tools, Active Directory Migration Tool).
|
2. | Right-click Active Directory Migration Tool in the left pane, and choose Group Account Migration Wizard.
|
3. | Click Next to continue.
|
4. | Select the source and destination domains, and click Next to continue.
|
5. | Choose the Select Groups from Domain option, and click Next.
|
6. | On
the subsequent page, you can select the group accounts from the source
domain. Select all the groups required by using the Add button and
selecting the objects. After you select the groups, click Next to
continue.
|
7. | Enter
the destination OU for the accounts from the source domain by clicking
Browse and selecting the OU created in the steps outlined previously.
Click Next to continue.
|
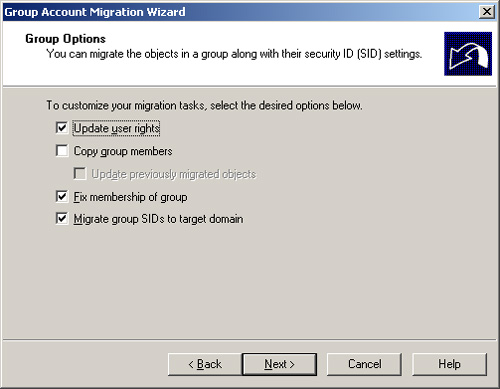
8. | On
the following page, there are several options to choose from that
determine the nature of the migrated groups. Clicking the Help button
details the nature of each setting. In the sample migration, choose the
settings, as shown in Figure 2. After choosing the appropriate settings, click Next to continue.
|
9. | Enter a user account with proper administrative rights on the source domain on the following page. Then click Next to continue.
|
10. | The
subsequent page allows for the exclusion of specific directory-level
attributes from migration. If you need to exclude any attributes, they
can be set here. In this example, no exclusions are set. Click Next to
continue.
|
11. | Naming
conflicts often arise during domain migrations. In addition, different
naming conventions might apply in the new environment. Objects will not
be migrated if conflicts occur. Click Next.
|
12. | The
verification page is the last wizard page you see before any changes
are made. Once again, make sure that the procedure has been tested
before running it because ADMT will henceforth write changes to the
target Windows 2008 Active Directory environment. Click Finish when
you’re ready to begin group migration.
|
13. | The group migration process then commences. The window shows the migration progress. Click Close when it completes.
|
The group(s) is (are) now migrated to the new domain.
Migrating User Accounts
User accounts are the “bread
and butter” of domain objects and are among the most important
components. The biggest shortcoming of older versions of ADMT was their
inability to migrate passwords of user objects, which effectively
limited their use. However, ADMT v3.1 does an excellent job of migrating
users, their passwords, and the security associated with them. To
migrate users, follow these steps:
1. | Open the ADMT MMC snap-in (Start, All Programs, Administrative Tools, Active Directory Migration Tool).
|
2. | Right-click the Active Directory Migration Tool, and choose User Account Migration Wizard.
|
3. | Click Next on the Welcome page.
|
4. | Select the source and target domains on the subsequent page, and click Next to continue.
|
5. | Choose the Select Users from Domain option, and click Next.
|
6. | The
following page allows you to choose user accounts for migration. Just
click the Add button and select the user accounts to be migrated. After
you select all the user accounts, click Next to continue.
|
7. | The
next page allows you to choose a target OU for all created users.
Choose the OU by clicking the Browse button. After you select it, click
Next to continue.
|
8. | Select
Migrate Passwords and then select the server in the source domain in
which the Password Export Server (PES) service was installed, as covered
in the “Installing PES on the Source Domain” section. Click Next to continue.
|
9. | On the Account Transition Options page, leave the default transition options, and click Next.
|
10. | Enter the account to use when adding SID History, which has to have administrative rights on the source domain. Then click Next.
|
11. | The
subsequent page deals with User Options settings. Click Help for an
overview of each option. Select Translate Roaming Profiles. Then click
Next to continue.
|
12. | The
next page is for setting exclusions. Specify any property of the user
object that should not be migrated here. In this example, no exclusions
are set. Click Next to continue.
|
13. | Naming
conflicts for user accounts are common. Designate a procedure for
dealing with duplicate accounts in advance and enter such information on
the next wizard page. Select the appropriate options for duplicate
accounts and click Next to continue.
|
14. | The
following verification page presents a summary of the procedure that
will take place. This is the last page before changes are written to the
target domain. Verify the settings and click Finish to continue.
|
15. | The
Migration Progress status box displays the migration process as it
occurs, indicating the number of successful and unsuccessful accounts
created. When the process is complete, review the log by clicking View
Log and verify the integrity of the procedure. Click Close when you
finish.
|
Note
Depending on if
other wizards have already been run, there might be additional steps at
this point that happen one time only to set up proper Registry settings,
reboot DCs, and create special groups.
Migrating Computer Accounts
Another important set
of objects that must be migrated is also one of the trickier ones.
Computer objects must not only be migrated in AD, but they must also be
updated at the workstations themselves so that users will be able to log
on effectively from their consoles. ADMT seamlessly installs agents on
all migrated computer accounts and reboots them, forcing them into their
new domain structures.
The account running
the ADMT must have local administrator rights to the computers being
migrated. The agents must also be accessible over the network, so any
firewalls should be disabled for the migration or grant exceptions.
Follow these steps to migrate computer accounts:
1. | Open the ADMT MMC snap-in (Start, All Programs, Administrative Tools, Active Directory Migration Tool).
|
2. | Right-click the Active Directory Migration Tool, and choose Computer Migration Wizard.
|
3. | Click Next on the Welcome page.
|
4. | Type the names of the source and destination domains in the drop-down boxes on the next page, and click Next to continue.
|
5. | Choose the Select Computers from Domain option, and click Next.
|
6. | On
the following page, select the computer accounts that will be migrated
by clicking the Add button and selecting the appropriate accounts. Click
Next to continue.
|
7. | Select the OU the computer accounts will be migrated to, and click Next to continue.
|
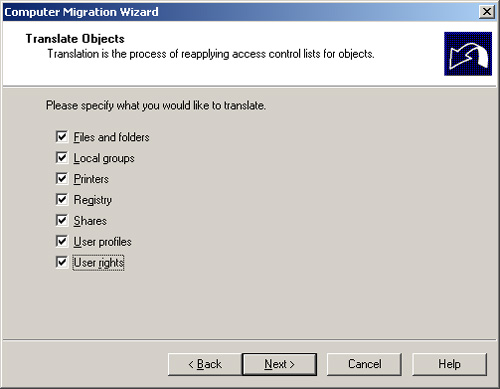
8. | The
next Translate Objects page allows for the option to specify which
settings on the local clients will be migrated. Click the Help button
for a detailed description of each item. In this example, select all
items, as shown in Figure 3. Click Next to continue.
|
9. | The
subsequent page prompts to choose whether existing security will be
replaced, removed, or added to. In this example, replace the security.
Click Next to continue.
|
10. | A prompt then informs you that the user rights translation will be performed in Add mode only. Click OK to continue.
|
11. | The
next page is important, as it allows an administrator to specify how
many minutes a computer will wait before restarting itself (the default
is 5 minutes). Click Next to continue.
|
12. | Just
as in the previous wizards, exclusions can be set for specific
attributes in the following wizard page. Select any exclusions needed
and click Next to continue.
|
13. | Naming
conflicts are addressed on the subsequent page. If any specific naming
conventions or conflict resolution settings are required, enter them
here. Click Next to continue.
|
14. | The
Completion page lists a summary of the changes that will be made.
Review the list and click Finish when you are ready. All clients that
will be upgraded are subsequently rebooted.
|
15. | When
the migration process is complete, you can view the Migration log by
clicking the View Log button. After verifying all settings, click Close.
|
16. | The
ADMT Agent Dialog window opens. This tool allows the administrator to
control the agent operations. Click Start to run pre-check. This
identifies any potential issues with the agent migration. The results of
the pre-check will be displayed in the Pre-check column. Verify that
all computers passed.
|
17. | In
the Agent Actions box, select the Run Pre-check and Agent Operations
option button. Then click Start to perform the migration operations.
|
18. | The
client agents are subsequently distributed to all clients that have
been migrated. Click Close on the ADMT MMC snap-in to end the wizard.
|
Each agent is
installed automatically and counts down until the designated time limit
set during the configuration of the Computer Migration Wizard. Then the
migrated computers reboot into the new domain with the designated
settings migrated.
Migrating Other Domain Functionality
In addition to the
Group, User, and Computer Migration Wizards, several other wizards can
be used to migrate specific domain-critical components. These wizards
operate using the same principles as those described in the preceding
sections, and are as straightforward in their operation. The following
is a list of the additional wizards included in ADMT v3.1:
Security Translation Wizard
Reporting Wizard
Service Account Migration Wizard
Exchange 5.5 Mailbox Translation Wizard
Retry Task Wizard
Password Migration Wizard
Virtually all
necessary functionality that needs replacing when migrating from one
domain to another can be transferred by using ADMT v3.1. It has proven
to be a valuable tool that gives administrators an additional option to
consider when migrating and restructuring Active Directory environments.
