The
Content Organizer is a new feature in SharePoint Server 2010 Standard
or Enterprise that allows content uploaded to the Drop Off Library to be
routed to other libraries based on the Content Organizer rules that
have been created. This is an important tool to be familiar with in the
context of list and library design because it can automate the task of
moving content to a specific library, which will affect the overall
management of content.
To create a Content
Organizer rule, follow these steps in SharePoint Server 2010 Standard or
Enterprise. This first set of steps walks a site administrator through
the process of enabling or verifying that the Content Organizer feature
is on, and then the process of configuring the Content Organizer
settings:
1. | First,
verify that the Content Organizer feature is turned on for the site in
question. Click Site Actions drop-down menu, select Site Settings.
| 2. | From the Site Settings page, in the Site Actions section, click Manage Site Features.
| 3. | Check
the status of the Content Organizer feature. If it is not set to
Active, click the Activate button. After it has activated, click Site
Settings in the breadcrumb to return to the Site Settings page. Note
that a Drop Off Library will be created as part of the feature
activation process.
Note
Another option on the Manage
Site Features page, under Content Organizer, is the E-mail Integration
with Content Organizer. This will add another option to the Content
Organizer Settings page, in the Submission Points section.
| 4. | Click the Content Organizer Settings link in the Site Administration section of the Site Settings page.
| 5. | The
first option on this page in the Redirect Users to the Drop Off Library
is Require Users to Use the Organizer When Submitting New Content to
Libraries with One or More Organizer Rules Pointing to Them. If this box
is checked, users will see a notice in the upload window that states
“Documents uploaded here are automatically moved to the correct library
and folder after document properties are collected.” Generally, this
option should be enabled to ensure that the Content Organizer rules are
applied to new content uploaded. Otherwise, users can bypass the rules
by uploading
to whichever library they choose, and ignoring the Drop Off Library.
For this example, check the box next to Require Users to Use the
Organizer.
| 6. | In
the Sending to Another Site section, the next decision to make is
whether to check the box next to Allow Rules to Specify Another Site as a
Target Location. This box should be checked if site quotas are in use
and IT expects the total amount of data uploaded to exceed this amount.
In general, however, this will complicate the management of content and
can confuse end users, so leave it unchecked unless there are specific
requirements for checking this box. Leave it unchecked in this example.
| 7. | The Folder Partitioning section allows the option to Create subfolders after a target location has too many items as shown in Figure 1.
The administrator can specify the number of items allowed in a single
folder, and the format of the folder names that will be created. Once
again, it is up to IT to determine whether this is recommended as a best
practice as there are pros and cons to the use of folders in SharePoint
lists and libraries, but they can enhance performance when there are
large numbers of items in the list or library. For this example, check
the box, and leave the defaults, which should be 2500 for the number of
items in a single folder, and Submitted after %1 for the format of the
folder name.

| 8. | The
Duplicate Submissions section gives the choices: Use SharePoint
Versioning or Append Unique Characters to the End of Duplicate
Filenames. In general, it is recommended to use SharePoint Versioning
because users will be familiar with its use. For this example, check the
box next to Use SharePoint Versioning.
Note
If Use SharePoint Versioning
is checked but the destination library does not have versioning
enabled, the duplicate file or files will be appended with a string of
six unique characters.
| 9. | In
the Preserving Context section, decide whether to Save the Original
Audit Log and Properties of Submitted Content. For this example, uncheck
this box.
| 10. | In
the Rule Managers section, enter users or groups who manage the rules
and can respond when incoming content doesn’t match any rule. Then
choose whether to check the box next to E-mail Rule Managers When
Submissions Do Not Match a Rule or E-mail Rule Managers When Content Has
Been Left in the Drop Off Library; if this second box is checked, enter
in a number of days to wait before sending an email. For this example,
enter appropriate users or groups that will have rule manager
responsibilities. As noted on this page, rule managers must have the
manage web site permission to access the content organizer rules list
from the site settings page. It is a good general practice to check both
of these options and to set a waiting period of several days. For this
example, check both of these options and enter 3 for the number of days
to wait.
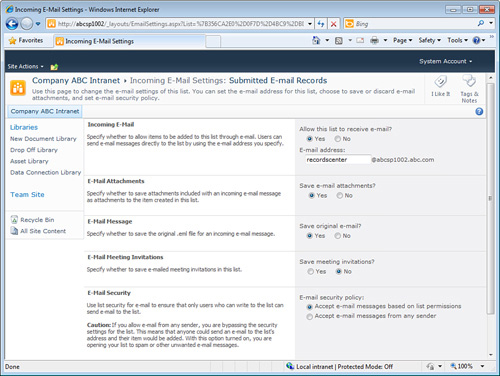
| 11. | Finally,
no actions will be possible in the Submission Points section unless the
Site Feature E-mail Integration with Content Organizer is enabled for
the site. If E-mail Integration with Content Organizer has been enabled
from the Manage Site Features page, there will be a link to Configure
the Organizer’s Incoming Email Settings, as shown in Figure 2.
After these settings are reviewed, click OK. Notice that you will end
up on the listedit.aspx page for a list titled Submitted E-mail Records,
which is a hidden list that does not show up in the All Site Content
view.
| 12. | After the settings are configured as desired, click OK to save the settings and return to the Site Settings page.
|
The next step in the process is to create an actual Content Organizer rule, which is outlined in the following section:
1. | From the Site Settings page, in the Site Administration section, click Content Organizer Rules.
| 2. | Click Add New Item to create a new rule.
| 3. | In
the Rule Name field, provide a name for the rule that will make sense
to other content organizers. For this example, use the title Audio Routing Rule 1.
| 4. | In
the Rule Status and Priority section, select Active, and set the
priority to 5 (Medium). A nice option here is to set the rule to
Inactive, as opposed to having the delete the rule.
| 5. | In
the Submission’s Content Type section, choose from the content types
available to the site, which by default are Digital Asset Content Types,
Document Content Types, Page Layout Content Types, Publishing Content
Types, Special Content Types. An additional group, Content Organizer
Content Types, may also appear if E-mail Integration with Content
Organizer is enabled for the site. For this example, choose Digital
Asset Content Types, and then select Audio. Uncheck This Content Type
Has Alternate Names in Other Sites.
| 6. | In
the Conditions section, choose from the Property drop-down list and
then choose an operator. For this example, select Author as the property
and “is equal to” as the operator and enter a value of User1 (or a value that is valid in your environment, such as your username).
Tip
Many administrators may not
find the Property value that they think would be the most efficient for a
powerful Content Organizer rule. For instance, in the example, the
Audio content type is matched with the condition of Author, equaling a
specific value to determining the final location of the file. If in this
example the administrator wanted to add a property to the content type
(such as Artist), that can be done by accessing the Site Content Types
gallery. Then the Audio site content type can have a column added to it.
| 7. | In
the Target Location section, the Browse button can be clicked and the
administrator can select the destination library. In this example, the
library Asset Library is selected, and it is added to the field in the
format of /Asset Library. There is also the option to Automatically Create a Folder for Each Unique Value of a Property that can be used.
Note
Note that the content type
associated with the rule must be available at the target location. This
means that the destination document library must have Allow Management
of Content Types set to Yes, and the content type in question (for
example, Audio in this example) added to the Content Types section on
the Document Library Settings page.
| 8. | Click OK once the rule is completed.
|
To test that the Content
Organizer is working, you can visit the Drop Off Library, upload a
document that matches the criteria just set for the rule (for example,
content type is Audio, and the author is User1), and then save the
document to the Drop Off Library. Assuming the document metadata matches
the rule, you will be informed that the item has been moved to the
destination library defined in the rule (Asset Library in this example).
|
