1. Problem
You are building a solution
that requires the implementation of a business process. You must
configure an orchestration to receive messages, which begins the
business process.
2. Solution
BizTalk Server
orchestrations receive messages either through a Receive shape or
directly from another orchestration as an orchestration input parameter.
A Receive shape allows messages to be routed from the MessageBox to the
orchestration, as demonstrated in this solution.
To create an orchestration that receives messages via a Receive shape, follow these steps:
Open a project that contains a schema that represents the message that will be received.
Right-click the project in Solution Explorer, and select Add→New Item.
In
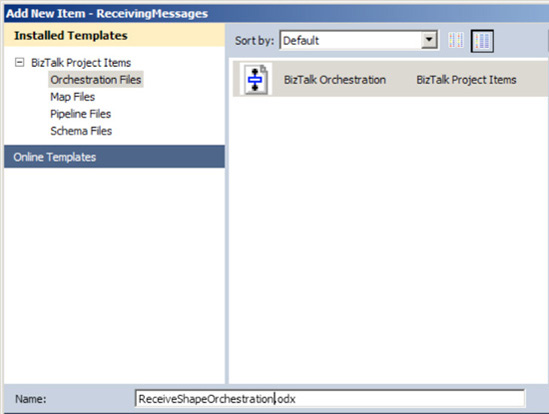
the Add New Item dialog box, select Orchestration Files from the
Installed Templates list, choose the BizTalk Orchestration template, and
give a descriptive name to your new orchestration, as shown in Figure 1. In our example, the orchestration is named ReceiveShapeOrchestration. Then, click Add.
In
the Orchestration View window, expand the top node of the tree view
(this node will have the same name as the orchestration), so that the Messages folder is visible. (If the Orchestration View window is not visible, select View→Other Windows→Orchestration View.)
Right-click the Messages folder, and select New Message, which creates a message called Message_1 by default.
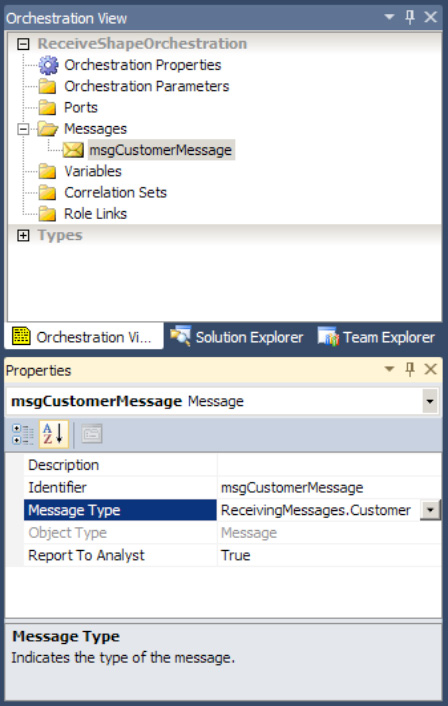
Click the new message, and give it a descriptive name in the Properties window. In our example, the message is named msgCustomerMessage.
Click the Message Type property in the Properties window, and select the appropriate type to associate with the message, as shown in Figure 2. In our example, we select the CustomerSchema message type.
NOTE
Notice all of the types available for setting the message. A very common option is to set a message to System.Xml.XmlDocument,
which allows an XML document of any format to be received (rather than
strongly typed against a specific XSD). Of course, subscribing to the
generic XMLDocument will cause all documents on the MessageBox to be picked up, so make sure your filtering is set up!
From
the toolbox, drag a Receive shape onto the orchestration directly
beneath the green circle at the top of the design surface.
NOTE
In addition to
dragging and dropping shapes from the toolbox, you can also add shapes
to an orchestration by right-clicking a section of the vertical process
flow arrow and selecting Insert Shape.
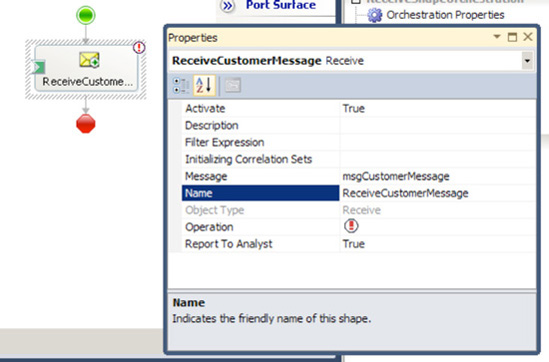
With the Receive shape selected, specify the shape's Name, Message, and Activate properties, as shown in Figure 3. The Message property is set via a drop-down list, which is populated with all the messages that are in scope for the Receive shape. The Active property is also set via a drop-down list, with the choices True or False. In our example, we use ReceiveCustomerMessage, msgCustomerMessage (created in step 6), and True, respectively.
To
configure a port and port type for the orchestration to use to receive a
message, right-click the Port Surface area, and select New Configured
Port. This will start the Port Configuration Wizard.
Step through the Port Configuration Wizard, specifying the following items (accept all other defaulted values):
Port name: oprtReceiveCustomerMessagePort.
New port type name: oprtTypeCustomerMessagePortType.
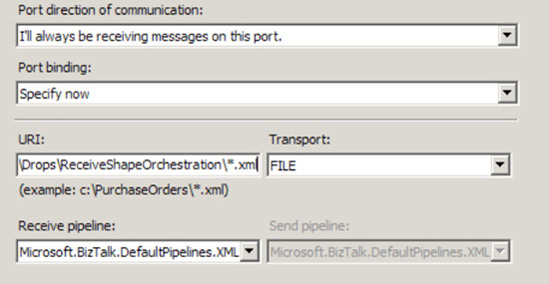
Port binding: Select Specify Now, and configure the appropriate receive adapter to consume inbound messages, as shown in Figure 4. In this example, we configure the port to use the FILE adapter, which receives XML messages from the C:\Users\Administrator\Desktop\Drops\ReceiveShapeOrchestration folder.
|
Using Specify Now as your
method of port binding can make your development and deployment process
easier, but be careful when using this feature. It is not the
recommended method for production code, because you should not embed
port bindings inside an orchestration. A better approach is to use a
binding file.
|
|
Connect the orchestration port's request operation to the Receive shape, as shown in Figure 5.
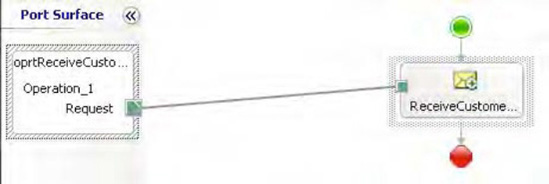
The
project can now be deployed. During the deployment process, the port
will automatically be created, along with all bindings to the
orchestration (this does not happen when a port is set up using the
Specify Later option). Figure 6 shows the port created for this solution.

3. How It Works
Understanding how
messages are received into orchestrations is critical when designing and
implementing orchestrations in BizTalk Server. Receive shapes are the
most common method used to deliver messages to orchestrations. In this
recipe's solution, we showed how to add a Receive shape to an
orchestration, configure the Receive shape's Message Type and Activate properties, and connect it to a receive port.
If the Receive shape is the first shape in the orchestration, it must have its Activate property set to True.
If an orchestration does not have an activating Receive shape, it must
be called or started (instantiated) from another orchestration.
The data a Receive shape accepts is defined by its Message
property, which relates to a message that has been defined within the
orchestration. All messages in BizTalk are bound to a specific type,
which can be an XSD schema or a .NET class. This allows orchestrations
to receive instances of XSD schemas or .NET classes as inputs. While our
example used a single Receive shape, orchestrations can use many
Receive shapes to accept different types of messages at different points
in the business logic.
Each Receive shape must be
bound to an operation, or orchestration port. An orchestration port is
the interface through which messages pass on their way into or out of
orchestration instances. Orchestration ports define the direction
messages flow (receiving into an orchestration, sending from an
orchestration, or both), and are bound to a physical port, another
orchestration, or directly to the MessageBox database. Binding orchestrations is important to understand the methods by which orchestration
ports can be bound and how they affect the way messages are received
into an orchestration:
Physical receive port:
All messages that are consumed by the specified receive port are routed
to the orchestration. This setting creates subscriptions in the
MessageBox database, which deliver messages passing through the physical
receive port to the orchestration port.
Another orchestration: Only those messages explicitly being passed from the calling orchestration are routed to the orchestration.
Directly to the MessageBox:
All messages in the MessageBox database that validate against the
Receive shape's message type are routed to the orchestration.
Each Receive shape has a number of properties associated with it, as listed in Table 1.
Table 1. Receive Shape Properties
| Property | Description |
|---|
| Activate | Flag indicating whether the Receive shape activates the orchestration instance. |
| Description | Summary of the Receive shape. |
| Filter Expression | A filter that is applied to all messages being received via the Receive shape. |
| Initializing Correlation Sets | A list of correlation sets that are initialized as messages pass through the Receive shape. |
| Following Correlation Sets | A
list of correlation sets that are followed as messages pass through the
Receive shape. This property is not available on the first Receive
shape of an orchestration. |
| Message | The message that will be created when a document is passed through the Receive shape. A message with a message type of XmlDocument can be used to receive a generic XML message, without limiting documents to a specific XSD schema. |
| Name | Name of the Receive shape. |
| Object Type | Name of the object type (read-only, automatically set to Receive). |
| Operation | Specifies through which orchestration port operation the Receive shape receives its message. |
| Report To Analyst | Flag indicating whether the message part should be exposed via the Visual Business Analyst Tool. |
The Filter Expression
property allows you to be a bit more specific about which messages make
it into your orchestration. Clicking the ellipsis in the input box for
the Filter Expression property
launches the Filter Expression dialog box. This dialog box allows you to
create specific filters, which include one to many logical expressions
that must be met in order for a message to be received into the
orchestration. These logical expressions are based on a property, an
operator, and a value and can be grouped by using the And and Or keywords.
A filter expression can be set on only a Receive shape that has its Activate property set to True.
When the value portion of the filter expression is a string, you must
put double quotes around the actual value for the expression to work
properly.
The Initializing Correlation Sets and Following Correlation Sets
properties specify which correlation is followed when messages are
received on the Receive shape. Generally speaking, correlation sets
allow you to send and receive messages in and out of orchestrations that
directly relate to one another.