OK—enough of that getting-ready stuff and basic
configuration. The real reason you’re running Hyper-V is to actually
create and use virtual machines (VMs), so let’s get down to it. There
are several ways you can make a VM, but they all start with the Hyper-V Manager console.
Note:
System Center Virtual
Machine Manager (SCVMM) 2008 R2 fully supports Hyper-V R2. If you use
more than one or two VMs and support more than one host server, SCVMM is
a great product. And we’re pretty cautious about saying things like
that.
The basic steps for creating a VM are as follows:
Create a new VM, giving it a name and location. Assign RAM to the VM. Connect to a network. Assign or create a virtual disk. Specify where the operating system will be loaded from.
The New Virtual Machine
Wizard handles all these basic steps but is pretty limited, and
insufficient for creating a VM for SBS. You’ll want to actually
configure the VM further before installing SBS or the SBS second server
on your VM. We’ll start by walking through the steps for creating a VM
and then show you how to change that basic VM to be a bit more useful
and flexible.
1. Creating a Basic VM
To create a new VM, follow these steps:
Open the Hyper-V Manager console if it isn’t already open. Select
the Hyper-V computer in the left pane, click New, and then click
Virtual Machine on the Actions menu to start the New Virtual Machine
Wizard. If
you haven’t disabled the Before You Begin page, you can read the
description of what’s going to happen, or click the More About Creating
Virtual Machines link to open the Help pages for creating a VM. Select
the Do Not Show This Page Again check box so that you don’t have to see
this page again. Click Next to open the Specify Name And Location page, shown in Figure 1.
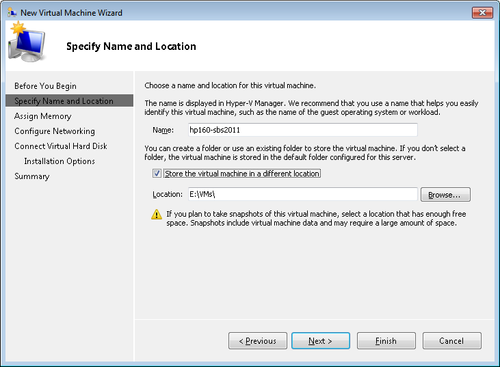
Enter a name for the VM,
and select the Store The Virtual Machine In A Different Location check
box. When you select this check box, all the files for this VM will be
stored in a directory with the same name as the VM, shown below in the
Location field.
Note:
For this first VM, with a name
of hp160-sbs2011 and a default location of E:\VMs\, the result will be a
new directory of E:\VMs\hp160-sbs2011, with the files and
subdirectories of the VM stored in it.
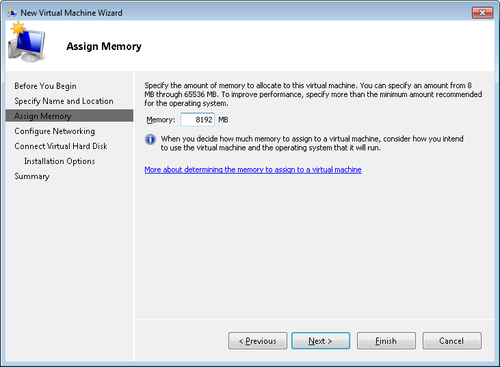
Click Next to open the Assign Memory page, shown in Figure 2.
Specify the amount of memory that will be assigned to the new VM. You
should specify the same amount of memory you would specify for the RAM
of a physical SBS computer, but do not exceed the memory of the host physical computer.
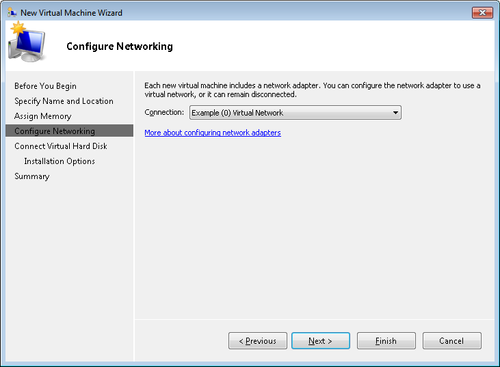
Click Next to open the Configure Networking page. Select the network that the VM will be connected to, as shown in Figure 3.
Click Next to open the Connect Virtual Hard Disk page, shown in Figure 4.
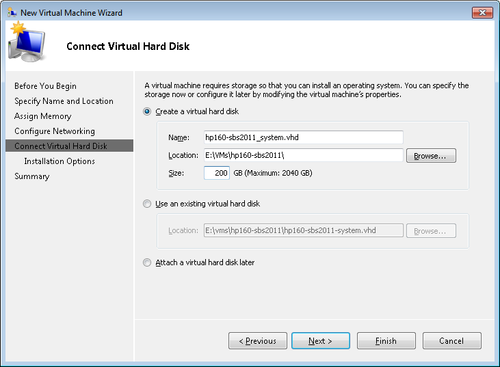
Select
Create A Virtual Hard Disk to create a new, automatically expanding,
virtual disk with a nominal size of 127 GB. Accept the default location,
and name or modify the disk as appropriate for your environment. Even
though 127 GB seems like a lot, we suggest you change the Size field to
at least 200 GB. The
default is to create a dynamically expanding hard disk. Now that’s just
great if this isn’t a production server, but we think it’s a good idea
to create a fixed-size
VHD for a production system. Even though dynamic VHDs have gotten a lot
faster since the original release of Hyper-V, there’s still a definite
performance advantage to a fixed-size VHD. To use a fixed-size VHD, run
the New Virtual Hard Disk Wizard and create the disk first, and then
attach it at this stage of the New Virtual Machine Wizard, or skip the
Connect Virtual Hard Disk page of the wizard for now and attach a disk
later.
Warning:
IMPORTANT
The maximum size of an IDE VHD in Hyper-V is 2 terabytes (2040 GB,
actually). But a dynamically expanding virtual hard disk doesn’t
actually take up any more room on your physical hard disk or array than
it needs to. As you expand your use of the VM,
the size of the disk will continue to grow, up to the size you set when
you create the disk. But if you run out of actual disk space because
you overcommitted the total size of dynamic VHDs, ugly things will
happen.
Click Next to open the Installation Options page, as shown in Figure 5.
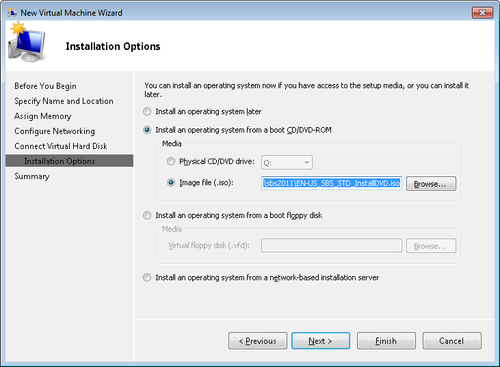
The choices are Install An Operating System Later This option requires you to configure how your operating system will be installed manually before starting the VM. Install An Operating System From A Boot CD/DVD-ROM
This option allows you to connect to the physical computer’s CD or DVD
drive, or to mount an ISO file stored on the physical computer’s hard
disk as if it were a physical CD/DVD drive. Install An Operating System From A Boot Floppy Disk This option allows you to connect to a virtual floppy disk (.vfd) file as if it were a physical floppy drive. Install An Operating System From A Network-Based Installation Server
This option changes the BIOS setting for the VM to enable a network
boot from a PXE server, and it also changes the network card for the VM
to be an emulated legacy network adapter instead of the default
synthetic network adapter.
Click
Next to open the Completing The New Virtual Machine Wizard summary
page, or click Finish to skip the last step. On the last page, you can
choose to automatically start the new VM as soon as you close the
wizard, but we think that’s a bad option. Just skip it—you should
probably adjust the settings for the new VM before you start it anyway.
|