1. Installing the Exchange Client
The option that requires the most administrative
attention—manually installing the Outlook client—is often a necessary
choice for deploying the Outlook client. After considering all available
options, administrators must determine which option best fits the
deployment needs by determining the overall effort required for each.
Any or all of the options can be
utilized for an organizationwide deployment—utilizing each where it best
fits. In this section, you review the basic steps for installing the
Outlook client to desktop systems using transforms, PRF files, and the
switches available when using these options.
Using Transforms and PRF Files When Installing Outlook
When the options are not available to push the
installation to client systems, administrators can still install the
Outlook client and save valuable keystrokes and time by predefining
profile information. Using these options with a manual installation
scenario can greatly reduce the overall amount of time required to
install the Outlook client manually. Administrators can now incorporate
the manual installation process with preconfiguration files, such as PRF
files and transforms, and save time on each installation by avoiding
the necessity of manually configuring each installation after
completion.
When the required functionality is the client
profile configuration setting and limited configuration options, the
manual installation can easily be completed by using a simple PRF file.
PRF files are simple to incorporate into the installation and require
only the addition of a command-line switch with the setup.exe installation program to deploy.
With more complex installation needs,
administrators can create MST files to define Outlook settings, security
profiles, and user options. This option is most effective and enables
administrators to continue with installations rather than manually
configure each client setting individually.
Installing the Outlook Clients with PRF Files
After creating a PRF file by following the steps
detailed in the previous section, administrators can copy the file to
an installation share for use when manually installing Outlook. This
allows administrators to avoid the necessity of manually configuring
each Outlook profile after installation.
To understand more about using PRF files when using the Windows installation program, complete these steps:
1. | Create a folder share and place the Outlook.PRF file in the folder where it can be accessed from any location on the network.
Tip
When creating shares to support installs and
PRF configuration file access, grant the account being used to install
the client with Full Control permissions to the PRF file and
installation share.
|
2. | To
open a command prompt and begin an installation in Outlook using PRF
files, begin by selecting Start, Run, enter “command” in the Open text
box, and then click OK to continue.
|
3. | At the command prompt, type
d:\setup.exe /ImportPRF \\Outlook Files\Outlook.PRF
where d: represents the location of the Outlook installation files and Outlook Files is the name of the folder share created to host the PRF configuration files.
|
When errors occur or it appears that the Outlook
profile has not been set correctly, the PRF file can be run by using
the Open command and manually installing the configuration information.
Manually Installing Outlook with Transforms
Transforms offer administrators the most
functionality and flexibility when predefining Outlook settings and
profile information. By utilizing transforms, administrators can
leverage multiple options and even combine multiple transforms to
configure Outlook clients. To understand the command lines and syntax
used when installing the Microsoft Outlook client with MST files, review
the examples listed in the following sections.
Applying Transforms with the Outlook Setup.exe
In these examples, administrators should use the OutlookSet1.MST
transform filename to customize the Outlook installation. To
incorporate transforms into the Outlook installation, use the following
command:
Example: D:\setup.exe TRANSFORMS=OutlookSet1.mst
Administrators can also use multiple transforms
when necessary. At times, organizations create individual transforms to
configure specific settings. By combining these individual transforms,
administrators can “pick and choose” which settings they do or do not
want to apply.
For example, an organization creates a
baseline transform that defines settings to be applied to all users.
They then create individual transforms for specific settings for
particular departments. These transforms can be applied to a single
installation, creating customized Outlook settings that are configurable
and easily redeployed if necessary. Using a Setup.ini file with the proper syntax, administrators can link and apply transforms in a very effective manner.
2. Pushing Client Software with Windows Server 2003 Group Policies
Using Windows Server 2003 Group Policy management
tools, administrators can easily and inexpensively deploy the Outlook
client to desktops throughout their organization by minimizing the tasks
that require manual intervention.
Group policies can provide extremely powerful
administration and management options when deploying the Outlook client.
Use the information provided in this section to set up and deploy the Outlook.MSI package.
Deploying Outlook with Group Policy Overview
Using Group Policy to deploy the Outlook client is one of the most effective and flexible options administrators can leverage.
However, before creating deployment packages,
administrators should understand the basic functionality of Group Policy
in Windows Server 2003. Review the information and overview provided in
the next sections before planning and setting up Windows Server 2003
Group Policy to support the Outlook client deployment.
Exchange Client Policy Options
When
utilizing Group Policy functionality to deploy Outlook clients, the ORK
provides predefined security templates for managing Outlook on the
domain.
This template enables administrators to
centrally manage and configure many of the security functions and
preferences normally required to be configured at each individual
Outlook client. Using the security template, administrators can fully
manage and configure the following areas defined by domain clients:
Outlook preferences—
The preferences options available with the security template can be
enabled in the same manner as using the Options tab available on the
Tools menu of the Outlook desktop client. When defining preferences,
administrators can control the standard look and feel of each component
available with Outlook. Options include areas for enforcing items, such
as spell check and email format, calendaring views, contacts options,
and more.
Exchange settings— Configuration items, such as Outlook user profile configurations and auto archiving, can now be centrally configured.
Intranet and SharePoint Portal Server settings—
In addition to the Outlook client settings, using the templates enables
administrators to configure access to internal business information and
SharePoint Portal Server resources through Outlook client folders.
Though the template enables you to configure
many important options and preferences with the Outlook Exchange client,
not all areas are available using the template.
Adding the Outlook Administrative Template
Because the additional administrative templates
are not configured by default when Windows Server 2003 is installed,
administrators must download or install the administrative Outlook
template manually. For Outlook 2003, this file is called Outlook11.adm and is available in the ORK. During installation, Outlk11.adm is placed on the local drive of the systems on which the ORK is installed.
To begin setting up the Outlook security template Outlk11.adm,
start by installing the Group Policy Management Console (GPMC) on the
domain controller on which the policy will be administered.
Next install the Microsoft ORK on a system on
which the template can be accessed from a domain controller for import
into the Domain Group Policy.
Note
Both the GPMC and the ORK can be downloaded from Microsoft at: www.microsoft.com/downloads.
In the Search field, simply type “Office Resource Kit” or “GPMC” to find the latest revisions.
After the ORK is installed, the Outlk11.adm file is automatically extracted and placed in the C:\Windows\Inf directory (where C: represents the system root where the Windows installation resides) on the local system drive where the ORK was installed.
To import the Outlook security template Outlk11.adm into the Domain Group Policy using the GPMC, use the following steps:
Note
When importing the Outlk11.adm
security template, it is a best practice to import the template to the
default Domain Group Policy. Review the event logs on additional domain
controllers or use the Replmon tool available with Windows 2003 support
tools to ensure the replication of the domain policy to all domain
controllers occurs correctly.
1. | From
a domain controller in the domain where the policy will be applied,
open the Group Policy snap-in by selecting Start, All Programs,
Administrative Tools, Group Policy Management.
|
2. | Select the location Default Domain Policy where Outlk11.adm will be imported to, as shown in Figure 1.

|
3. | On the Action menu, select Edit; this opens the Group Policy Object Editor window.
|
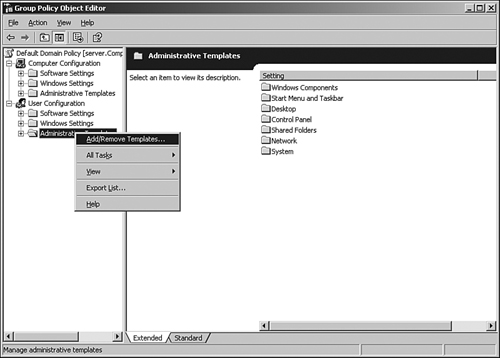
4. | In
the Group Policy Object Editor, right-click Administrative Templates
under the User Configuration option and choose Add/Remove Templates, as
shown in Figure 2.
|
5. | From the Add/Remove Templates dialog box, click the Add button.
|
6. | Navigate to the location where Outlk11.adm was placed, as noted in step 2. Select the template to import Outlk11.ADM and click the Open button.
|
7. | Ensure that the OUTLK11 template has been added to the Add/Remove Templates dialog box, and click Close to continue.
|
You should now see the Microsoft Outlook 2003
template under the Administrative Templates folder in the Group Policy
Object Editor.
Administrative Options
Delegating the proper rights for administrators
to manage and manipulate Group Policy when deploying Outlook clients is
important. With the Delegation Wizard available in the Windows Group
Policy snap-in, administrative rights can be assigned to Exchange
administrators to manage and control the deployment of Outlook to the
desktop without interfering with the day-to-day operations of the
Windows systems. By using the Delegation Wizard to assign rights,
administrators can grant permissions to individual accounts, groups, and
Exchange server administrators.
Deployment Options
With Group Policy, the Outlook client can be deployed to the desktop using any of the following deployment methods:
Assigned to Computers—
This method of installation creates an Outlook installation package
that is applied to workstations when a user logs on to the desktop.
Using this option, all users have access to the Exchange client software
after it’s installed.
Assigned to Users—
When the installation package is assigned to users, application
shortcuts are placed on the desktop of the user’s profiles and in the
Start menu of the individual user’s profile. When these shortcuts are
selected, the application installation is launched and completed.
Publishing the Installation—
When Outlook client software packages are published, the installation
package is displayed in the Add/Remove Programs Group in the local
desktop system Control Panel. Users can then initiate the installation
by selecting the Install option.
With each method, Exchange 2003 administrators
use the MSI installation file format to push the Outlook client’s
software packages from a central location or from administrative
installation points to the workstations or users on the network.
Pushing Outlook Client
The steps in this scenario enable administrators to push the Exchange Outlook client package to workstations on the domain.
Note
To enhance functionality when using Windows
Server 2003 Group Policy, download and install the Microsoft Group
Policy Management Console (GPMC) from Microsoft.
Open the Group Policy Management Console by
selecting Start, All Programs, Administrative Tools, Group Policy
Management. To create Outlook client software Group Policy Objects
(GPOs), complete the following steps:
1. | Select the Default Domain Policy for your domain by selecting Forest, Domains, YourCompanyDomain, Group Policy Objects.
|
2. | Select
the Default Domain Policy, click Action, and then click Edit. This
opens the Group Policy Object Editor to create the software push.
|
3. | Select Computer Configuration and then Software Installation.
|
4. | From the Action menu, select New, Package.
|
5. | Navigate the Open dialog box to the network share where the Outlook.MSI was placed, and select the MSI package being applied. Select Open to continue.
Note
If
prompted that the Group Policy Object Editor cannot verify the network
location, ensure that the share containing the installation files has
the permissions configured to allow user access. Select Yes to continue
when confirmed.
|
6. | At
the Deploy Software dialog box, select Advanced and click OK to
continue. Windows Server 2003 will verify the installation package; wait
for the verification to complete before continuing to the next step.
|
7. | After
the package is visible in the right pane of the software installation
properties, highlight the install package and click Action/Properties.
|
8. | On
the Package properties page, select the Deployment tab. Review the
configuration, click Assign, and ensure that the Install this Package at
Logon option is selected. Click OK when you are finished.
|
If problems exist, redeploy the package by
selecting the software update; click Action, All Tasks, Redeploy
Application to force the deployment.
Testing the Outlook Client Deployment
When using Group Policy, administrators cannot
determine whether a software package was pushed successfully without any
additional management software such as Microsoft SMS. Evidence of the
success of a client installation using Group Policy can only be
determined by reviewing the client desktop. Using the following two
areas on the client desktop, administrators can determine whether a
software installation was successful:
View the client application logs for MSI Installer events.
On the local machine, view Add/Remove Programs to see whether the Outlook update package is listed.
Updates and Patch Management with Group Policies
One other advantage to using Group Policy is the
centralized deployment options available to distribute the Exchange
Outlook client updates and patches to domain workstations. Using any one
of the following options, including a combination of each, Exchange
administrators can use Group Policy to deploy updates using Microsoft
MSI installation packages or Windows Updates security templates to push
updates to the Microsoft Outlook client. Using GPOs, installation of
software updates can be deployed from the centralized administrative
installation point to a predefined set of workstations or, in the case
of a WAN, from any remote installation point or Windows Update site
configured in the GPO settings.
Deployment Options When Updating Exchange Clients
Using Group Policy, the Outlook client can be upgraded and patched using one of the following deployment methods:
Assigned to Computers—
This method of installation uses the Outlook Installation package on
the workstation and is available when the workstation is restarted.
Using this option, all users have access to the Exchange client software
after it is installed.
Assigned to Users—
When the installation package is assigned to users, application
shortcuts are placed on the desktop of the user’s profile and on the
Start menu. When these shortcuts are selected, the application
installation will be completed.
Publishing the Installation—
This option requires additional configuration at the desktop level to
allow users the ability to install published packages on client systems.
When a software package is published, the installation package is
displayed in the Add/Remove Programs group in the local desktop system
Control Panel. Users can then initiate the installation by selecting the
update.
Using Windows Update Services—
This might be the most common method of deploying software updates to
client desktop systems on any enterprise. Using Windows Server Update
Services technology and Group Policy, security updates, patches, and
critical updates can be deployed for Microsoft Office platforms to the
client workstation.
Each method enables Exchange Server
administrators to deliver update packages to the Outlook client using a
push or pull method. These updates can be configured for deployment from
a central location or from an administrative installation point located
on the network to allow for ease of download to the workstation
anywhere in the enterprise.
Caution
When deploying updates with GPOs, do not
assign the option to install updates to users and computers at the same
time. Assigning both options can create conflicts as to how updates are
installed and possibly corrupt the installation of the Outlook client.
Group Policy Best Practices
As with all aspects of Group Policy, the
choices and configuration options available when deploying clients or
updates are numerous. Regardless of which type of package is being
pushed, some basic best practices apply and can help make the process
easier and less troublesome:
When configuring clients to use update
methods such as Windows Server Update Services, configure clients to use
installation points that will allow clients to update systems from the
local LAN rather than over WAN links.
Software
packages pushed with GPOs must be in the format of an MSI package. Any
other format type than an MSI cannot be pushed using Group Policy. Using
additional tools such as Marovision’s Admin Studio can help
administrators convert other update formats such as .exe files to customized MSI installation packages as well as custom configuration of predefined installation choices.
When
configuring software pushes using GPOs, configure the GPO at the
highest levels possible in the domain tree. If the push is going out to
more than one group or OU, the software update should be configured to
be pushed at the domain level. If the software update is being pushed to
only a few groups or one OU, or if multiple update packages are being
pushed, configure the push at the group or OU level.
Configure
software pushes to the Computer Configuration settings rather than the
User Configuration settings. This way, if users log on to multiple
computer systems, updates are not applied more than once to the same
system.
When pushing updates to multiple
locations, use technologies such as administrative distribution points
and distributed file system (DFS). This allows software updates to be
installed from packages and sources close to the client being updated.
Pushing Client Updates
With the options available and a good
understanding of the best practices for deploying software using GPOs,
the next step is to configure a GPO to push an update directly to the
Outlook client. The steps in this scenario enable administrators to push
a small update package to the Exchange Server 2003 Outlook client
workstations on the domain.
Begin by downloading an update to use for this
exercise ensuring an MSI format. Also, create a share on the network
folder where the update will be placed and deployed. To begin, open the
GPMC by selecting Start, All Programs, Administrative Tools, Group
Policy Management. With the GPMC open, create an Outlook client software
update GPO by following these steps:
1. | Select the Default Domain Policy for your domain by selecting Forest, Domains, YourCompanydomain, Group Policy Objects.
|
2. | Select
Default Domain Policy, click Action, and then click Edit. This opens
the Group Policy Object Editor to create the software push.
|
3. | Select Computer Configuration and select Software Settings, Software Installation.
|
4. | On the Action menu, select New, Package.
|
5. | Navigate
the Open dialog box to the network share where the MSI was placed, and
select the MSI package being applied. Select Open to continue.
Note
If prompted that the Group Policy Object
Editor cannot verify the network location, ensure that the share created
earlier in these steps has permissions allowing user accounts in the
domain access to the share. Select Yes to continue after confirming.
|
6. | At
the Deploy Software dialog box, select Advanced and click OK to
continue. Windows verifies the installation package; wait for the
verification to complete before continuing to the next step.
|
7. | When
the package is visible in the right pane of the software installation
properties, highlight the install package, and click Action, Properties.
|
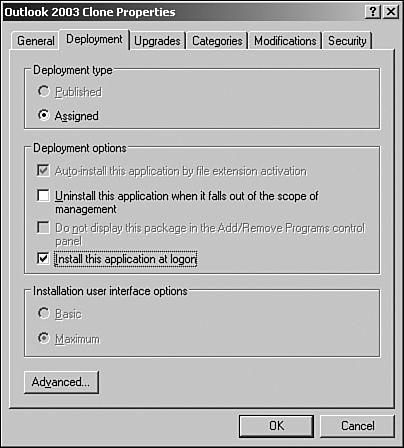
8. | On
the Package properties page, select the Deployment tab. Review the
configuration, click Assign, and ensure that the Install This
Application at Logon option is selected, as shown in Figure 3. Click OK when you are finished.
|
The new package is now ready to deploy; test
the update by logging on to a workstation connected to the domain.
Verify that the package has been installed. If problems exist, redeploy
the package by selecting the software update in the GPMC and clicking
Action, All Tasks, Redeploy Application to force the deployment.
Determining the Success of a Push
Without additional management software such as
Systems Management Server 2003, administrators cannot determine whether a
software package was pushed successfully to a client system with a GPO.
This is because all evidence of software pushes is only evident locally
on the client machines on which the update logs are stored. To check
and verify if an update has been installed successfully, you can check
several areas:
Look for MSI Installer events that are written into the application event logs.
On the local machine, view Add/Remove Programs to see whether the Outlook update package is listed.
If using Windows Server Update Services, review the Windows Update log located in the Program Files\Windows Update directory on the local machine.
